(update frame ranges, screenshot) |
|||
| (13 intermediate revisions by the same user not shown) | |||
| Line 1: | Line 1: | ||
[[File: | == '''Overview:''' == | ||
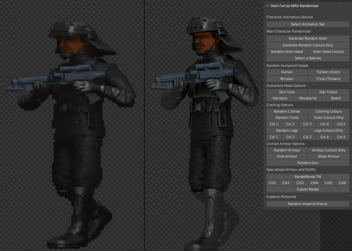
The tool is under development, as is the documentation. Here is a video update on the progress:[[File:ScriptScreenshot 03.png|none|thumb|352x352px]]<youtube>kvbzYAiFZLA</youtube> | |||
Please check back soon for more information. | |||
Enemies and other sprites in Dark Forces are in the WAX file format. Effectively they are a series of bitmap images, adhering to a set palette, with position data and ordered in to sequences - ie attack front, movement right-side 90, and so on. Editing these or creating a new one from scratch has generally been a very time consuming process. Especially with early tools available to the mod community. The goal of the Wax File Generator is to streamline that process with a purpose built collection of rigged 3D models, easy customisation options and templates for the various enemy types in the game, with added idle loop options for animated background characters. | |||
While it is a Blender based tool, it has been created to be simple for users with no prior 3D knowledge required. All the core functionality is in a custom UI panel on the right hand side of the main 3D viewport. Switching enemy animations, randomising full outfits, selecting a specific alien species - it's all there. | |||
Before we begin, there are a few things to download. | |||
== '''Download Requirements:''' == | |||
Before we get started, there are some tools to download: | Before we get started, there are some tools to download: | ||
1) Blender: https://www.blender.org/download/ - current version (4. | 1) Blender: https://www.blender.org/download/ - current version (4.4 at time of writing, multi platform) | ||
or if need be https://download.blender.org/release/ for any and all previous releases. | or if need be https://download.blender.org/release/ for any and all previous releases. | ||
2) WAX/FME Convertor (by Jereth Kok): https://df-21.net/downloads/utilities/waxconverter/waxconverter.zip | 2) WAX/FME Convertor (by Jereth Kok): https://df-21.net/downloads/utilities/waxconverter/waxconverter.zip (Windows specific) | ||
Note: Requires .NET 6.0 - Version 3.2 - June 2024 Release | Note: Requires .NET 6.0 - Version 3.2 - June 2024 Release | ||
3) The template files, available here: '''''(Insert link here when files complete)''''' | 3) The template files, available here: '''''(Insert link here when files complete)''''' | ||
* | The template files consist of one main Blender file and a 'Render' subfolder. Inside the 'Render' are a series of specifically named _***_Template folders. Please '''<u>do not rename</u>''' these as the folder naming structure is referenced by both Blender '''<u>and</u>''' Wax Convertor for this process to be as smooth as possible. | ||
* | |||
* | The general process is as follows: | ||
* | |||
* | * Load the Blender file and use the script to create a character combination you want for your level | ||
* | * Render out the frames - the script should select which render sub folder for you automatically | ||
* | * Run the Photoshop / Gimp script to trim the images '''<u>before</u>''' loading Wax Convertor | ||
* Open the render sub folder - for example \Render\_TROOP_LH_Template - and open _TROOP_LH_Template.wproj in Wax Convertor | |||
* (Optional) Make any minor tweaks required to position / colour palette file selection, defaults should generally be fine | |||
* Click 'Create WAX!' | |||
== '''The Blender file and "''WAX File Generator''" UI:''' == | |||
First things first, install Blender on your machine. This can be as simple as downloading the .zip option and extracting to a folder on your desktop if you don't intend to use Blender often. Once that is done, there are two settings to check in the preferences to make the process smoother. | |||
[[File:Blender settings 01.png|frameless]] | |||
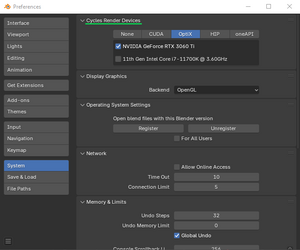
Go to 'Edit - Preferences' from the top menu bar. Select 'System' on the left, then choose a Cycles Render Device up the top if available. Cycles will run fine on a CPU only, but it's faster if one of these options are available. | |||
[[File:Blender settings 02.png|frameless]] | |||
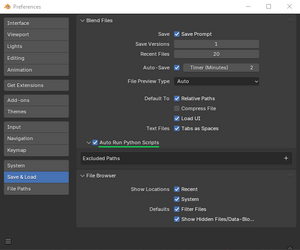
Select 'Save & Load' on the left, then check 'Auto Run Python Scripts'. If not selected, you will need to run the rig ui script and character ui script each time you load the Blender file. | |||
Blender will automatically save these preferences for future use, so you can now load the Blender file. | |||
Current Species Head Options: | |||
{| class="wikitable" | |||
|- | |||
|Twilek | |||
|Duros | |||
|Rodian | |||
|Sullustan | |||
|Twilek (Alt) | |||
|Ithorian | |||
|- | |||
|Mon Calamari | |||
|Gran (Ree-Yees) | |||
|Quarren | |||
|Bith | |||
|Devaronian | |||
|Arcona | |||
|- | |||
|Trandoshan | |||
|Kubaz (Garindan) | |||
|Pyke (Syndicate) | |||
|Bothan | |||
|Chagrian | |||
|Gand (Zuckuss) | |||
|- | |||
|Wequay | |||
|Togruta | |||
|Aqualish (Ponda Baba) | |||
|Yarkora | |||
|Human | |||
|Falleen (Xizor) | |||
|- | |||
|Mirialan | |||
|Chiss (Thrawn) | |||
| | |||
| | |||
| | |||
| | |||
|} | |||
Current Imperial Personnel Options: | |||
{| class="wikitable" | |||
|- | |||
|ATAT Pilot | |||
|Imperial Army Trooper | |||
|Imperial Navy Commando | |||
|Imperial Officer | |||
|Juggernaut Transport Driver | |||
|- | |||
|Patrol Trooper | |||
|Sandtrooper | |||
|Scout Trooper | |||
|Shore Trooper | |||
|Snowtrooper | |||
|- | |||
|Stormtrooper (Standard) | |||
|Swap Trooper | |||
|Tie Pilot | |||
| | |||
| | |||
|}Female variations are planned, but not yet included. | |||
Wax Convertor Template: | |||
Wax Convertor is the program that will take the sequence of png images rendered out of Blender, give them placement coordinates and assign images to sequences, and sequences inside actions. This should already be set up and ready to go for you! However, some background information on how it all works in case you need to make minor adjustments. | |||
* 1 | TROOP Replacement Template - Frame Ranges: | ||
* 2 | * Seq 0: 0-7 Walking Front | ||
* 3 | * Seq 1: 8-15 Walking Front Angle Left | ||
* 4 | * Seq 2: 16-23 Walking Side Left | ||
* 5 | * Seq 3: 24-31 Walking Rear Angle Left | ||
* 6 | * Seq 4: 32-39 Walking Rear | ||
* 7 | * Seq 5: 40-47 Walking Rear Angle Right | ||
* 8 | * Seq 6: 48-55 Walking Side Right | ||
* 9 | * Seq 7: 56-63 Walking Front Angle Right | ||
* 10 | * Seq 8: 64-65 Standing Shot Front | ||
* 11 | * Seq 9: 66-67 Pain Front | ||
* 12 | * Seq 10: 68-70 Ranged Death | ||
* 13 | * Seq 11: 71 Corpse | ||
* 14 | * Seq 12: 72-75 Melee Death | ||
* 15 | * Seq 13: 76 Idle Front | ||
* 16 | * Seq 14: 77 Idle Front Angle Left | ||
* 17 | * Seq 15: 78 Idle Side Left | ||
* 18 | * Seq 16: 79 Idle Rear Angle Left | ||
* 19 | * Seq 17: 80 Idle Rear | ||
* 20 | * Seq 18: 81 Idle Rear Angle Right | ||
* 21 | * Seq 19: 82 Idle Side Right | ||
* 22 | * Seq 20: 83 Idle Front Angle Right | ||
* 23 | * Seq 21: 84-85 Pain Front Angle Left | ||
* 24 | * Seq 22: 86-87 Pain Side Left | ||
* 25 | * Seq 23: 88-89 Pain Rear Angle Left | ||
* Seq 24: 90-91 Pain Rear | |||
* Seq 25: 92-93 Pain Rear Angle Right | |||
* Seq 26: 94-95 Pain Side Right | |||
* Seq 27: 96-97 Pain Front Angle Left | |||
* Seq 28: 98-99 Recoil Front | |||
(Note: If making animations to be compatible with the original game, avoid re-using individual frames.) | |||
Latest revision as of 16:42, 19 March 2025
Overview:
The tool is under development, as is the documentation. Here is a video update on the progress:

Please check back soon for more information.
Enemies and other sprites in Dark Forces are in the WAX file format. Effectively they are a series of bitmap images, adhering to a set palette, with position data and ordered in to sequences - ie attack front, movement right-side 90, and so on. Editing these or creating a new one from scratch has generally been a very time consuming process. Especially with early tools available to the mod community. The goal of the Wax File Generator is to streamline that process with a purpose built collection of rigged 3D models, easy customisation options and templates for the various enemy types in the game, with added idle loop options for animated background characters.
While it is a Blender based tool, it has been created to be simple for users with no prior 3D knowledge required. All the core functionality is in a custom UI panel on the right hand side of the main 3D viewport. Switching enemy animations, randomising full outfits, selecting a specific alien species - it's all there.
Before we begin, there are a few things to download.
Download Requirements:
Before we get started, there are some tools to download:
1) Blender: https://www.blender.org/download/ - current version (4.4 at time of writing, multi platform)
or if need be https://download.blender.org/release/ for any and all previous releases.
2) WAX/FME Convertor (by Jereth Kok): https://df-21.net/downloads/utilities/waxconverter/waxconverter.zip (Windows specific)
Note: Requires .NET 6.0 - Version 3.2 - June 2024 Release
3) The template files, available here: (Insert link here when files complete)
The template files consist of one main Blender file and a 'Render' subfolder. Inside the 'Render' are a series of specifically named _***_Template folders. Please do not rename these as the folder naming structure is referenced by both Blender and Wax Convertor for this process to be as smooth as possible.
The general process is as follows:
- Load the Blender file and use the script to create a character combination you want for your level
- Render out the frames - the script should select which render sub folder for you automatically
- Run the Photoshop / Gimp script to trim the images before loading Wax Convertor
- Open the render sub folder - for example \Render\_TROOP_LH_Template - and open _TROOP_LH_Template.wproj in Wax Convertor
- (Optional) Make any minor tweaks required to position / colour palette file selection, defaults should generally be fine
- Click 'Create WAX!'
The Blender file and "WAX File Generator" UI:
First things first, install Blender on your machine. This can be as simple as downloading the .zip option and extracting to a folder on your desktop if you don't intend to use Blender often. Once that is done, there are two settings to check in the preferences to make the process smoother.
Go to 'Edit - Preferences' from the top menu bar. Select 'System' on the left, then choose a Cycles Render Device up the top if available. Cycles will run fine on a CPU only, but it's faster if one of these options are available.
Select 'Save & Load' on the left, then check 'Auto Run Python Scripts'. If not selected, you will need to run the rig ui script and character ui script each time you load the Blender file.
Blender will automatically save these preferences for future use, so you can now load the Blender file.
Current Species Head Options:
| Twilek | Duros | Rodian | Sullustan | Twilek (Alt) | Ithorian |
| Mon Calamari | Gran (Ree-Yees) | Quarren | Bith | Devaronian | Arcona |
| Trandoshan | Kubaz (Garindan) | Pyke (Syndicate) | Bothan | Chagrian | Gand (Zuckuss) |
| Wequay | Togruta | Aqualish (Ponda Baba) | Yarkora | Human | Falleen (Xizor) |
| Mirialan | Chiss (Thrawn) |
Current Imperial Personnel Options:
| ATAT Pilot | Imperial Army Trooper | Imperial Navy Commando | Imperial Officer | Juggernaut Transport Driver |
| Patrol Trooper | Sandtrooper | Scout Trooper | Shore Trooper | Snowtrooper |
| Stormtrooper (Standard) | Swap Trooper | Tie Pilot |
Female variations are planned, but not yet included.
Wax Convertor Template:
Wax Convertor is the program that will take the sequence of png images rendered out of Blender, give them placement coordinates and assign images to sequences, and sequences inside actions. This should already be set up and ready to go for you! However, some background information on how it all works in case you need to make minor adjustments.
TROOP Replacement Template - Frame Ranges:
- Seq 0: 0-7 Walking Front
- Seq 1: 8-15 Walking Front Angle Left
- Seq 2: 16-23 Walking Side Left
- Seq 3: 24-31 Walking Rear Angle Left
- Seq 4: 32-39 Walking Rear
- Seq 5: 40-47 Walking Rear Angle Right
- Seq 6: 48-55 Walking Side Right
- Seq 7: 56-63 Walking Front Angle Right
- Seq 8: 64-65 Standing Shot Front
- Seq 9: 66-67 Pain Front
- Seq 10: 68-70 Ranged Death
- Seq 11: 71 Corpse
- Seq 12: 72-75 Melee Death
- Seq 13: 76 Idle Front
- Seq 14: 77 Idle Front Angle Left
- Seq 15: 78 Idle Side Left
- Seq 16: 79 Idle Rear Angle Left
- Seq 17: 80 Idle Rear
- Seq 18: 81 Idle Rear Angle Right
- Seq 19: 82 Idle Side Right
- Seq 20: 83 Idle Front Angle Right
- Seq 21: 84-85 Pain Front Angle Left
- Seq 22: 86-87 Pain Side Left
- Seq 23: 88-89 Pain Rear Angle Left
- Seq 24: 90-91 Pain Rear
- Seq 25: 92-93 Pain Rear Angle Right
- Seq 26: 94-95 Pain Side Right
- Seq 27: 96-97 Pain Front Angle Left
- Seq 28: 98-99 Recoil Front
(Note: If making animations to be compatible with the original game, avoid re-using individual frames.)

