(Created page with "== Navigating WDFUSE == When you load the BASICS tutorial from the New Project window you will see a red square. === Sector === This is a '''Sector ,''' or simply a room where action takes place in Dark Forces. It is colored red because it is currently selected. none|thumb|1044x1044px Here are some things you should try now! === Exploring the Map === You can '''LOOK''' around this one-sector map by holding the '''left-mouse''' button a...") |
No edit summary |
||
| (18 intermediate revisions by 2 users not shown) | |||
| Line 4: | Line 4: | ||
=== Sector === | === Sector === | ||
This is a '''Sector ,''' or simply a room where action takes place in Dark Forces. It is colored red because it is currently selected. | This is a '''Sector ,''' or simply a room where action takes place in Dark Forces. It is colored red because it is currently selected. | ||
[[File:Tutorial BASICS 1.png|none|thumb| | [[File:Tutorial BASICS 1.png|none|thumb|1085x1085px]] | ||
Here are some things you should try now! | Here are some things you should try now! | ||
| Line 11: | Line 12: | ||
=== Moving Geometry === | === Moving Geometry === | ||
You can '''MOVE''' the sector (or anything on the map) by holding the '''CTRL''' button and moving the mouse. Give it a try! | You can '''MOVE''' the sector (or anything on the map) by holding the '''CTRL''' button and moving the mouse. The offset from which you move anything in WDFUSE is always the '''Red Circle''' of your highlighted items. In the picture above, the lower left corner of the square is the position from which all movement calculations will be made. Give it a try! [[File:ZoomGrid.png|thumb|center]] | ||
=== The Grid === | === The Grid === | ||
Notice that as you move the sector it will snap to the '''GRID''' consisting of the small purple dots in the background. You can always turn off the grid by pressing the '''G''' button. You can also click the buttons in the Main Menu to change the Grid and Zoom levels . | Notice that as you move the sector it will snap to the '''GRID''' consisting of the small purple dots in the background. You can always turn off the grid by pressing the '''G''' button. You can also click the buttons in the Main Menu to change the Grid and Zoom levels . | ||
=== Zooming === | === Zooming === | ||
To get more details on the sector you are working with try '''ZOOMING''' with your '''middle-mouse''' button. Notice the square sector will become bigger and smaller as you zoom. The Grid, if you have it on, will automatically resize as you keep zooming. Give it a try so you see more of the sector. | To get more details on the sector you are working with try '''ZOOMING''' with your '''middle-mouse''' button. Notice the square sector will become bigger and smaller as you zoom. The Grid, if you have it on, will automatically resize as you keep zooming. Give it a try so you see more of the sector. | ||
== MAP Modes == | == MAP Modes == | ||
WDFUSE consists of four main map modes. Based on the mode you select, you will | WDFUSE consists of four main map modes. Based on the mode you select, you will edit different components in the editor. | ||
Take a look at the '''Map Mode''' icons'''.''' You are already familiar with '''Sectors'''. The others are '''Walls''', '''Vertices''' and '''Objects''' . | Take a look at the '''Map Mode''' icons'''.''' You are already familiar with '''Sectors'''. The others are '''Walls''', '''Vertices''' and '''Objects''' . | ||
[[File:Map Modes.png | [[File:Map Modes.png|thumb|271x271px|center]] | ||
=== '''Wall''' === | === '''Wall''' === | ||
Try selecting the '''Wall Map''' Mode. Notice the editor now has the wall selected in red while the other walls are green because they are not selected. | Try selecting the '''Wall Map''' Mode. Notice the editor now has the wall selected in red while the other walls are green because they are not selected. | ||
[[File:Wall.png | [[File:Wall.png|thumb|345x345px|left]] | ||
You will also see that there are four small perpendicular lines to the walls. These are called '''Normals''' and tell you which direction is '''inside''' the sector. It can get very confusing if you have many walls and this will make it clearer. You can always turn them off with '''ALT-L''' - but you will always see the normal of the wall you have currently selected. | You will also see that there are four small perpendicular lines to the walls. These are called '''Normals''' and tell you which direction is '''inside''' the sector. It can get very confusing if you have many walls and this will make it clearer. You can always turn them off with '''ALT-L''' - but you will always see the normal of the wall you have currently selected. | ||
[[File:Deformed Sector.png|none|thumb|329x329px]] | |||
Just like sectors you can move walls by holding the '''CTRL''' button. | |||
As you move the wall, you will see that the shape of the sector gets deformed. | |||
=== '''Vertex''' === | === '''Vertex''' === | ||
Now try clicking on the '''Vertex Map''' mode. These are the tiny points between the walls of the sector. Once again, if you have a vertex selected it will be colored red and the others will be colored green. | Now try clicking on the '''Vertex Map''' mode. These are the tiny points between the walls of the sector. Once again, if you have a vertex selected it will be colored red and the others will be colored green. | ||
[[File:Square Vertexes.png | [[File:Square Vertexes.png|thumb|369x369px|center]] | ||
Just like walls you can move the vertices by holding the '''CTRL''' button. This is useful to fine-tune the geometry of your sector. For example, you can easily change the shape of the square into a diamond by moving the vertices. | Just like walls you can move the vertices by holding the '''CTRL''' button. This is useful to fine-tune the geometry of your sector. For example, you can easily change the shape of the square into a diamond by moving the vertices. | ||
[[File:Diamond.png | [[File:Diamond.png|thumb|378x378px|center]] | ||
=== '''Object''' === | === '''Object''' === | ||
Now select the final mode called '''Object .''' Now you can work with all the objects in the game. These can be either the player themselves, an enemy stormtrooper, an extra life pickup and the Moldy Crow. | Now select the final mode called '''Object .''' Now you can work with all the objects in the game. These can be either the player themselves, an enemy stormtrooper, an extra life pickup and the Moldy Crow. | ||
[[File:Object Tutorial.png|none|thumb|401x401px]] | [[File:Object Tutorial.png|none|thumb|401x401px]] | ||
| Line 48: | Line 58: | ||
Just like the other items, you can move objects by holding the '''CTRL''' button. However, it is '''VERY IMPORTANT''' you do '''NOT''' place objects outside of a valid sector. If you do, they will appear in the negative space and cannot be interacted with. If you do this with the Player object the game will crash. | Just like the other items, you can move objects by holding the '''CTRL''' button. However, it is '''VERY IMPORTANT''' you do '''NOT''' place objects outside of a valid sector. If you do, they will appear in the negative space and cannot be interacted with. If you do this with the Player object the game will crash. | ||
== Map Editor Details == | == Map Editor Details == | ||
=== '''Selecting Next/Previous component''' === | |||
You can select the '''Next''' or '''Previous''' Sector , Wall , Vertex or Object by pressing the '''N''' or '''P''' buttons. It's a quick way to get around the map. | |||
=== '''Undoing a mistake''' === | === '''Undoing a mistake''' === | ||
You will make mistakes when you edit your map. To '''UNDO''' an action hold the '''CTRL''' button and press '''Z''' . Keep doing it to undo more actions. The default limit of undo actions is 32. You can also '''REDO''' an action by holding the '''CTRL''' button and pressing '''Y.''' | You will make mistakes when you edit your map. To '''UNDO''' an action hold the '''CTRL''' button and press '''Z''' . Keep doing it to undo more actions. The default limit of undo actions is 32. You can also '''REDO''' an action by holding the '''CTRL''' button and pressing '''Y.''' | ||
| Line 56: | Line 73: | ||
=== Coordinate System === | === Coordinate System === | ||
Dark Forces has a coordinate system where the X and Z are in the horizontal plane while the Y coordinate is the vertical plane (height). You can see the X and Z coordinates in the bottom left corner as you move your mouse. In the example below the X coordinate is '''200.25''' while the Z coordinate is '''215.25''' | Dark Forces has a coordinate system where the X and Z are in the horizontal plane while the Y coordinate is the vertical plane (height). You can see the X and Z coordinates in the bottom left corner as you move your mouse. In the example below the X coordinate is '''200.25''' while the Z coordinate is '''215.25''' | ||
[[File:Coordinates.png| | [[File:Coordinates.png|thumb|center]] | ||
=== Layers === | === Layers === | ||
Just like ogres, Dark Forces mission maps may consist of multiple layers. '''Layers''' are simply a collection of sectors and objects in a single group. Most often this is done to separate the different floors of a mission (like Detention Center). This is done so they don't all show up at once on the map and confuse the player. For example, here is the Secret Base mission with all the layers shown. When an object is '''greyed-out''' it means it is in a different layer. | Just like ogres, Dark Forces mission maps may consist of multiple layers. '''Layers''' are simply a collection of sectors and objects in a single group. Most often this is done to separate the different floors of a mission (like Detention Center). This is done so they don't all show up at once on the map and confuse the player. For example, here is the Secret Base mission with all the layers shown. When an object is '''greyed-out''' it means it is in a different layer. | ||
[[File:Secret Base.png | [[File:Secret Base.png|thumb|953x953px|center]]You can control the layer of the mission by changing the layer button indicator arrows in the Main Menu. You can also click on the layer number button to turn on and turn off seeing all the layers at once. If the button is colored red then you will see all the layers and if it is colored black you will only see a single layer at a time. | ||
[[File:Layer Indicator.png|thumb|center]]Lets move to the next part of the tutorial and starting making changes to our geometry. Click [[WDFUSE Tutorial - Basics Geometry II|'''here''']] to continue. | |||
'''WDFUSE Tutorials''' | |||
[[ | #[[WDFUSE Tutorial - Introduction|Introduction]] | ||
# [[WDFUSE Tutorial - Configuration]] | |||
#[[WDFUSE Tutorial - Basic Geometry]] | |||
#[[WDFUSE Tutorial - Basic Geometry II]] | |||
#[[WDFUSE Tutorial - 3D Renderer]] | |||
# [[WDFUSE Tutorial - Advanced Geometry]] | |||
#[[WDFUSE Tutorial - Advanced Geometry II]] | |||
# [[WDFUSE Tutorial - Advanced Geometry III]] | |||
#[[WDFUSE Tutorial - Objects]] | |||
#[[WDFUSE Tutorial - Scripting]] | |||
#[[WDFUSE Tutorial - Scripting II]] | |||
#[[WDFUSE Tutorial - Scripting III]] | |||
{{Game}} | {{Game}} | ||
Latest revision as of 18:57, 14 March 2024
When you load the BASICS tutorial from the New Project window you will see a red square.
Sector
This is a Sector , or simply a room where action takes place in Dark Forces. It is colored red because it is currently selected.
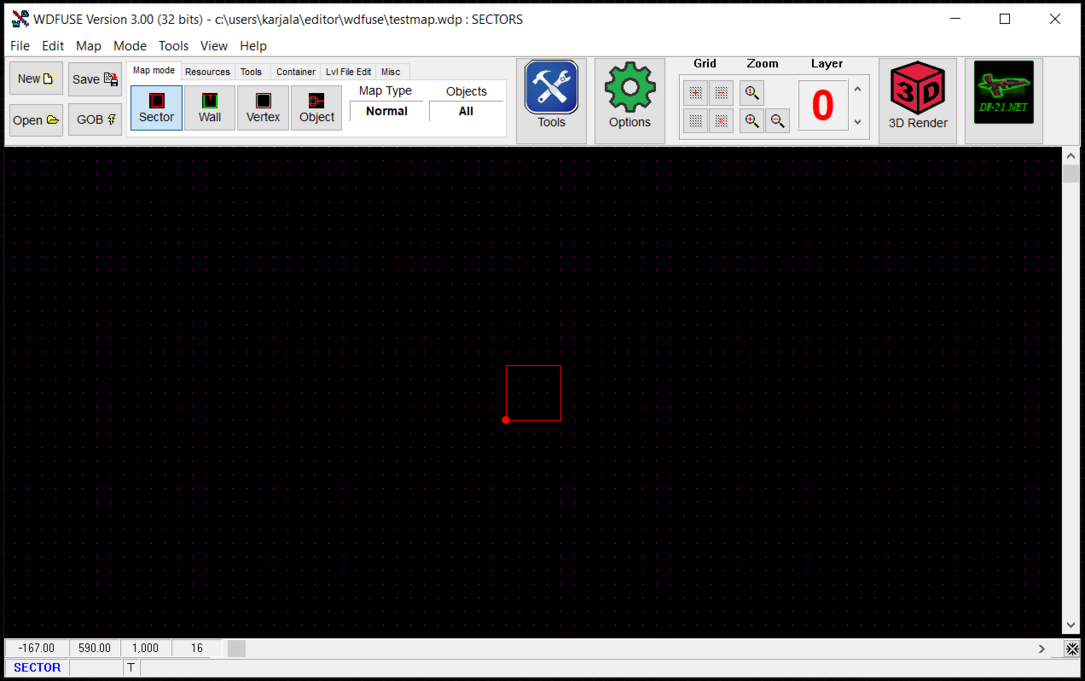
Here are some things you should try now!
Exploring the Map
You can LOOK around this one-sector map by holding the left-mouse button and moving the mouse.
Moving Geometry
You can MOVE the sector (or anything on the map) by holding the CTRL button and moving the mouse. The offset from which you move anything in WDFUSE is always the Red Circle of your highlighted items. In the picture above, the lower left corner of the square is the position from which all movement calculations will be made. Give it a try!
The Grid
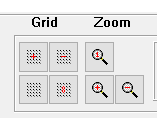
Notice that as you move the sector it will snap to the GRID consisting of the small purple dots in the background. You can always turn off the grid by pressing the G button. You can also click the buttons in the Main Menu to change the Grid and Zoom levels .
Zooming
To get more details on the sector you are working with try ZOOMING with your middle-mouse button. Notice the square sector will become bigger and smaller as you zoom. The Grid, if you have it on, will automatically resize as you keep zooming. Give it a try so you see more of the sector.
MAP Modes
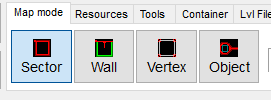
WDFUSE consists of four main map modes. Based on the mode you select, you will edit different components in the editor.
Take a look at the Map Mode icons. You are already familiar with Sectors. The others are Walls, Vertices and Objects .
Wall
Try selecting the Wall Map Mode. Notice the editor now has the wall selected in red while the other walls are green because they are not selected.
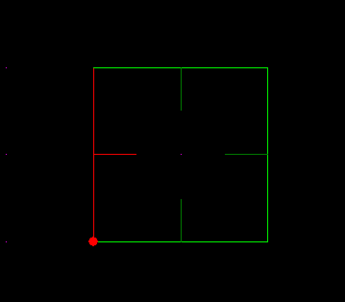
You will also see that there are four small perpendicular lines to the walls. These are called Normals and tell you which direction is inside the sector. It can get very confusing if you have many walls and this will make it clearer. You can always turn them off with ALT-L - but you will always see the normal of the wall you have currently selected.
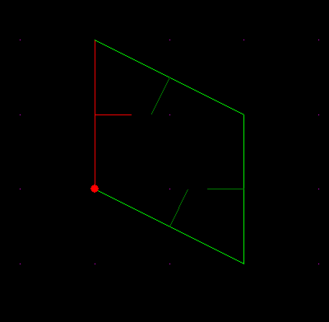
Just like sectors you can move walls by holding the CTRL button.
As you move the wall, you will see that the shape of the sector gets deformed.
Vertex
Now try clicking on the Vertex Map mode. These are the tiny points between the walls of the sector. Once again, if you have a vertex selected it will be colored red and the others will be colored green.
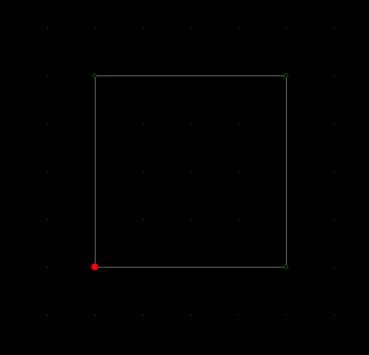
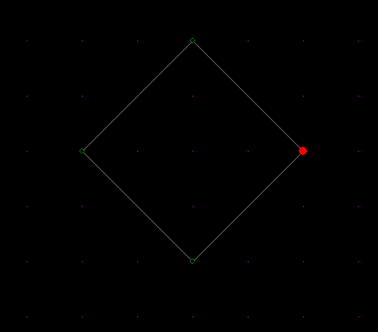
Just like walls you can move the vertices by holding the CTRL button. This is useful to fine-tune the geometry of your sector. For example, you can easily change the shape of the square into a diamond by moving the vertices.
Object
Now select the final mode called Object . Now you can work with all the objects in the game. These can be either the player themselves, an enemy stormtrooper, an extra life pickup and the Moldy Crow.
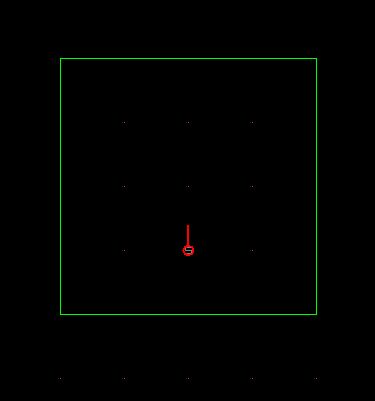
Notice that the object has a line pointing north. That is the direction of where the object is looking at. By default they are all looking north (up).
Just like the other items, you can move objects by holding the CTRL button. However, it is VERY IMPORTANT you do NOT place objects outside of a valid sector. If you do, they will appear in the negative space and cannot be interacted with. If you do this with the Player object the game will crash.
Map Editor Details
Selecting Next/Previous component
You can select the Next or Previous Sector , Wall , Vertex or Object by pressing the N or P buttons. It's a quick way to get around the map.
Undoing a mistake
You will make mistakes when you edit your map. To UNDO an action hold the CTRL button and press Z . Keep doing it to undo more actions. The default limit of undo actions is 32. You can also REDO an action by holding the CTRL button and pressing Y.
Coordinate System
Dark Forces has a coordinate system where the X and Z are in the horizontal plane while the Y coordinate is the vertical plane (height). You can see the X and Z coordinates in the bottom left corner as you move your mouse. In the example below the X coordinate is 200.25 while the Z coordinate is 215.25

Layers
Just like ogres, Dark Forces mission maps may consist of multiple layers. Layers are simply a collection of sectors and objects in a single group. Most often this is done to separate the different floors of a mission (like Detention Center). This is done so they don't all show up at once on the map and confuse the player. For example, here is the Secret Base mission with all the layers shown. When an object is greyed-out it means it is in a different layer.
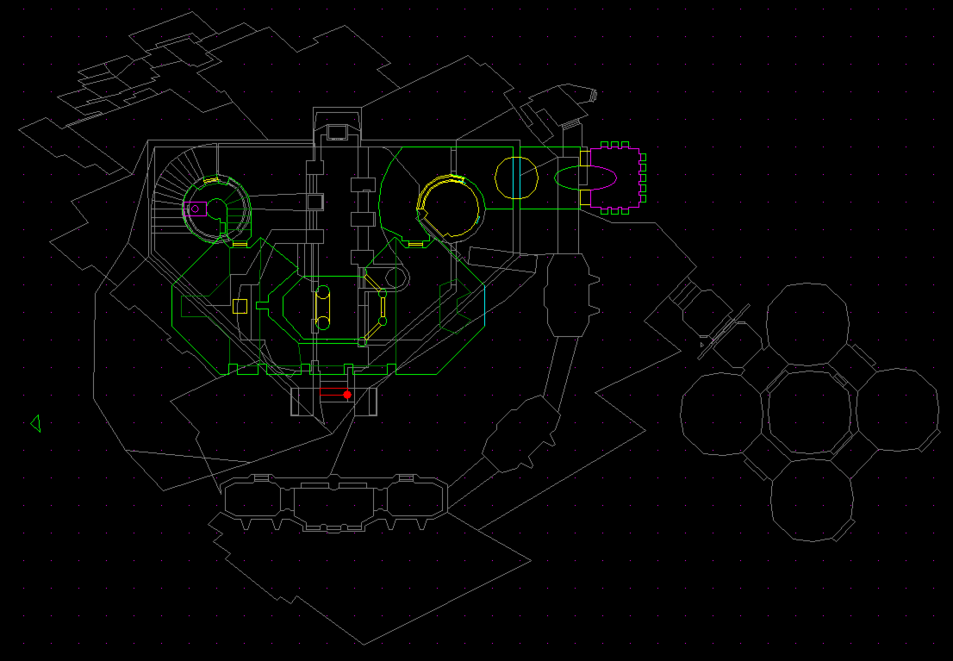
You can control the layer of the mission by changing the layer button indicator arrows in the Main Menu. You can also click on the layer number button to turn on and turn off seeing all the layers at once. If the button is colored red then you will see all the layers and if it is colored black you will only see a single layer at a time.

Lets move to the next part of the tutorial and starting making changes to our geometry. Click here to continue.
WDFUSE Tutorials
- Introduction
- WDFUSE Tutorial - Configuration
- WDFUSE Tutorial - Basic Geometry
- WDFUSE Tutorial - Basic Geometry II
- WDFUSE Tutorial - 3D Renderer
- WDFUSE Tutorial - Advanced Geometry
- WDFUSE Tutorial - Advanced Geometry II
- WDFUSE Tutorial - Advanced Geometry III
- WDFUSE Tutorial - Objects
- WDFUSE Tutorial - Scripting
- WDFUSE Tutorial - Scripting II
- WDFUSE Tutorial - Scripting III