No edit summary |
No edit summary |
||
| (7 intermediate revisions by 3 users not shown) | |||
| Line 1: | Line 1: | ||
== Advanced Geometry - Component Overview == | == Advanced Geometry - Component Overview == | ||
Now that you've learned the basics switch to the Geometry tutorial by starting a New project (you can click the '''New''' button in the main menu or press '''CTRL-N''') and choosing the '''Geometry''' tutorial and press '''Ok.''' | Now that you've learned the basics switch to the Geometry tutorial by starting a New project (you can click the '''New''' button in the main menu or press '''CTRL-N''') and choosing the '''Geometry''' tutorial and press '''Ok .''' | ||
[[File:Geometry Tutorial.png| | [[File:Geometry Tutorial.png|thumb|thumb|438x438px|center]] | ||
| Line 8: | Line 8: | ||
Remember, if you make a mistake you can simply undo by using '''CTRL-Z.''' Also, you can always restart this tutorial by making a new project. | Remember, if you make a mistake you can simply undo by using '''CTRL-Z.''' Also, you can always restart this tutorial by making a new project. | ||
[[File:GeometryTutorial.png| | [[File:GeometryTutorial.png|thumb|thumb|964x964px|center]] | ||
We are now at a point where we can start testing our mission. Once the tutorial is loaded press '''GOB''' in the top left corner or press '''CTRL-G.''' This process will take all the assets in your project directory, put them into a GOB called '''''<PROJECT_NAME>.GOB''''' and tell Dark Forces to launch it. [[File:GOBit.png| | One more thing. WDFUSE has many hotkeys for you to learn. It is impossible to memorize them all on the first try. You can press '''F12''' to see all the bindings if you forget what combination of keys does what you wanted it to do. | ||
[[File:KeyBinds.png|thumb|thumb|819x819px|center]] | |||
== Testing (GOB-ing) your Map in Dark Forces == | |||
We are now at a point where we can start testing our mission. Once the tutorial is loaded press '''GOB''' in the top left corner or press '''CTRL-G.''' This process will take all the assets in your project directory, put them into a GOB called '''''<PROJECT_NAME>.GOB''''' and tell Dark Forces to launch it. [[File:GOBit.png|thumb|thumb]] | |||
'''Note:''' This assumes you have already configured your Dark Forces Launcher (Steam / GOG / Origin / Custom) and Engine ('''JEDI''' / '''The Force Engine)'''. If not, then press '''F9''' to set it in the '''Options''' screen. | '''Note:''' This assumes you have already configured your Dark Forces Launcher (Steam / GOG / Origin / Custom) and Engine ('''JEDI''' / '''The Force Engine)'''. If not, then press '''F9''' to set it in the '''Options''' screen. | ||
If you made any changes you may get prompted to Save your project. Say "'''YES'''" if that happens. | If you made any changes you may get prompted to Save your project. Say "'''YES'''" if that happens. | ||
[[File:SaveGob.png| | [[File:SaveGob.png|thumb|thumb|441x441px|center]] | ||
The game will launch and you will find yourself in the tutorial mission. There isn't much to do yet. You can run around between the two rooms connected by the corridor. | The game will launch and you will find yourself in the tutorial mission. There isn't much to do yet. You can run around between the two rooms connected by the corridor. | ||
[[File:Tutorial2.png| | [[File:Tutorial2.png|thumb|thumb|681x681px|center]] | ||
Once you confirm that the Dark Forces launches successfully, exit the game and go back to the WDFUSE editor. | Once you confirm that the Dark Forces launches successfully, exit the game and go back to the WDFUSE editor. | ||
Press '''F9''' and switch to the tab "'''Backup & Launch'''" . Here you can see various settings that deal with launching the game. | Press '''F9''' and switch to the tab "'''Backup & Launch'''" . Here you can see various settings that deal with launching the game. | ||
[[File:Backup Launch.png| | [[File:Backup Launch.png|thumb|thumb|948x948px|center]] | ||
Notice that the editor makes a backup every time you save your project. They are stored in a '''BACKUP''' folder inside your project folder. You also have a LOG file you can look at for any issues. You can always bring up the current logfile by pressing '''F5 .''' | Notice that the editor makes a backup every time you save your project. They are stored in a '''BACKUP''' folder inside your project folder. You also have a LOG file you can look at for any issues. You can always bring up the current logfile by pressing '''F5 .''' | ||
| Line 39: | Line 44: | ||
Go ahead and select the top-left most Sector where you start the tutorial. | Go ahead and select the top-left most Sector where you start the tutorial. | ||
[[File:StartSector.png| | [[File:StartSector.png|thumb|thumb|691x691px|center]] | ||
You will see the details of the selected Sector that says '''''SC 0''''' at the top. The '''0''' is the numerical ID of the Sector. Dark Forces starts counting map components from 0. So if you have 10 Sectors (or Walls, Vertices or Objects) in total they will be assigned numbers 0 through 9. | You will see the details of the selected Sector that says '''''SC 0''''' at the top. The '''0''' is the numerical ID of the Sector. Dark Forces starts counting map components from 0. So if you have 10 Sectors (or Walls, Vertices or Objects) in total they will be assigned numbers 0 through 9. | ||
| Line 48: | Line 53: | ||
# '''Name''' - Name of the Sector. This is Optional and can be left blank. | # '''Name''' - Name of the Sector. This is Optional and can be left blank. | ||
# '''Ambient Light''' - how bright a Sector is. The number must be between 0 and 31 where 0 is total darkness and 31 is the brightest. | # '''Ambient Light''' - how bright a Sector is. The number must be between 0 and 31 where 0 is total darkness and 31 is the brightest. | ||
# '''Flag 1''' - Grouping of flags that modify a Sector's properties such as. This will be explained in detail later in the tutorial. | # '''Flag 1''' - Grouping of flags that modify a Sector's properties such as floor causing damage, no ceiling rendered, etc. This will be explained in detail later in the tutorial. | ||
# '''Flag''' '''2''' - Unused. ('''Ignore''' for now) | # '''Flag''' '''2''' - Unused. ('''Ignore''' for now) | ||
# '''Flag 3''' - Sets up custom lighting for the Talay Mission (Ignore for now). | # '''Flag 3''' - Sets up custom lighting for the Talay Mission (Ignore for now). | ||
| Line 60: | Line 65: | ||
# '''Ceiling TX Z Off''' - Configures the Z-horizontal offset for the ceiling texture. | # '''Ceiling TX Z Off''' - Configures the Z-horizontal offset for the ceiling texture. | ||
# '''Ceiling Tx #''' - Unused ('''Ignore''' for now) | # '''Ceiling Tx #''' - Unused ('''Ignore''' for now) | ||
# '''Second Alt''' - Dark Forces supports one additional altitude on which you can walk. This is optional. | # '''Second Alt''' - Dark Forces supports one additional altitude on which you can walk. This is optional, and in ''relative height'' to the Floor Altitude, not absolute. | ||
# '''Layer''' - What map layer this Sector belongs to. | # '''Layer''' - What map layer this Sector belongs to. | ||
Lets go over the icons at the top. | Lets go over the icons at the top. | ||
[[File:SCIcons.png| | [[File:SCIcons.png|thumb|thumb]] | ||
* Whenever you make changes to the Sector (or any other Map Component like Walls) your changes must be saved. To do that click the Green Checkmark icon at the top or by pressing '''F3.''' | * Whenever you make changes to the Sector (or any other Map Component like Walls) your changes must be saved. To do that click the Green Checkmark icon at the top or by pressing '''F3.''' | ||
| Line 73: | Line 78: | ||
* Finally, the question mark icon will bring up WDFUSE help. | * Finally, the question mark icon will bring up WDFUSE help. | ||
The information bar at the bottom lists additional information about the Sector. | The information bar at the bottom lists additional information about the Sector. | ||
[[File:Sector Bar.png| | [[File:Sector Bar.png|thumb|thumb|238x238px|center]] | ||
You can see the number of '''Vertices''' and number of '''Walls''' the Sector has (those numbers are always the same). It also includes the '''height''' of the Sector. Finally, it has the '''Class''' and '''Slave''' which deals with INF scripting that will be covered later. | You can see the number of '''Vertices''' and number of '''Walls''' the Sector has (those numbers are always the same). It also includes the '''height''' of the Sector. Finally, it has the '''Class''' and '''Slave''' which deals with INF scripting that will be covered later. | ||
| Line 80: | Line 85: | ||
While having '''STARTSector''' selected, try double-clicking on the '''Flag 1''' option. This will bring up the Flag Edit menu. | While having '''STARTSector''' selected, try double-clicking on the '''Flag 1''' option. This will bring up the Flag Edit menu. | ||
[[File:SCFlagEdit.png| | [[File:SCFlagEdit.png|thumb|thumb|463x463px|center]] | ||
Flags are various options assigned to the Sector. In this particular case, the only option selected is the Exterior. This is because when you look outside you will see the sky. If that flag wasn't checked you will just see a flat texture as your ceiling. Exit out of this menu by pressing the '''X''' in the top right corner. | Flags are various options assigned to the Sector. In this particular case, the only option selected is the Exterior. This is because when you look outside you will see the sky. If that flag wasn't checked you will just see a flat texture as your ceiling. Exit out of this menu by pressing the '''X''' in the top right corner. | ||
| Line 87: | Line 92: | ||
==== Finding Sectors ==== | ==== Finding Sectors ==== | ||
To help you navigate , you can find a Sector either by name or by numerical ID by pressing the '''F''' key. The search menu will popup allowing you to quickly find your Sector. | To help you navigate , you can find a Sector either by name or by numerical ID by pressing the '''F''' key. The search menu will popup allowing you to quickly find your Sector. | ||
[[File:FindSector.png| | [[File:FindSector.png|thumb|thumb|534x534px|center]] | ||
=== Wall Editor === | === Wall Editor === | ||
Now lets go over the Wall Component details. A grouping of Walls makes up a Sector. You must have '''at least 3 Walls''' to have a valid Sector. Walls connections called '''adjoins''' are how you connect one Sector to the next. Switch to the '''Wall Mode''' and select the left Wall of the first Sector. | Now lets go over the Wall Component details. A grouping of Walls makes up a Sector. You must have '''at least 3 Walls''' to have a valid Sector. Walls connections called '''adjoins''' are how you connect one Sector to the next. Switch to the '''Wall Mode''' and select the left Wall of the first Sector. | ||
[[File:WallTutorial.png| | [[File:WallTutorial.png|thumb|thumb|792x792px|center]] | ||
The top menu bar of the Wall Editor is similar to the Sector Editor. You can see that you can commit changes by hitting the green checkbox (or '''F3''') or roll them back by hitting the red circle. Just like Sectors you have a "'''Stay on Top'''" checkbox and the '''INF''' Scripting button (more on that later). | The top menu bar of the Wall Editor is similar to the Sector Editor. You can see that you can commit changes by hitting the green checkbox (or '''F3''') or roll them back by hitting the red circle. Just like Sectors you have a "'''Stay on Top'''" checkbox and the '''INF''' Scripting button (more on that later). | ||
| Line 121: | Line 126: | ||
At the bottom you will see the Wall panel properties. | At the bottom you will see the Wall panel properties. | ||
[[File:Wall Properties.png| | [[File:Wall Properties.png|thumb|thumb|238x238px|center]] | ||
Here you can see the '''Sector Name''' and the altitudes of '''Floor''' and '''Ceiling''' along with the '''height''' and '''length''' of the Wall. It also lists the numerical vertex identifiers. The '''L''' stands for Left Vertex of the Wall and the '''R''' is the Right Vertex of the Wall. In this case, Vertex 0 is on the Left and Vertex 1 is on the Right of this Wall. Finally, the '''class''' and '''trigger''' are INF scripting components that will be covered later. | Here you can see the '''Sector Name''' and the altitudes of '''Floor''' and '''Ceiling''' along with the '''height''' and '''length''' of the Wall. It also lists the numerical vertex identifiers. The '''L''' stands for Left Vertex of the Wall and the '''R''' is the Right Vertex of the Wall. In this case, Vertex 0 is on the Left and Vertex 1 is on the Right of this Wall. Finally, the '''class''' and '''trigger''' are INF scripting components that will be covered later. | ||
==== Flags ==== | ==== Flags ==== | ||
[[File:WallFlags1.png| | [[File:WallFlags1.png|thumb|thumb|377x377px|center]] | ||
When you double click on '''Flag 1''' option you will see the various Wall options. Just like Sectors, you can multi select the options that you are interested in. So if you want to flip the wall's texture you would select value 4. When you are done editing, simply press the green checkmark at the top. | When you double click on '''Flag 1''' option you will see the various Wall options. Just like Sectors, you can multi select the options that you are interested in. So if you want to flip the wall's texture you would select value 4. When you are done editing, simply press the green checkmark at the top. | ||
[[File:WallFlags3.png| | [[File:WallFlags3.png|thumb|thumb|307x307px|center]] | ||
When you double click on the '''Flag 3''' option you will see flags that deal with wall traversal when it is adjoined to another sector's wall. Basically, you can make it so the enemies cannot get past this wall or you can make it so you could not pass it yourself or shoot a blaster bolt through. Once again, when you are done editing the flags you can click the green checkmark to save your settings. | When you double click on the '''Flag 3''' option you will see flags that deal with wall traversal when it is adjoined to another sector's wall. Basically, you can make it so the enemies cannot get past this wall or you can make it so you could not pass it yourself or shoot a blaster bolt through. Once again, when you are done editing the flags you can click the green checkmark to save your settings. | ||
==== Normals and Lengths ==== | ==== Normals and Lengths ==== | ||
Every time you select a Wall you will also see a perpendicular line that always points to the center of the Sector. This is called a '''normal''' line. | Every time you select a Wall you will also see a perpendicular line that always points to the center of the Sector. This is called a '''normal''' line. | ||
[[File:NormalLine.png| | [[File:NormalLine.png|thumb|thumb|423x423px|center]] | ||
You can enable or disable Wall normals by typing '''ALT-L .''' The Wall you have currently selected will always show the normal. | You can enable or disable Wall normals by typing '''ALT-L .''' The Wall you have currently selected will always show the normal. | ||
One other useful thing you can display in the Map Editor is the '''length''' of the Wall. Simply press '''L''' and all the Walls will show their lengths. | One other useful thing you can display in the Map Editor is the '''length''' of the Wall. Simply press '''L''' and all the Walls will show their lengths. | ||
[[File:Wall Lengths.png| | [[File:Wall Lengths.png|thumb|thumb|638x638px|center]] | ||
=== Vertex Editor === | === Vertex Editor === | ||
| Line 142: | Line 147: | ||
Go ahead and click on one of the starting Sector's Vertices . | Go ahead and click on one of the starting Sector's Vertices . | ||
[[File:Vertices.png| | [[File:Vertices.png|thumb|thumb|412x412px|center]] | ||
You will notice the the Vertex is a lot simpler than the Wall or the Sector. | You will notice the the Vertex is a lot simpler than the Wall or the Sector. | ||
| Line 154: | Line 159: | ||
Vertexes are a nice way to easily align your sectors when you join them together with other sectors. | Vertexes are a nice way to easily align your sectors when you join them together with other sectors. | ||
Be Careful! You '''cannot''' have one vertex be on top of another vertex for the same sector. This will cause a bug prevent the player from moving inside the sector. Be sure to | Be Careful! You '''cannot''' have one vertex be on top of another vertex for the same sector. This will cause a bug prevent the player from moving inside the sector. Be sure to delete one of them before testing your map. | ||
=== Texture Editor === | === Texture Editor === | ||
When you double click on a texture parameter in a Sector or Wall editor the Texture Resource Picker window will appear. | When you double click on a texture parameter in a Sector or Wall editor the Texture Resource Picker window will appear. | ||
[[File:Texture Picker.png| | [[File:Texture Picker.png|thumb|thumb|1012x1012px|center]] | ||
On the left you will see a list of textures. These are files that end in '''.BM''' and loaded from '''TEXTURES.GOB .''' When you pick the texture you like, the texture will be rendered in the window on the right. You will also have texture details explained in the top right corner such as the location, size and dimensions of the asset. | On the left you will see a list of textures. These are files that end in '''.BM''' and loaded from '''TEXTURES.GOB .''' When you pick the texture you like, the texture will be rendered in the window on the right. You will also have texture details explained in the top right corner such as the location, size and dimensions of the asset. | ||
| Line 171: | Line 176: | ||
You will also see a pull down called '''Available Pick Lists''' . These are nice groupings of textures to help you find the ones you need. You can search for a grouping of '''Walls''', '''Ceilings''' or from an existing mission such as '''NARSHADA''' or '''IMPCITY''' | You will also see a pull down called '''Available Pick Lists''' . These are nice groupings of textures to help you find the ones you need. You can search for a grouping of '''Walls''', '''Ceilings''' or from an existing mission such as '''NARSHADA''' or '''IMPCITY''' | ||
[[File:TexturePickList.png| | [[File:TexturePickList.png|thumb|thumb]] | ||
Clicking on the above will instantly filter the list at the bottom. | Clicking on the above will instantly filter the list at the bottom. | ||
Another way to easily find a texture you want is to use the filter bar above the texture list. While having "'''Full TEXTURES.GOB'''" selected in the Available Pick List try to find all the switches by typing "'''swi'''" . The textures will immediately show all the ones that contain that phrase. | Another way to easily find a texture you want is to use the filter bar above the texture list. While having "'''Full TEXTURES.GOB'''" selected in the Available Pick List try to find all the switches by typing "'''swi'''" . The textures will immediately show all the ones that contain that phrase. | ||
[[File:TextureFind.png| | [[File:TextureFind.png|thumb|thumb|346x346px|center]] | ||
==== Palettes ==== | ==== Palettes ==== | ||
| Line 181: | Line 186: | ||
When you choose a different palette from the pulldown menu the texture on the right will instantly be rendered with the colors. Here is what '''CESUNSET.BM l'''ooks like when rendered with '''ROBOTICS.PAL''' | When you choose a different palette from the pulldown menu the texture on the right will instantly be rendered with the colors. Here is what '''CESUNSET.BM l'''ooks like when rendered with '''ROBOTICS.PAL''' | ||
[[File:PALLETTE1.png| | [[File:PALLETTE1.png|thumb|thumb|783x783px|center]] | ||
And this is what it looks like when using '''TALAY.PAL''' . It's a world of difference! | And this is what it looks like when using '''TALAY.PAL''' . It's a world of difference! | ||
[[File:TalayPal.png| | [[File:TalayPal.png|thumb|thumb|802x802px|center]] | ||
By default your mission will use the PAL from Secret Base but you can always change it in the level header editor. To access it, go back to the main editor window and go to '''View''' --> '''Editors''' --> '''LVL''' | By default your mission will use the PAL from Secret Base but you can always change it in the level header editor. To access it, go back to the main editor window and go to '''View''' --> '''Editors''' --> '''LVL''' | ||
[[File:HeaderEditor.png| | [[File:HeaderEditor.png|thumb|thumb|318x318px|center]] | ||
Here you can change SECBASE.PAL to another one. | Here you can change SECBASE.PAL to another one. | ||
[[File:LVL Palette.png| | [[File:LVL Palette.png|thumb|thumb|399x399px|center]] | ||
Remember, you can only have '''ONE''' palette per mission! | Remember, you can only have '''ONE''' palette per mission! | ||
| Line 198: | Line 203: | ||
In the top left corner you will see a number of checkboxes. The ones shown will differ depending if you open the texture from the Sector Editor or from a Wall Editor. Here is what the Wall Texture checkboxes look like. | In the top left corner you will see a number of checkboxes. The ones shown will differ depending if you open the texture from the Sector Editor or from a Wall Editor. Here is what the Wall Texture checkboxes look like. | ||
[[File:CheckBoxes.png| | [[File:CheckBoxes.png|thumb|thumb|499x499px|center]] | ||
Here is the function of each one. | Here is the function of each one. | ||
| Line 206: | Line 211: | ||
Now that you've finished learned about Sector, Wall and Vertex components you are ready to start joining the Sectors together to make a mission! Continue to Advanced Geometry II . | Now that you've finished learned about Sector, Wall and Vertex components you are ready to start joining the Sectors together to make a mission! Continue to [[WDFUSE Tutorial - Advanced Geometry II|'''Advanced Geometry II''']] . | ||
'''WDFUSE Tutorials''' | |||
#[[WDFUSE Tutorial - Introduction|Introduction]] | |||
#[[WDFUSE Tutorial - Configuration]] | |||
#[[WDFUSE Tutorial - Basic Geometry]] | |||
# [[WDFUSE Tutorial - Basic Geometry II]] | |||
# [[WDFUSE Tutorial - 3D Renderer]] | |||
#[[WDFUSE Tutorial - Advanced Geometry]] | |||
#[[WDFUSE Tutorial - Advanced Geometry II]] | |||
# [[WDFUSE Tutorial - Advanced Geometry III]] | |||
#[[WDFUSE Tutorial - Objects]] | |||
#[[WDFUSE Tutorial - Scripting]] | |||
# [[WDFUSE Tutorial - Scripting II]] | |||
#[[WDFUSE Tutorial - Scripting III]] | |||
Latest revision as of 13:11, 18 March 2024
Advanced Geometry - Component Overview
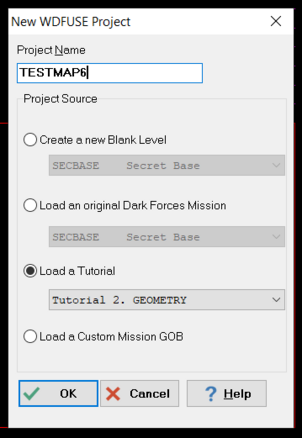
Now that you've learned the basics switch to the Geometry tutorial by starting a New project (you can click the New button in the main menu or press CTRL-N) and choosing the Geometry tutorial and press Ok .
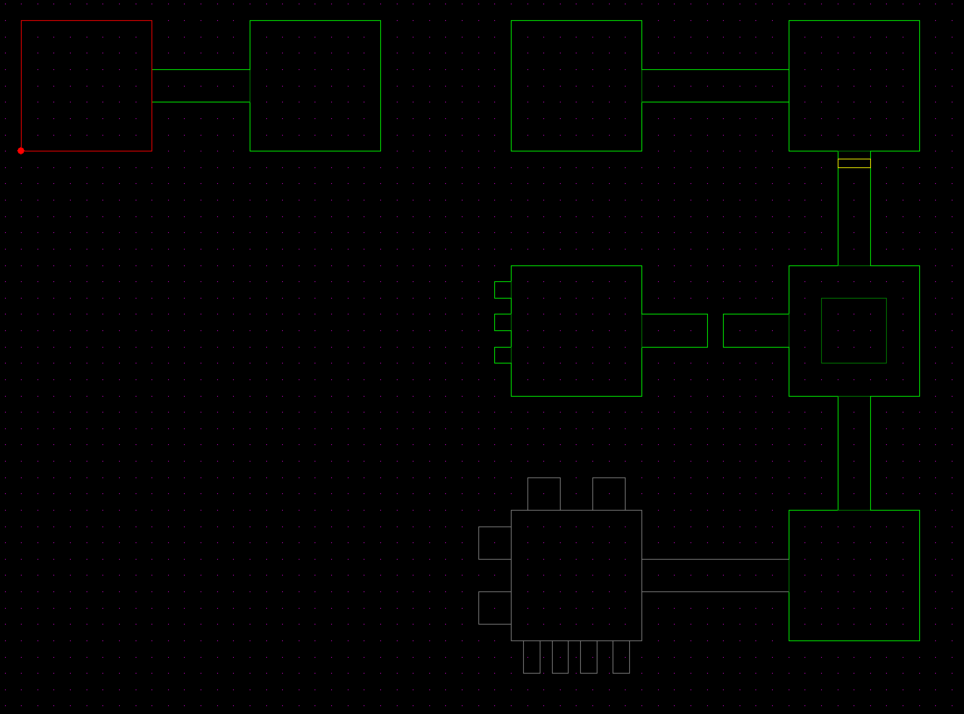
You will be greeted by many Sectors with rooms connected via corridors. Each room will teach you something new about Dark Forces editing. All these lessons are quite important so make sure you understand and practice the concepts being taught. Please do this tutorial in order since each room's objective is based on completion of previous lessons.
Remember, if you make a mistake you can simply undo by using CTRL-Z. Also, you can always restart this tutorial by making a new project.
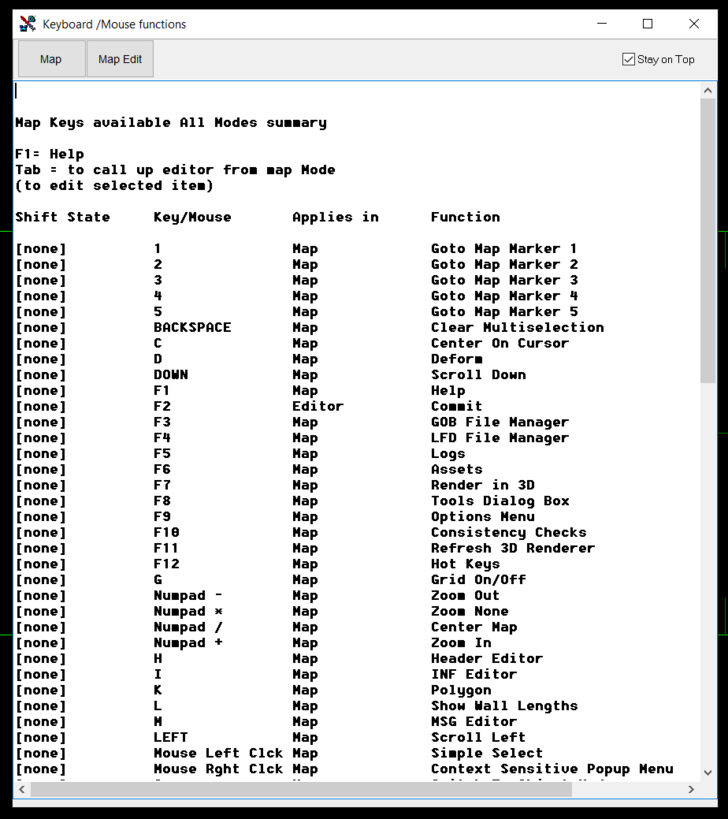
One more thing. WDFUSE has many hotkeys for you to learn. It is impossible to memorize them all on the first try. You can press F12 to see all the bindings if you forget what combination of keys does what you wanted it to do.
Testing (GOB-ing) your Map in Dark Forces
We are now at a point where we can start testing our mission. Once the tutorial is loaded press GOB in the top left corner or press CTRL-G. This process will take all the assets in your project directory, put them into a GOB called <PROJECT_NAME>.GOB and tell Dark Forces to launch it.
Note: This assumes you have already configured your Dark Forces Launcher (Steam / GOG / Origin / Custom) and Engine (JEDI / The Force Engine). If not, then press F9 to set it in the Options screen.
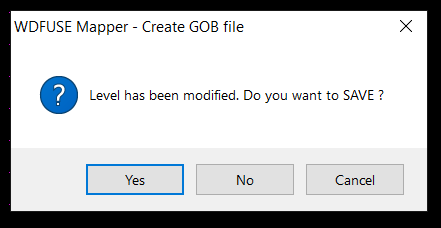
If you made any changes you may get prompted to Save your project. Say "YES" if that happens.
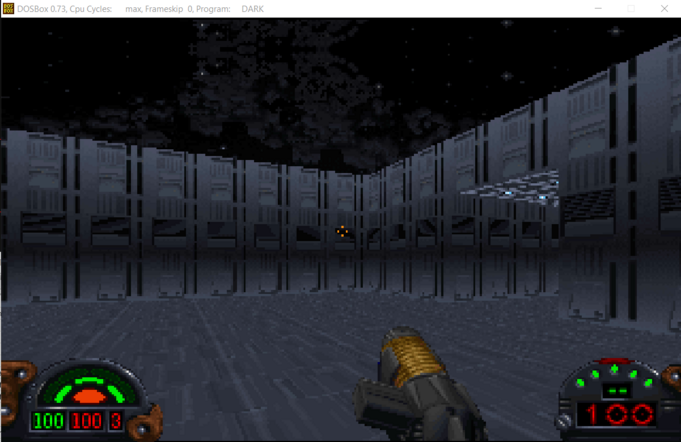
The game will launch and you will find yourself in the tutorial mission. There isn't much to do yet. You can run around between the two rooms connected by the corridor.
Once you confirm that the Dark Forces launches successfully, exit the game and go back to the WDFUSE editor.
Press F9 and switch to the tab "Backup & Launch" . Here you can see various settings that deal with launching the game.
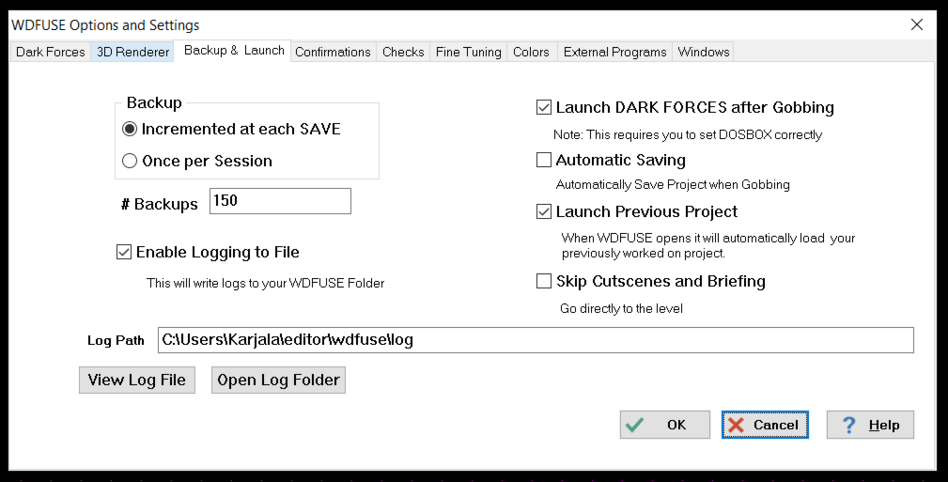
Notice that the editor makes a backup every time you save your project. They are stored in a BACKUP folder inside your project folder. You also have a LOG file you can look at for any issues. You can always bring up the current logfile by pressing F5 .
It is recommended you make two changes when you are working on your map.
- Enable Automatic Saving - this gets annoying very quickly and will stop prompting you every time you try to GOB the mission.
- Enable Skip Cutscenes and Briefing - this will allow you to instantly load into your mission without constantly showing your the cutscenes and the mission briefing (believe me - they get old quick!).
Once you have those two items checked, press OK to exit the options menu. Every time you make settings changes like this they get stored in a file called WDFUSE.INI inside your WDFUSE folder. If you ever want to wipe your setting and start form scratch simply delete that file.
Before we continue we must go over each map component in detail. Starting with the Sector.
Sector Editor
We had a brief overview of Sectors before but now it is time to get into the details. When you select a room in the Sector Mode you will see a window popup that lists all the parameters of the Sector.
Go ahead and select the top-left most Sector where you start the tutorial.
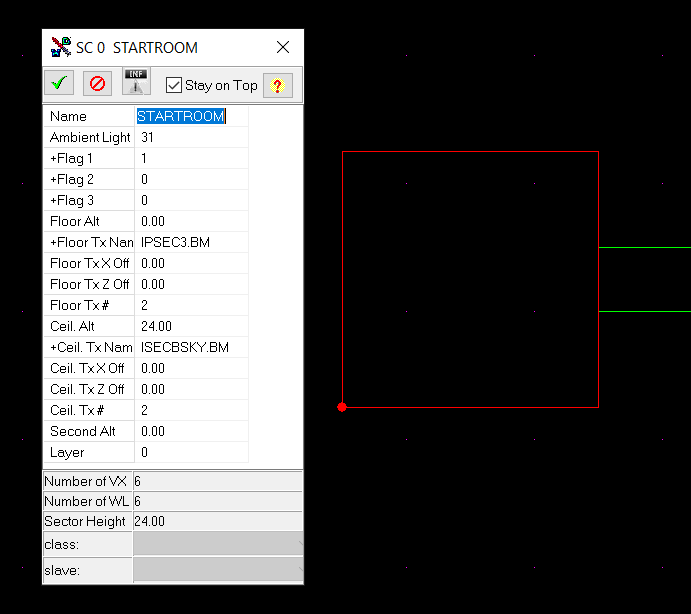
You will see the details of the selected Sector that says SC 0 at the top. The 0 is the numerical ID of the Sector. Dark Forces starts counting map components from 0. So if you have 10 Sectors (or Walls, Vertices or Objects) in total they will be assigned numbers 0 through 9.
While all the Sectors must have a number assigned to them, not all of them have a name. In this case this Sector is called STARTROOM. Sector names make it easier to reference them when you start scripting and also is a helpful way to identify the Sector's function.
Lets go over all the Sector components.
- Name - Name of the Sector. This is Optional and can be left blank.
- Ambient Light - how bright a Sector is. The number must be between 0 and 31 where 0 is total darkness and 31 is the brightest.
- Flag 1 - Grouping of flags that modify a Sector's properties such as floor causing damage, no ceiling rendered, etc. This will be explained in detail later in the tutorial.
- Flag 2 - Unused. (Ignore for now)
- Flag 3 - Sets up custom lighting for the Talay Mission (Ignore for now).
- Floor Altitude - At what vertical position if the floor located at. The floor must always be below the ceiling!
- Floor Texture - Brings up the Texture Editor for the floor.
- Floor TX X Off - Configures the X-horizontal offset for the floor texture.
- Floor TX Z Off - Configures the Z-horizontal offset for the floor texture.
- Floor Tx # - Unused (Ignore for now)
- Ceiling Alt - At what vertical altitude if the ceiling located at. The ceiling must always be above the floor!
- Ceiling TX X Off - Configures the X-horizontal offset for the ceiling texture.
- Ceiling TX Z Off - Configures the Z-horizontal offset for the ceiling texture.
- Ceiling Tx # - Unused (Ignore for now)
- Second Alt - Dark Forces supports one additional altitude on which you can walk. This is optional, and in relative height to the Floor Altitude, not absolute.
- Layer - What map layer this Sector belongs to.
Lets go over the icons at the top.

- Whenever you make changes to the Sector (or any other Map Component like Walls) your changes must be saved. To do that click the Green Checkmark icon at the top or by pressing F3.
- You can cancel your changes by clicking the red circle next to it.
- The INF exclamation icon opens up the Scripting Editor - we will go over this in a later tutorial.
- You will also see a "Stay on Top" checkbox. If it is selected, this window will not be hidden when overlaid by the Map Editor. It's recommended to keep it checked.
- Finally, the question mark icon will bring up WDFUSE help.
The information bar at the bottom lists additional information about the Sector.
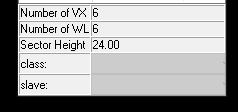
You can see the number of Vertices and number of Walls the Sector has (those numbers are always the same). It also includes the height of the Sector. Finally, it has the Class and Slave which deals with INF scripting that will be covered later.
Flags
Lets quickly explore the Flag Editor.
While having STARTSector selected, try double-clicking on the Flag 1 option. This will bring up the Flag Edit menu.
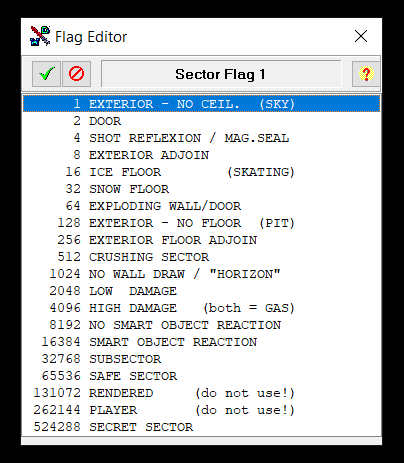
Flags are various options assigned to the Sector. In this particular case, the only option selected is the Exterior. This is because when you look outside you will see the sky. If that flag wasn't checked you will just see a flat texture as your ceiling. Exit out of this menu by pressing the X in the top right corner.
Just like flags, you can change a texture by double clicking on the texture parameter (Either Floor or Ceiling for a Sector). We will talk about that later in this tutorial.
Finding Sectors
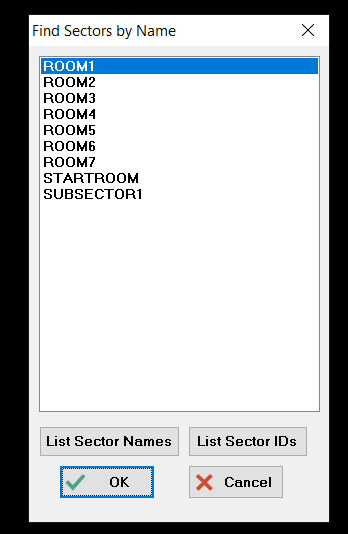
To help you navigate , you can find a Sector either by name or by numerical ID by pressing the F key. The search menu will popup allowing you to quickly find your Sector.
Wall Editor
Now lets go over the Wall Component details. A grouping of Walls makes up a Sector. You must have at least 3 Walls to have a valid Sector. Walls connections called adjoins are how you connect one Sector to the next. Switch to the Wall Mode and select the left Wall of the first Sector.
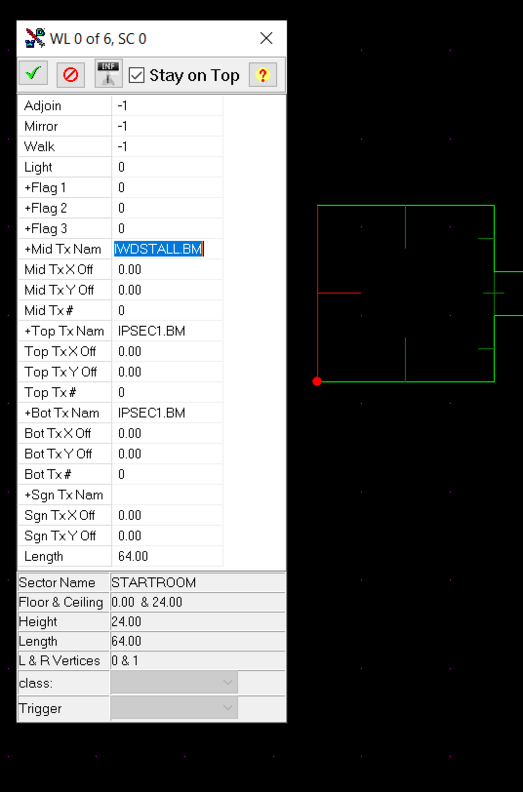
The top menu bar of the Wall Editor is similar to the Sector Editor. You can see that you can commit changes by hitting the green checkbox (or F3) or roll them back by hitting the red circle. Just like Sectors you have a "Stay on Top" checkbox and the INF Scripting button (more on that later).
Les go over all Wall Editor components.
- Adjoin - This tells the editor which other Sector this Wall is adjoined to. (More on Adjoins later)
- Mirror - This tells the editor which other Sector's Wall
- Walk - Same as adjoin (Ignore this for now)
- Light - The Wall's light variable
- Flag1 - Flags that handle Wall's properties
- Flag2 - Unused (Ignore for now)
- Flag3 - Flags that deal with the Wall's adjoin traversal properties (ex: movement)
- Mid Tx Name - Middle Texture's Name
- Mid Tx X Off - Middle Texture's X Offset
- Mid Tx Y Off - Middle Texture's Y Offset
- Mid Tx # - Unused (Ignore for now)
- Top Tx Name - Top Texture's Name
- Top Tx X Off - Top Texture's X Offset
- Top Tx Y Off - Top Texture's Y Offset
- Top Tx # - Unused (Ignore for now)
- Bot Tx Name - Bottom Texture's Name
- Bot Tx X Off - Bottom Texture's X Offset
- Bot Tx Y Off - Bottom Texture's Y Offset
- Bot Tx # - Unused (Ignore for now)
- Sign Tx Name - Sign Texture's Name
- Sign Tx X Off - Sign Texture's X Offset
- Sign Tx Y Off - Sign Texture's Y Offset
- Length - Length of the Wall
At the bottom you will see the Wall panel properties.
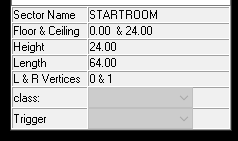
Here you can see the Sector Name and the altitudes of Floor and Ceiling along with the height and length of the Wall. It also lists the numerical vertex identifiers. The L stands for Left Vertex of the Wall and the R is the Right Vertex of the Wall. In this case, Vertex 0 is on the Left and Vertex 1 is on the Right of this Wall. Finally, the class and trigger are INF scripting components that will be covered later.
Flags
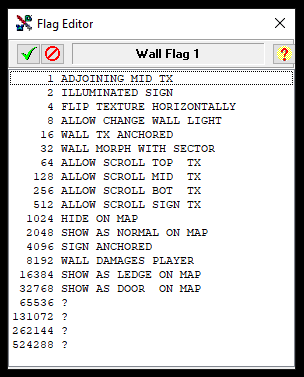
When you double click on Flag 1 option you will see the various Wall options. Just like Sectors, you can multi select the options that you are interested in. So if you want to flip the wall's texture you would select value 4. When you are done editing, simply press the green checkmark at the top.
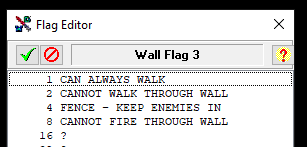
When you double click on the Flag 3 option you will see flags that deal with wall traversal when it is adjoined to another sector's wall. Basically, you can make it so the enemies cannot get past this wall or you can make it so you could not pass it yourself or shoot a blaster bolt through. Once again, when you are done editing the flags you can click the green checkmark to save your settings.
Normals and Lengths
Every time you select a Wall you will also see a perpendicular line that always points to the center of the Sector. This is called a normal line.
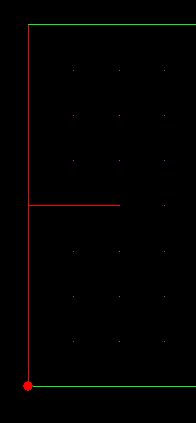
You can enable or disable Wall normals by typing ALT-L . The Wall you have currently selected will always show the normal.
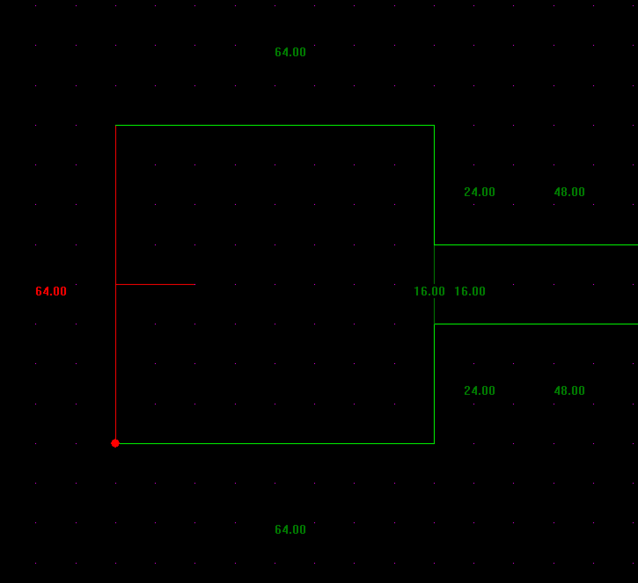
One other useful thing you can display in the Map Editor is the length of the Wall. Simply press L and all the Walls will show their lengths.
Vertex Editor
Now lets go over the Vertex editor. The Vertices are the end-points of the Wall. The number always matches the number of the Walls you have in your Sector. Each vertex connects two Walls together.
Go ahead and click on one of the starting Sector's Vertices .
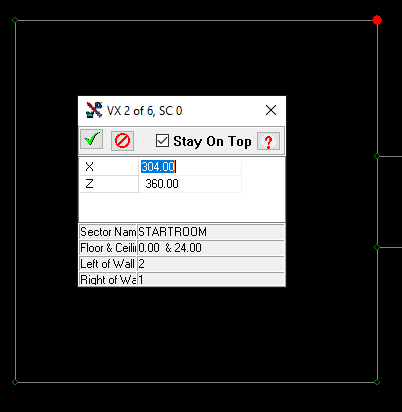
You will notice the the Vertex is a lot simpler than the Wall or the Sector.
- X - This is the X position on the map of the Vertex
- Z - This is the Z position on the map of the Vertex
At the top, as before you can commit or rollback your changes as well as keep the window on top .
Below you will see the Name of the sector, the Floor and Ceiling altitudes and the numerical IDs of the Left and Right Walls of this Vertex.
Vertexes are a nice way to easily align your sectors when you join them together with other sectors.
Be Careful! You cannot have one vertex be on top of another vertex for the same sector. This will cause a bug prevent the player from moving inside the sector. Be sure to delete one of them before testing your map.
Texture Editor
When you double click on a texture parameter in a Sector or Wall editor the Texture Resource Picker window will appear.
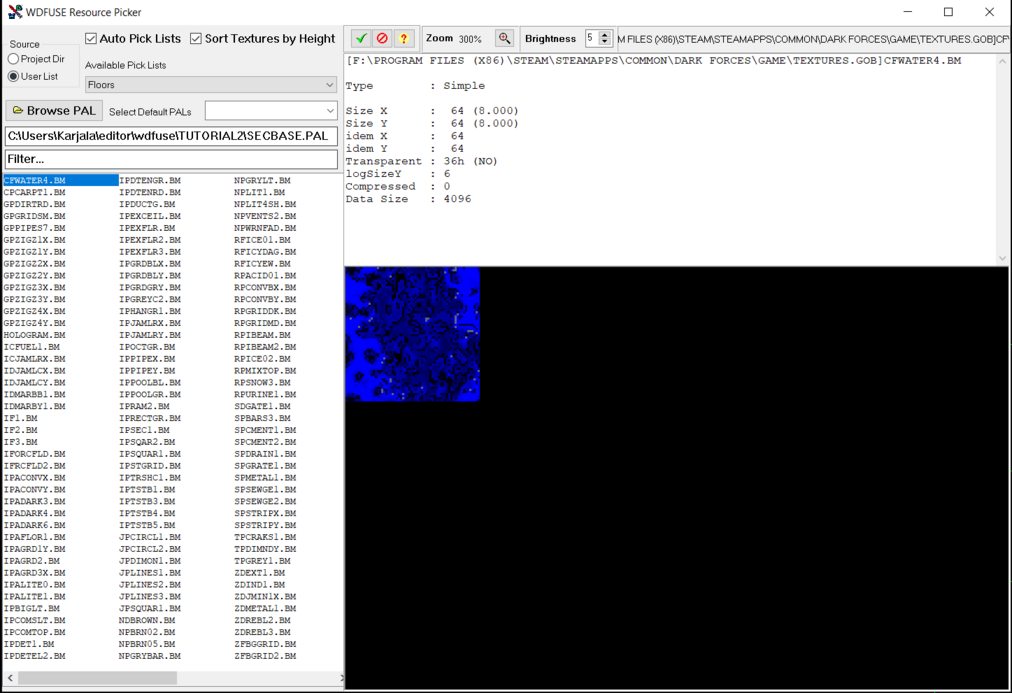
On the left you will see a list of textures. These are files that end in .BM and loaded from TEXTURES.GOB . When you pick the texture you like, the texture will be rendered in the window on the right. You will also have texture details explained in the top right corner such as the location, size and dimensions of the asset.
Notice that at the top you can also change the texture Brightness and the texture's Zoom level. So if the texture is too dark or too small you can always play with those settings to make it easier to view.
When you are done selecting your texture simply click the green checkmark at the top and your texture will be applied.
Filtering Textures
In the top left menu you can will see a Source option. Project Dir means that the textures are loaded from your WDFUSE project directory. Any BM file you put in that folder will appear in this list. User List means that the texture is loaded from TEXTURES.GOB .
You will also see a pull down called Available Pick Lists . These are nice groupings of textures to help you find the ones you need. You can search for a grouping of Walls, Ceilings or from an existing mission such as NARSHADA or IMPCITY
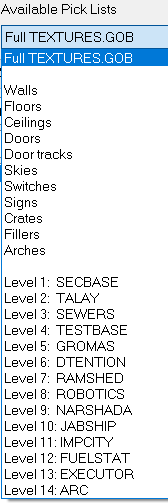
Clicking on the above will instantly filter the list at the bottom.
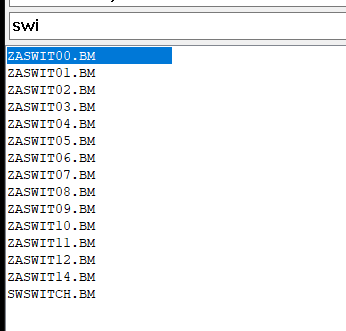
Another way to easily find a texture you want is to use the filter bar above the texture list. While having "Full TEXTURES.GOB" selected in the Available Pick List try to find all the switches by typing "swi" . The textures will immediately show all the ones that contain that phrase.
Palettes
A palette is a grouping of colors in Dark Forces. Because of the limits of the 1990s computer memory the game could only use a maximum of 256 colors per mission. A mission like Gromas Mines required a lot of red color gradients so it would use a special palette that has an emphasis on the color red. While a mission like Talay has an emphasis on moody purple colors. The palettes for each of those missions would be stored in GROMAS.PAL and TALAY.PAL files.
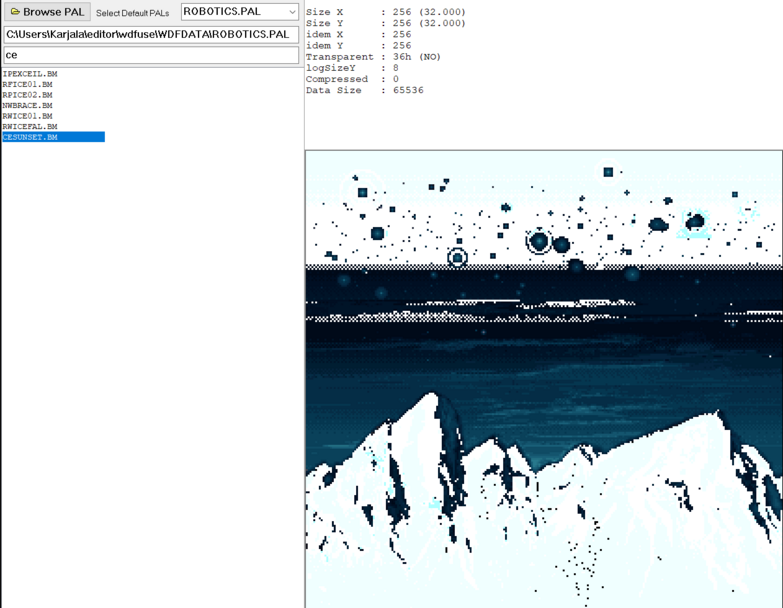
When you choose a different palette from the pulldown menu the texture on the right will instantly be rendered with the colors. Here is what CESUNSET.BM looks like when rendered with ROBOTICS.PAL
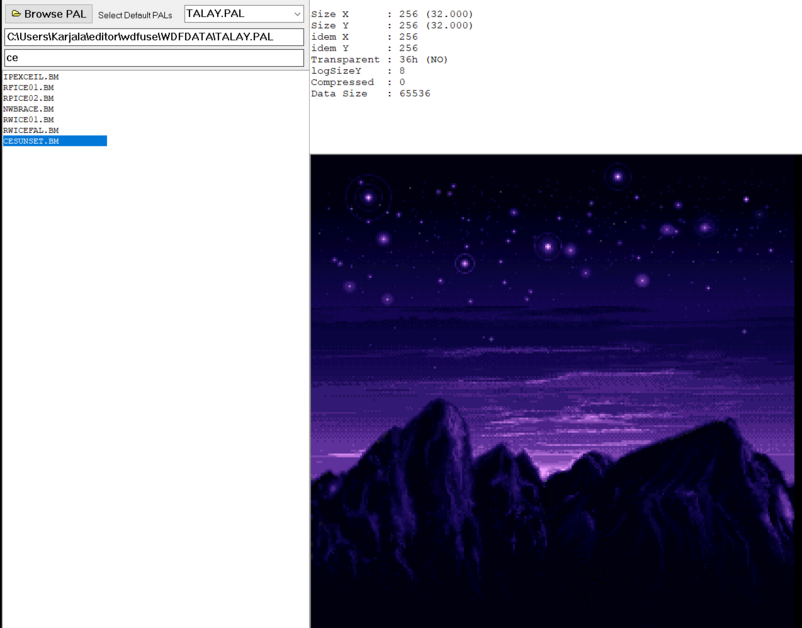
And this is what it looks like when using TALAY.PAL . It's a world of difference!
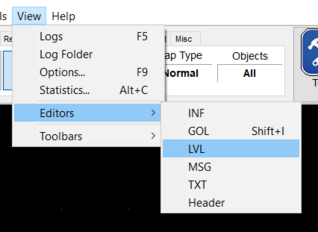
By default your mission will use the PAL from Secret Base but you can always change it in the level header editor. To access it, go back to the main editor window and go to View --> Editors --> LVL
Here you can change SECBASE.PAL to another one.
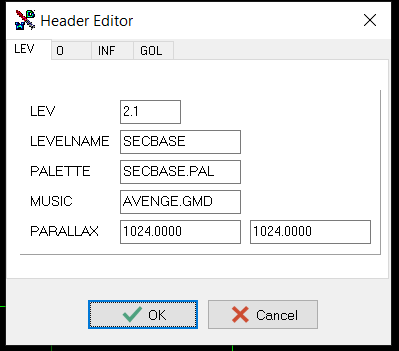
Remember, you can only have ONE palette per mission!
Automatic Texture Selection
In the top left corner you will see a number of checkboxes. The ones shown will differ depending if you open the texture from the Sector Editor or from a Wall Editor. Here is what the Wall Texture checkboxes look like.
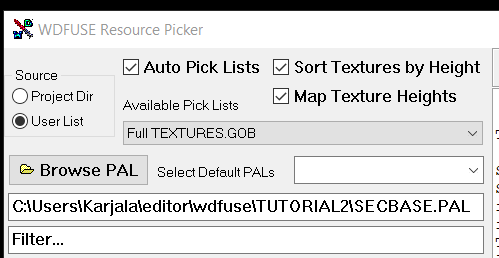
Here is the function of each one.
- Auto Pick Lists will automatically switch to a Floor or a Ceiling (or Sky) texture if you try to load the texture from the Sector Editor.
- Sort Textures by Height will sort all the textures from smallest to largest. This will only work on non-switch uncompressed textures .
- Map Texture Heights (This option is only available for Walls) will try to map the texture height to the height of the Wall so it would fit perfectly.
Now that you've finished learned about Sector, Wall and Vertex components you are ready to start joining the Sectors together to make a mission! Continue to Advanced Geometry II .
WDFUSE Tutorials
- Introduction
- WDFUSE Tutorial - Configuration
- WDFUSE Tutorial - Basic Geometry
- WDFUSE Tutorial - Basic Geometry II
- WDFUSE Tutorial - 3D Renderer
- WDFUSE Tutorial - Advanced Geometry
- WDFUSE Tutorial - Advanced Geometry II
- WDFUSE Tutorial - Advanced Geometry III
- WDFUSE Tutorial - Objects
- WDFUSE Tutorial - Scripting
- WDFUSE Tutorial - Scripting II
- WDFUSE Tutorial - Scripting III