(Created page with "Layout and setup...") |
No edit summary |
||
| (5 intermediate revisions by the same user not shown) | |||
| Line 1: | Line 1: | ||
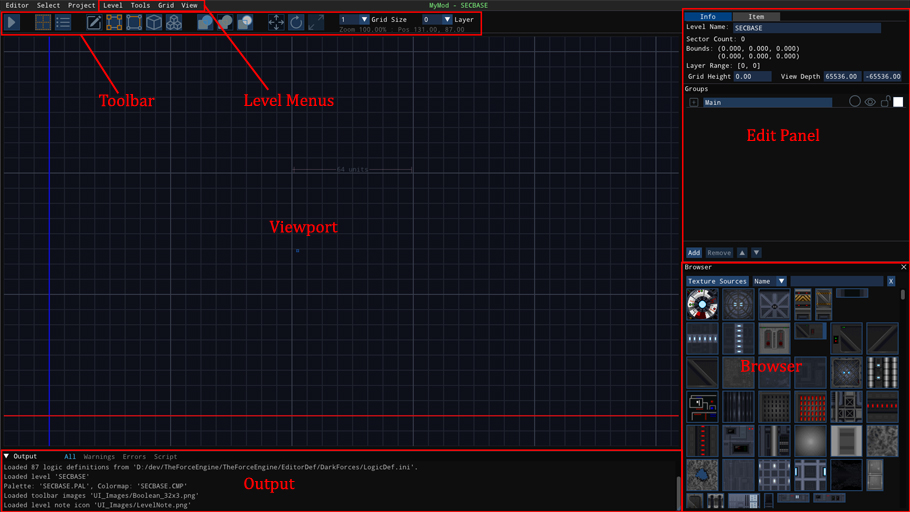
When you load a new level for the first time, you will see something like this. This has been annotated to show the different parts of the UI. | |||
{| style="margin:auto" | |||
|- | |||
| [[File:LevelEditorUI.jpg|left|frame|Level Editor UI]] | |||
|} | |||
For now, I am only going to cover the basics to get you started. | |||
=== Setup Test Options === | |||
Before you can test your level, you have to setup test options. | |||
{| style="margin:auto" | |||
|- | |||
| [[File:LevelMenu.jpg|left|frame|Level Menu]] | |||
| [[File:TestOptions.jpg|left|frame|Test Options]] | |||
|} | |||
First, you must setup a port to run your level. Use the Browse buttons to select the executable of the desired port. If TFE is used, make sure that '''Dark Forces: Use TFE''' is checked, as that will add extra hidden command line options to make iteration faster. | |||
Next, you can add any additional command line arguments. Note that arguments to skip cutscenes and directly load the level are already used. | |||
Finally there are some options you can use when testing. Currently the difficulty options are not working, but '''No Enemies''' will remove any objects that are flagged as enemies when testing, this makes looking at the architecture and testing INF functionality easier. | |||
=== View and Change Shortcuts === | |||
You will want to review and possibly change the shortcuts keys used by the level editor. For that choose '''User Preferences''', and then the Input tab. Other options are available, but they are bare bones for now. | |||
{| style="margin:auto" | |||
|- | |||
| [[File:UserPref-Input.jpg|left|thumb|User Preferences - Input]] | |||
|} | |||
=== Saving and Loading === | |||
{| style="margin:auto" | |||
|- | |||
| [[File:LevelMenu.jpg|left|frame|Level Menu]] | |||
|} | |||
You can save using '''Save''' from the Level Menu. '''Reload''' loads the level from the last save. If you want to load another level, click on '''Close''' and then select the desired level in the '''Asset Browser'''. The TFE editor also autosaves every 10 minutes - you can find those saves in the '''Autosaves/''' directory that gets generated in your project folder. | |||
Finally, you can Create, Load, or Delete named snapshots using the '''Snapshots''' option. | |||
{| style="margin:auto" | |||
|- | |||
| [[File:Snapshot.jpg|left|frame|Snapshot Dialog]] | |||
|} | |||
To '''create''' a new snapshot, which captures the level as it is now, give it a name and optional notes. As shown in the image, the notes will be display as a tooltip when hovering the mouse over the snapshot in the list. To '''load''' or '''delete''' a snapshot, select one from the list and hit the appropriate button. Hit '''Exit''' when done. Note that when loading from a snapshot your undo history is lost - the snapshot becomes the new root of the history. | |||
There is no hard limit to the number of snapshots but remember that they are full saves and the size can add up. It is a good idea to take snapshots at key points in development, not only as backups but also as reference. | |||
---- | |||
# [[TFE-EDITOR|The Force Engine Editor]] | |||
# [[TFE Editor - Creating or Importing a Level|TFE Editor - Creating or Importing a Level]] | |||
# [[TFE Editor - Layout and Setup|TFE Editor - Layout and Setup]] | |||
Latest revision as of 18:19, 22 March 2025
When you load a new level for the first time, you will see something like this. This has been annotated to show the different parts of the UI.
 |
For now, I am only going to cover the basics to get you started.
Setup Test Options
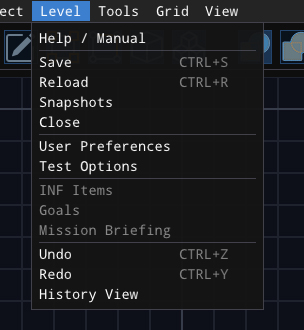
Before you can test your level, you have to setup test options.
 |
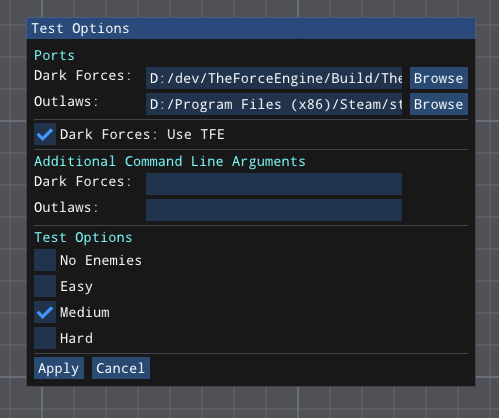 |
First, you must setup a port to run your level. Use the Browse buttons to select the executable of the desired port. If TFE is used, make sure that Dark Forces: Use TFE is checked, as that will add extra hidden command line options to make iteration faster.
Next, you can add any additional command line arguments. Note that arguments to skip cutscenes and directly load the level are already used.
Finally there are some options you can use when testing. Currently the difficulty options are not working, but No Enemies will remove any objects that are flagged as enemies when testing, this makes looking at the architecture and testing INF functionality easier.
View and Change Shortcuts
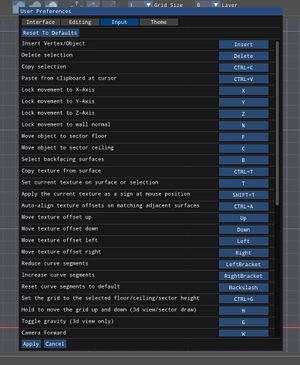
You will want to review and possibly change the shortcuts keys used by the level editor. For that choose User Preferences, and then the Input tab. Other options are available, but they are bare bones for now.
 |
Saving and Loading
 |
You can save using Save from the Level Menu. Reload loads the level from the last save. If you want to load another level, click on Close and then select the desired level in the Asset Browser. The TFE editor also autosaves every 10 minutes - you can find those saves in the Autosaves/ directory that gets generated in your project folder.
Finally, you can Create, Load, or Delete named snapshots using the Snapshots option.
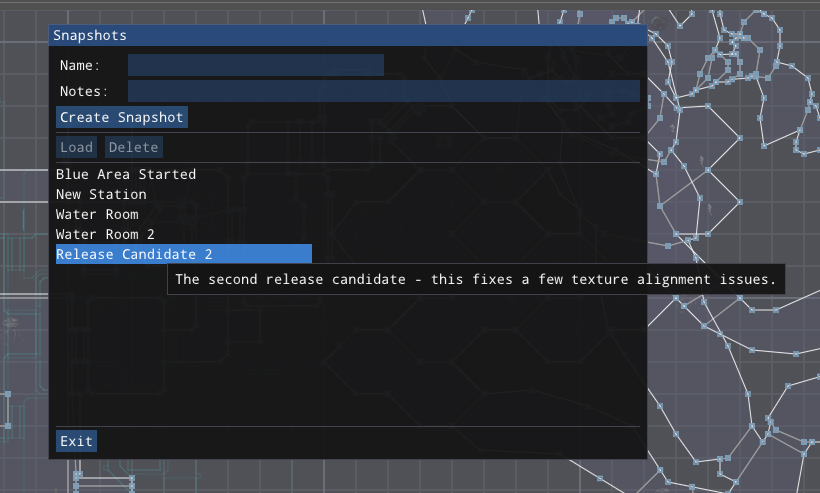 |
To create a new snapshot, which captures the level as it is now, give it a name and optional notes. As shown in the image, the notes will be display as a tooltip when hovering the mouse over the snapshot in the list. To load or delete a snapshot, select one from the list and hit the appropriate button. Hit Exit when done. Note that when loading from a snapshot your undo history is lost - the snapshot becomes the new root of the history.
There is no hard limit to the number of snapshots but remember that they are full saves and the size can add up. It is a good idea to take snapshots at key points in development, not only as backups but also as reference.