(→Combining Sectors: updating F7) |
No edit summary |
||
| Line 6: | Line 6: | ||
=== Adjoins === | === Adjoins === | ||
An '''Adjoin''' is the connection between two sectors. You adjoin a '''Wall''' of one sector to a '''Wall''' in another sector. The walls must have identical coordinates of their Left and Right Vertices. Take a look at the adjoin between the '''STARTSECTOR''' (Sector '''0''') room and the hallway . | An '''Adjoin''' is the connection between two sectors. You adjoin a '''Wall''' of one sector to a '''Wall''' in another sector. The walls must have identical coordinates of their Left and Right Vertices. Take a look at the adjoin between the '''STARTSECTOR''' (Sector '''0''') room and the hallway . | ||
[[File:Adjoins.png| | [[File:Adjoins.png|thumb|thumb|1021x1021px|center]] | ||
Notice the color of the adjoined walls is slightly darker shade of green than the solid walls of the sectors. Click on the adjoined wall of the sector. | Notice the color of the adjoined walls is slightly darker shade of green than the solid walls of the sectors. Click on the adjoined wall of the sector. | ||
[[File:LeftAdjoin.png| | [[File:LeftAdjoin.png|thumb|thumb|411x411px|center]] | ||
You will see that you are looking at '''Wall 3''' of '''Sector 0''' (WL3 and SC 0 at the top bar). | You will see that you are looking at '''Wall 3''' of '''Sector 0''' (WL3 and SC 0 at the top bar). | ||
| Line 14: | Line 14: | ||
Here is how it looks like in the 3D Renderer. | Here is how it looks like in the 3D Renderer. | ||
[[File:AdjoinRender.png| | [[File:AdjoinRender.png|thumb|thumb|613x613px|center]] | ||
Now click on the wall inside the tunnel (or press '''F''' to instantly jump to the Mirrored wall). | Now click on the wall inside the tunnel (or press '''F''' to instantly jump to the Mirrored wall). | ||
[[File:RightMirror.png| | [[File:RightMirror.png|thumb|thumb|419x419px|center]] | ||
Now you are looking '''Wall 0''' of '''Sector 1''' (WL0 and SC 1 at the top) | Now you are looking '''Wall 0''' of '''Sector 1''' (WL0 and SC 1 at the top) | ||
| Line 22: | Line 22: | ||
Now lets see what happens when you remove the adjoin or '''unadjoin''' the two walls. Go ahead and right click on the wall and choose '''UnAdjoin''' ( or press ALT-A). | Now lets see what happens when you remove the adjoin or '''unadjoin''' the two walls. Go ahead and right click on the wall and choose '''UnAdjoin''' ( or press ALT-A). | ||
[[File:UnAdjoin.png| | [[File:UnAdjoin.png|thumb|thumb|343x343px|center]] | ||
When you do that you will see that the wall is gone in the Renderer. | When you do that you will see that the wall is gone in the Renderer. | ||
[[File:UnAdjoin Render.png| | [[File:UnAdjoin Render.png|thumb|thumb|578x578px|center]] | ||
Notice that the colors turn to solid green and the walls are no longer connected! This means you cannot go through them anymore in the game. | Notice that the colors turn to solid green and the walls are no longer connected! This means you cannot go through them anymore in the game. | ||
[[File:Unadjoined Walls.png| | [[File:Unadjoined Walls.png|thumb|thumb|446x446px|center]] | ||
If you select one of the formerly-adjoined walls, you will see that the value of '''Adjoin''' and '''Mirror''' is -1 (or no adjoin connections). | If you select one of the formerly-adjoined walls, you will see that the value of '''Adjoin''' and '''Mirror''' is -1 (or no adjoin connections). | ||
[[File:No Adjoin Connections.png| | [[File:No Adjoin Connections.png|thumb|thumb|445x445px|center]] | ||
Go ahead no and re-adjoin the wall and we will continue in the tutorial. you can either right click on the wall and choose '''Adjoin''' or press '''Alt-A''' again. | Go ahead no and re-adjoin the wall and we will continue in the tutorial. you can either right click on the wall and choose '''Adjoin''' or press '''Alt-A''' again. | ||
=== Extruding a Wall === | === Extruding a Wall === | ||
Now that you know how adjoins walls lets talk about connecting two sectors together. Move the map to the empty passage between '''Room 1''' (Sector 2) and '''Room 2''' (Sector 3). While in '''Sector Mode''' select Wall 5 of the sector on the left. | Now that you know how adjoins walls lets talk about connecting two sectors together. Move the map to the empty passage between '''Room 1''' (Sector 2) and '''Room 2''' (Sector 3). While in '''Sector Mode''' select Wall 5 of the sector on the left. | ||
[[File:Passage between two rooms.png| | [[File:Passage between two rooms.png|thumb|thumb|673x673px|center]] | ||
We will use this wall to make a passage from '''Room 1''' to '''Room 2''' . To do that, we will '''Extrude''' the wall and create a new sector starting from that location. Go ahead and right click on the wall and choose '''Extrude''' (or press '''E''') . | We will use this wall to make a passage from '''Room 1''' to '''Room 2''' . To do that, we will '''Extrude''' the wall and create a new sector starting from that location. Go ahead and right click on the wall and choose '''Extrude''' (or press '''E''') . | ||
[[File:Extrude Wall.png| | [[File:Extrude Wall.png|thumb|thumb|555x555px|center]] | ||
If you get a popup asking you to confirm the extrusion choose '''Yes.''' | If you get a popup asking you to confirm the extrusion choose '''Yes.''' | ||
You will see a new sector is created where the wall is located. This sector will be our new corridor to the sector on the right. From this point we will reference this new extruded sector as the "'''corridor'''". | You will see a new sector is created where the wall is located. This sector will be our new corridor to the sector on the right. From this point we will reference this new extruded sector as the "'''corridor'''". | ||
[[File:Wall Extrude.png| | [[File:Wall Extrude.png|thumb|thumb|896x896px|center]] | ||
Now drag (with '''CTRL''') the wall of the new sector close to the rightmost sector. You may want to zoom-in (mousewheel) to see clearer. | Now drag (with '''CTRL''') the wall of the new sector close to the rightmost sector. You may want to zoom-in (mousewheel) to see clearer. | ||
[[File:ExtrudeDrag.png| | [[File:ExtrudeDrag.png|thumb|thumb|885x885px|center]] | ||
Remember that to adjoin this new sector to the corridor we must have a wall that has exactly the same vertex dimensions as the other wall. Therefore we must first make a wall on the other side. Make sure the '''grid''' is turned on ('''G''' button) and that you are have '''Wall''' '''Lengths''' turned on ('''L''' button). | Remember that to adjoin this new sector to the corridor we must have a wall that has exactly the same vertex dimensions as the other wall. Therefore we must first make a wall on the other side. Make sure the '''grid''' is turned on ('''G''' button) and that you are have '''Wall''' '''Lengths''' turned on ('''L''' button). | ||
Notice that the length of the wall must be 16 Dark Forces units in size. | Notice that the length of the wall must be 16 Dark Forces units in size. | ||
[[File:Wall Length.png| | [[File:Wall Length.png|thumb|thumb|494x494px|center]] | ||
Select '''Wall 0''' of the sector '''Room 2''', right click on it and choose Split. | Select '''Wall 0''' of the sector '''Room 2''', right click on it and choose Split. | ||
[[File:SplitWall2.png| | [[File:SplitWall2.png|thumb|thumb|478x478px|center]] | ||
Do that '''two''' times so the long wall is now split into three pieces! | Do that '''two''' times so the long wall is now split into three pieces! | ||
[[File:SplitTwice.png| | [[File:SplitTwice.png|thumb|thumb|783x783px|center]] | ||
Now switch to Vertex mode and align '''Room 2'''<nowiki/>'s vertices so they are directly opposite the extruded corridor. Do that by moving the vertices using '''CTRL''' button. | Now switch to Vertex mode and align '''Room 2'''<nowiki/>'s vertices so they are directly opposite the extruded corridor. Do that by moving the vertices using '''CTRL''' button. | ||
[[File:Align Vertices.png| | [[File:Align Vertices.png|thumb|thumb|366x366px|center]] | ||
Good! You now have a wall that has exactly the same length (16) as the corridor wall. Now move the corridor vertices and align them over '''Room 2'''<nowiki/>'s vertices. It should look like this. | Good! You now have a wall that has exactly the same length (16) as the corridor wall. Now move the corridor vertices and align them over '''Room 2'''<nowiki/>'s vertices. It should look like this. | ||
[[File:AlignedVertices.png| | [[File:AlignedVertices.png|thumb|thumb|686x686px|center]] | ||
Now switch back to Wall Mode, select the right most Wall and '''Adjoin''' it. | Now switch back to Wall Mode, select the right most Wall and '''Adjoin''' it. | ||
[[File:Adjoin Extruded.png| | [[File:Adjoin Extruded.png|thumb|thumb|685x685px|center]] | ||
Great, now you've learned how to connect sectors together with passageways. Remember, it's all about aligning the Vertices and then adjoining the Walls ! You can see that there is now a passageway between '''Room 1''' and '''Room 2''' in the renderer. | Great, now you've learned how to connect sectors together with passageways. Remember, it's all about aligning the Vertices and then adjoining the Walls ! You can see that there is now a passageway between '''Room 1''' and '''Room 2''' in the renderer. | ||
[[File:RenderAdjoin.png| | [[File:RenderAdjoin.png|thumb|thumb|697x697px|center]] | ||
=== Lighting === | === Lighting === | ||
Go ahead and GOB ('''CTRL-G)''' your mission and launch it in Dark Forces. Run towards Room 2 and look around. | Go ahead and GOB ('''CTRL-G)''' your mission and launch it in Dark Forces. Run towards Room 2 and look around. | ||
[[File:DarkRoom.png| | [[File:DarkRoom.png|thumb|thumb|697x697px|center]] | ||
Notice how dark it is... well except the southern wall. It looks much brighter than the rest. What is going on? | Notice how dark it is... well except the southern wall. It looks much brighter than the rest. What is going on? | ||
| Line 71: | Line 71: | ||
In Sector Mode, look at '''Room 2'''<nowiki/>'s '''Ambient Light''' value. Zero means it is as dark as possible. While 31 means it will be the brightest possible. | In Sector Mode, look at '''Room 2'''<nowiki/>'s '''Ambient Light''' value. Zero means it is as dark as possible. While 31 means it will be the brightest possible. | ||
[[File:Light Room.png| | [[File:Light Room.png|thumb|thumb|591x591px|center]] | ||
Ok that explains why the whole sector is dark... but why is the wall so bright? Switch to Wall Mode and click on the bottom Wall (# 7). | Ok that explains why the whole sector is dark... but why is the wall so bright? Switch to Wall Mode and click on the bottom Wall (# 7). | ||
[[File:Wall Light.png| | [[File:Wall Light.png|thumb|thumb|589x589px|center]] | ||
You will see that the Light value is '''31''' while the other walls are '''0.''' This means that the wall is brighter than the rest of the sector and that is why it looks so different. This is useful when you want people to pay attention to a particular wall in your mission. Very useful for signs and switches. Go ahead and change the '''Sector 's''' ('''Not''' the Walls) '''Ambient Light''' to 31, click '''Commit''' (F3) to save your change and lets continue with the next section. | You will see that the Light value is '''31''' while the other walls are '''0.''' This means that the wall is brighter than the rest of the sector and that is why it looks so different. This is useful when you want people to pay attention to a particular wall in your mission. Very useful for signs and switches. Go ahead and change the '''Sector 's''' ('''Not''' the Walls) '''Ambient Light''' to 31, click '''Commit''' (F3) to save your change and lets continue with the next section. | ||
| Line 80: | Line 80: | ||
==== Skies ==== | ==== Skies ==== | ||
Go to '''Room 3''' and you will see that it has a Sky Texture ceiling and a Water Floor. | Go to '''Room 3''' and you will see that it has a Sky Texture ceiling and a Water Floor. | ||
[[File:SkyWater.png| | [[File:SkyWater.png|thumb|thumb|800x800px|center]] | ||
To make the '''SKY''' - a sector must have the '''EXTERIOR''' flag turned on. | To make the '''SKY''' - a sector must have the '''EXTERIOR''' flag turned on. | ||
When you double click on '''Flag 1''' section of a sector you will see that Sky is enabled. | When you double click on '''Flag 1''' section of a sector you will see that Sky is enabled. | ||
[[File:SkyFlag.png| | [[File:SkyFlag.png|thumb|thumb|781x781px|center]] | ||
If you were to remove the '''Exterior''' flag (and save) the nice exterior effect will be gone and the Sector will have an ugly flat texture - or, in the original DF engine, a jumbled mess of pixels. | If you were to remove the '''Exterior''' flag (and save) the nice exterior effect will be gone and the Sector will have an ugly flat texture - or, in the original DF engine, a jumbled mess of pixels. | ||
[[File:SkyFlat.png| | [[File:SkyFlat.png|thumb|thumb|787x787px|center]] | ||
Go ahead and re-enable the sky, save and lets look at the water effect. | Go ahead and re-enable the sky, save and lets look at the water effect. | ||
| Line 93: | Line 93: | ||
Normally you have a '''Floor''' and '''Ceiling''' which are the vertical bounds of your sector. However, there is a third layer called '''Second Altitude''' as defined in the Sector Editor's properties. | Normally you have a '''Floor''' and '''Ceiling''' which are the vertical bounds of your sector. However, there is a third layer called '''Second Altitude''' as defined in the Sector Editor's properties. | ||
[[File:WaterSecondAlt.png| | [[File:WaterSecondAlt.png|thumb|thumb|768x768px|center]] | ||
A '''Second Altitude''' is an additional physical layer you can walk on. | A '''Second Altitude''' is an additional physical layer you can walk on. | ||
| Line 103: | Line 103: | ||
=== Basic Doors === | === Basic Doors === | ||
Lets look at the corridor just below '''Room 4 .''' This is our first door. | Lets look at the corridor just below '''Room 4 .''' This is our first door. | ||
[[File:FirstDoor.png| | [[File:FirstDoor.png|thumb|thumb|815x815px|center]] | ||
So how do we implement it? Lets take a look at the map editor. The first thing you see in the door sector is that it is colored '''yellow.''' it means that it has some logic to make it move or change states. | So how do we implement it? Lets take a look at the map editor. The first thing you see in the door sector is that it is colored '''yellow.''' it means that it has some logic to make it move or change states. | ||
[[File:FirstDoor2.png| | [[File:FirstDoor2.png|thumb|thumb|509x509px|center]] | ||
Click on the door in sector mode and lets see what makes it tick. Notice that '''Flag 1''' value is '''2.''' | Click on the door in sector mode and lets see what makes it tick. Notice that '''Flag 1''' value is '''2.''' | ||
[[File:FirstDoor3.png| | [[File:FirstDoor3.png|thumb|thumb|805x805px|center]] | ||
This means that this sector is marked as a '''door''' . This is a special basic case for a door. This type of flag-created door requires no scripting. All you need to do is mark the sector with the door flag and when you come near it it will '''automatically''' lift up when you press '''USE <Nudge>''' on it in the game. It will automatically play door whooosh sound and will close after a few seconds. The only thing done to make this sector a door in addition to changing the flag was to change the textures to something that looks like a door. | This means that this sector is marked as a '''door''' . This is a special basic case for a door. This type of flag-created door requires no scripting. All you need to do is mark the sector with the door flag and when you come near it it will '''automatically''' lift up when you press '''USE <Nudge>''' on it in the game. It will automatically play door whooosh sound and will close after a few seconds. The only thing done to make this sector a door in addition to changing the flag was to change the textures to something that looks like a door. | ||
When you are dealing with door textures, the ones you care about are the ones that belong to the '''adjoining''' walls. For a basic door you care about the '''TOP''' texture. Here you can see that the door texture '''ZDBIGDR4.BM''' is set as the top both from the corridor sector above and below it. Consider a door (opening upward) just as a sector whose ceiling is movable vertically, after being nudged by the player (or enemies looking for the player). | When you are dealing with door textures, the ones you care about are the ones that belong to the '''adjoining''' walls. For a basic door you care about the '''TOP''' texture. Here you can see that the door texture '''ZDBIGDR4.BM''' is set as the top both from the corridor sector above and below it. Consider a door (opening upward) just as a sector whose ceiling is movable vertically, after being nudged by the player (or enemies looking for the player). | ||
[[File:DoorTexture.png| | [[File:DoorTexture.png|thumb|thumb|889x889px|center]] | ||
Now lets try and make our own door. Lets look at the passageway between Rooms 4 and 5. | Now lets try and make our own door. Lets look at the passageway between Rooms 4 and 5. | ||
[[File:DoorPassage.png| | [[File:DoorPassage.png|thumb|thumb|762x762px|center]] | ||
Go ahead and switch to Wall Mode and '''Extrude''' one of the corridor walls just like you did before. This extruded sector will be our new door. | Go ahead and switch to Wall Mode and '''Extrude''' one of the corridor walls just like you did before. This extruded sector will be our new door. | ||
[[File:BasicDoor4.png| | [[File:BasicDoor4.png|thumb|thumb|764x764px|center]] | ||
Now align the left-most wall to the other side of the corridor and '''adjoin''' them like you did before. | Now align the left-most wall to the other side of the corridor and '''adjoin''' them like you did before. | ||
[[File:BasicDoor5.png| | [[File:BasicDoor5.png|thumb|thumb|744x744px|center]] | ||
You should now see a passageway consisting of three sectors. Looks like this. | You should now see a passageway consisting of three sectors. Looks like this. | ||
[[File:BasicDoor6.png| | [[File:BasicDoor6.png|thumb|thumb|749x749px|center]] | ||
Select the middle sector and change the Flag 1 section to 2 ('''Door''') and Save. | Select the middle sector and change the Flag 1 section to 2 ('''Door''') and Save. | ||
[[File:BaiscDoor7.png| | [[File:BaiscDoor7.png|thumb|thumb|785x785px|center]] | ||
When you do that, you will see that the door changes color to yellow and also that the passage is blocked off in the renderer. Also notice that the height of the corridor is '''16''' - you will need this later for texturing! | When you do that, you will see that the door changes color to yellow and also that the passage is blocked off in the renderer. Also notice that the height of the corridor is '''16''' - you will need this later for texturing! | ||
[[File:BasicDoor7.png| | [[File:BasicDoor7.png|thumb|thumb|788x788px|center]] | ||
This means that you've created your first door! Now we just need to give it a texture. Click on the walls of the sectors to the '''left''' and '''right''' of the door. Do '''NOT''' click on the walls of the door sector itself. You will never see them. | This means that you've created your first door! Now we just need to give it a texture. Click on the walls of the sectors to the '''left''' and '''right''' of the door. Do '''NOT''' click on the walls of the door sector itself. You will never see them. | ||
[[File:BasicDoor8.png| | [[File:BasicDoor8.png|thumb|thumb|783x783px|center]] | ||
Now double click on the '''Top Texture Name''' of the Wall and choose something that looks good. Remember you want something that fits the height of the corridor which is 16 units in size. | Now double click on the '''Top Texture Name''' of the Wall and choose something that looks good. Remember you want something that fits the height of the corridor which is 16 units in size. | ||
[[File:BasicDoor9.png| | [[File:BasicDoor9.png|thumb|thumb|753x753px|center]] | ||
How about '''ZDBIGDR1.BM''' ? in the top right section you will see that '''Size Y''' is 128 pixels and '''16''' Dark Forces Units in height. Click the green Commit button of the Texture Resource Viewer and then click the green button to commit the texture changes for the wall. | How about '''ZDBIGDR1.BM''' ? in the top right section you will see that '''Size Y''' is 128 pixels and '''16''' Dark Forces Units in height. Click the green Commit button of the Texture Resource Viewer and then click the green button to commit the texture changes for the wall. | ||
[[File:BasicDoor10.png| | [[File:BasicDoor10.png|thumb|thumb|766x766px|center]] | ||
Hey that looks much better! Make sure you do that the other side of the door. When you are done GOB your mission and make sure the door actually opens! | Hey that looks much better! Make sure you do that the other side of the door. When you are done GOB your mission and make sure the door actually opens! | ||
Latest revision as of 14:12, 18 March 2024
Combining Sectors
Now that you've learned about the properties of Dark Forces components we can start learning how to adjoin or combine them together. Switch to Wall Mode and continue below.
Important: For this section please open the 3D Renderer by clicking the red button at the top or pressing F7 .
Adjoins
An Adjoin is the connection between two sectors. You adjoin a Wall of one sector to a Wall in another sector. The walls must have identical coordinates of their Left and Right Vertices. Take a look at the adjoin between the STARTSECTOR (Sector 0) room and the hallway .
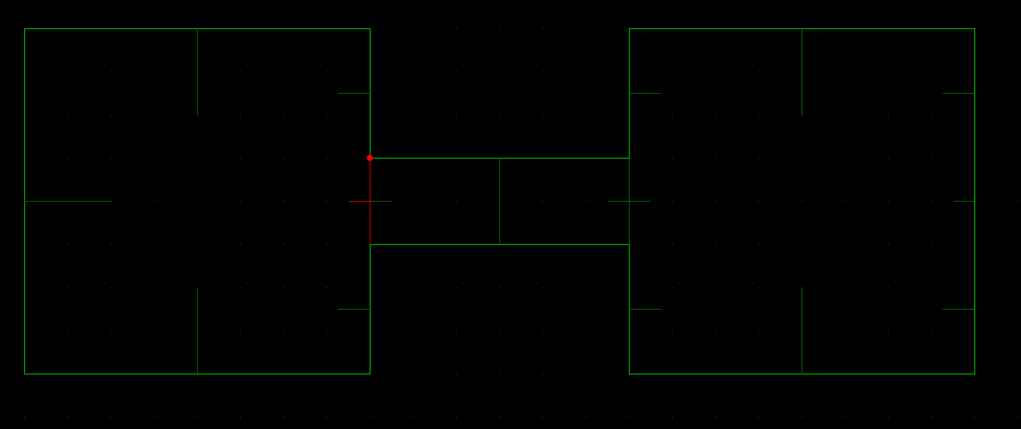
Notice the color of the adjoined walls is slightly darker shade of green than the solid walls of the sectors. Click on the adjoined wall of the sector.
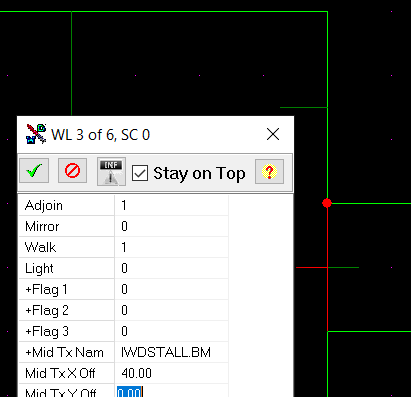
You will see that you are looking at Wall 3 of Sector 0 (WL3 and SC 0 at the top bar).
Notice that the value of Adjoin is 1. It means that this wall connects to Sector # 1. The Mirror's value is 0 which means that this wall connects to Wall 0 of Sector 1.
Here is how it looks like in the 3D Renderer.
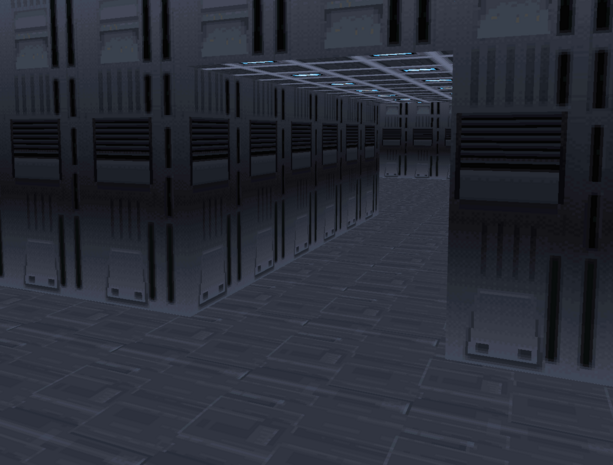
Now click on the wall inside the tunnel (or press F to instantly jump to the Mirrored wall).
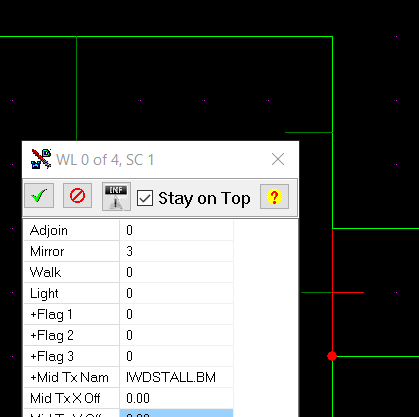
Now you are looking Wall 0 of Sector 1 (WL0 and SC 1 at the top)
From the point of view of Sector 1's Wall 0 the adjoin is to Sector 0 while the Mirror is to Wall 3. Which means that Sector 0 Wall 3 connect to Sector 1 Wall 0.
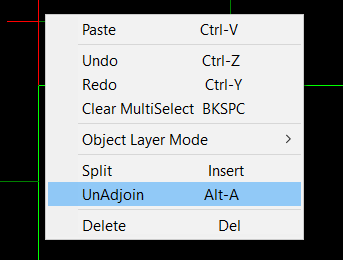
Now lets see what happens when you remove the adjoin or unadjoin the two walls. Go ahead and right click on the wall and choose UnAdjoin ( or press ALT-A).
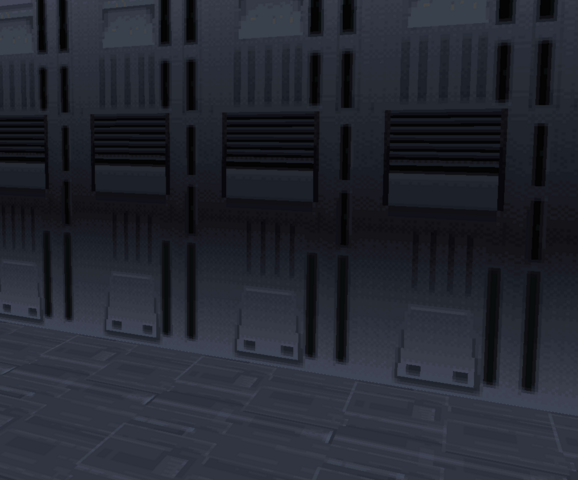
When you do that you will see that the wall is gone in the Renderer.
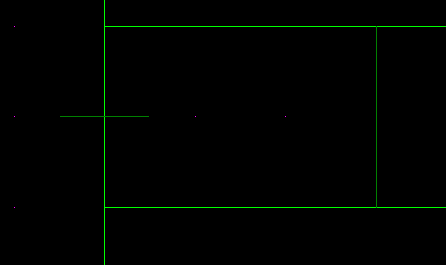
Notice that the colors turn to solid green and the walls are no longer connected! This means you cannot go through them anymore in the game.
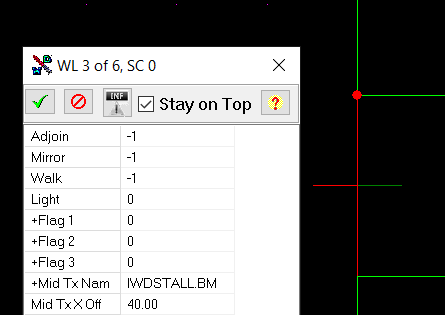
If you select one of the formerly-adjoined walls, you will see that the value of Adjoin and Mirror is -1 (or no adjoin connections).
Go ahead no and re-adjoin the wall and we will continue in the tutorial. you can either right click on the wall and choose Adjoin or press Alt-A again.
Extruding a Wall
Now that you know how adjoins walls lets talk about connecting two sectors together. Move the map to the empty passage between Room 1 (Sector 2) and Room 2 (Sector 3). While in Sector Mode select Wall 5 of the sector on the left.
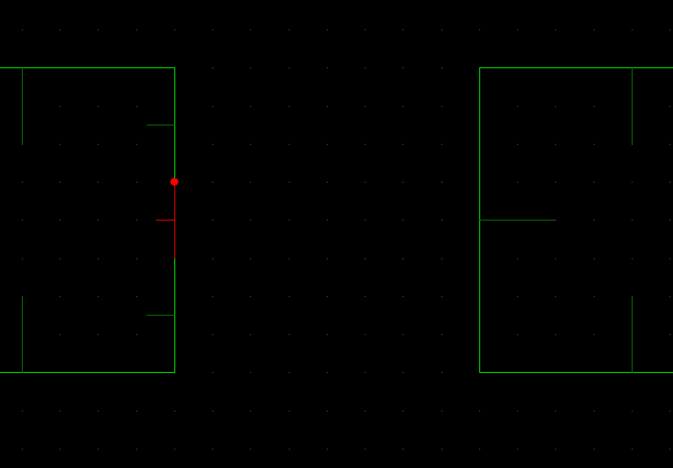
We will use this wall to make a passage from Room 1 to Room 2 . To do that, we will Extrude the wall and create a new sector starting from that location. Go ahead and right click on the wall and choose Extrude (or press E) .
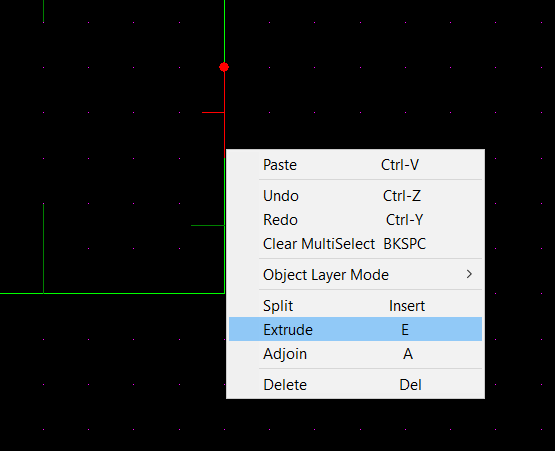
If you get a popup asking you to confirm the extrusion choose Yes.
You will see a new sector is created where the wall is located. This sector will be our new corridor to the sector on the right. From this point we will reference this new extruded sector as the "corridor".
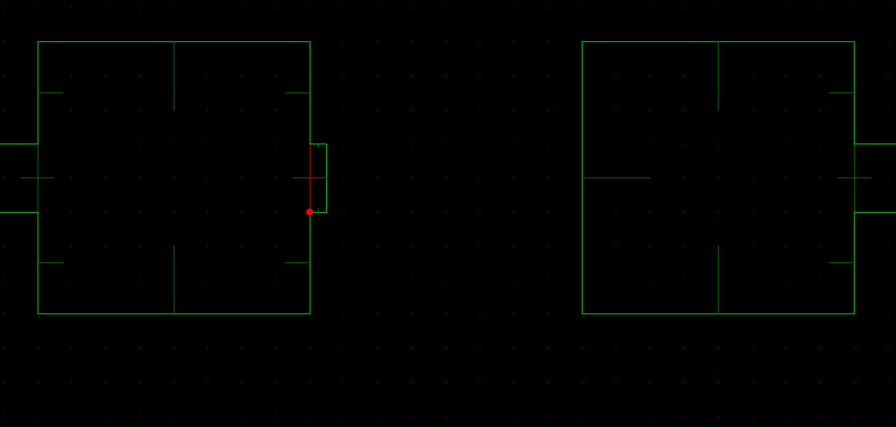
Now drag (with CTRL) the wall of the new sector close to the rightmost sector. You may want to zoom-in (mousewheel) to see clearer.
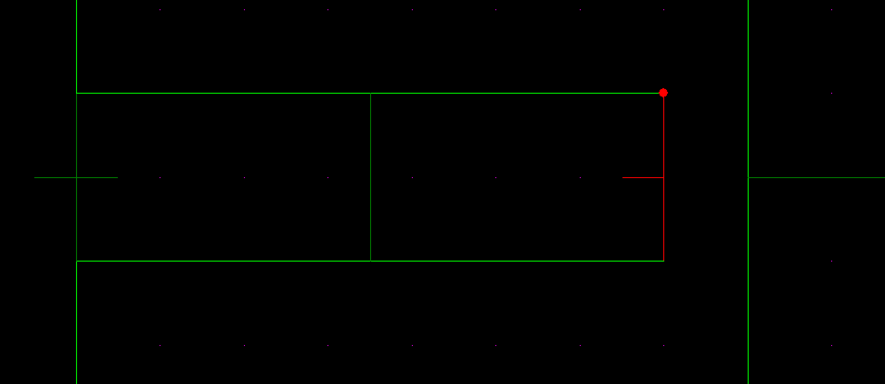
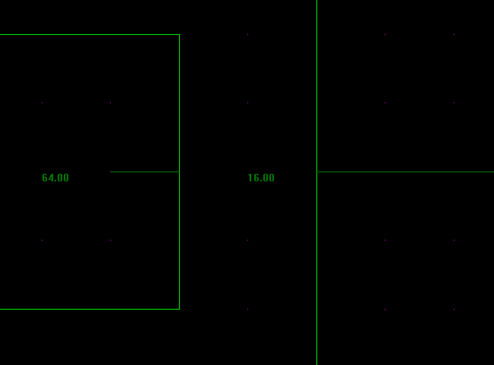
Remember that to adjoin this new sector to the corridor we must have a wall that has exactly the same vertex dimensions as the other wall. Therefore we must first make a wall on the other side. Make sure the grid is turned on (G button) and that you are have Wall Lengths turned on (L button).
Notice that the length of the wall must be 16 Dark Forces units in size.
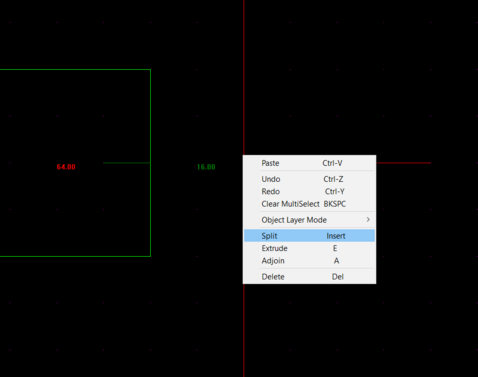
Select Wall 0 of the sector Room 2, right click on it and choose Split.
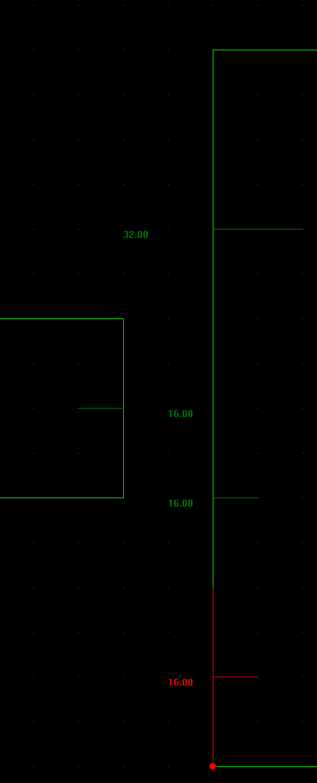
Do that two times so the long wall is now split into three pieces!
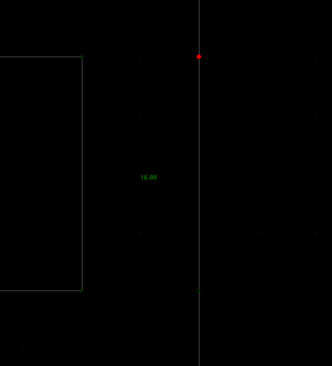
Now switch to Vertex mode and align Room 2's vertices so they are directly opposite the extruded corridor. Do that by moving the vertices using CTRL button.
Good! You now have a wall that has exactly the same length (16) as the corridor wall. Now move the corridor vertices and align them over Room 2's vertices. It should look like this.
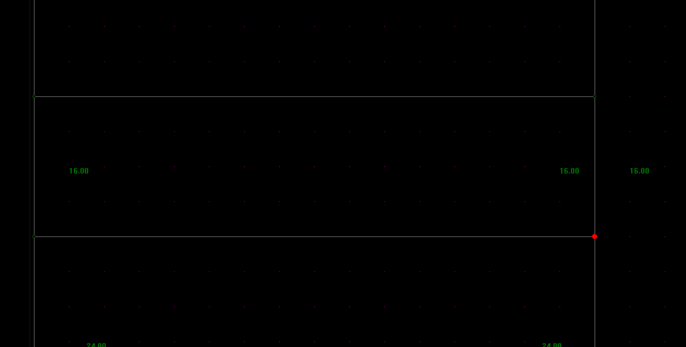
Now switch back to Wall Mode, select the right most Wall and Adjoin it.
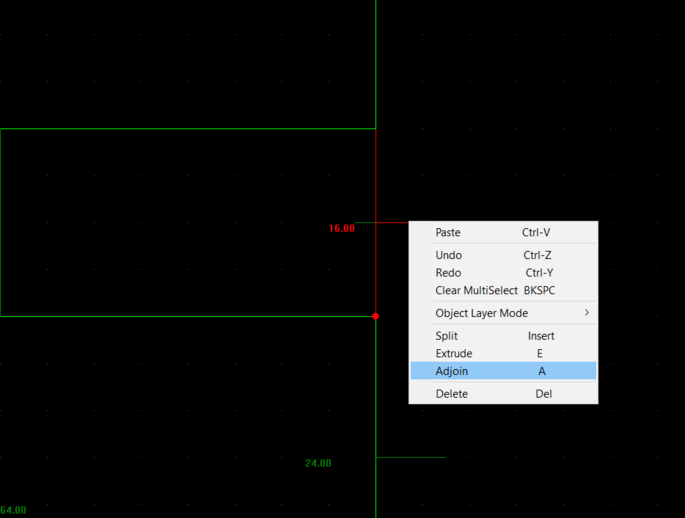
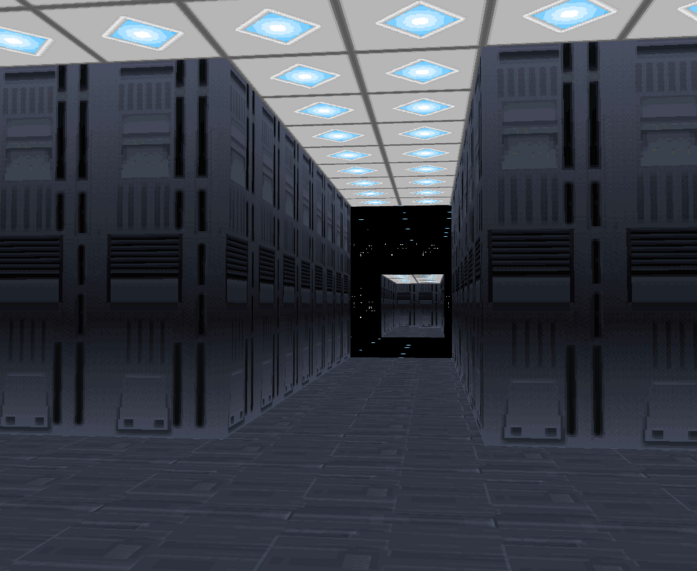
Great, now you've learned how to connect sectors together with passageways. Remember, it's all about aligning the Vertices and then adjoining the Walls ! You can see that there is now a passageway between Room 1 and Room 2 in the renderer.
Lighting
Go ahead and GOB (CTRL-G) your mission and launch it in Dark Forces. Run towards Room 2 and look around.
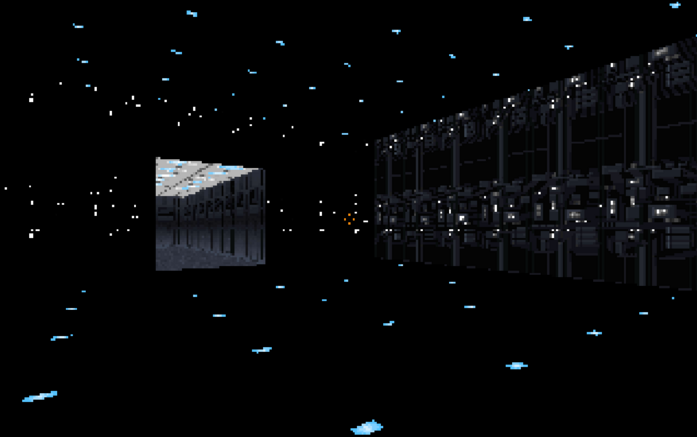
Notice how dark it is... well except the southern wall. It looks much brighter than the rest. What is going on?
Exit the game and go back to the editor.
In Sector Mode, look at Room 2's Ambient Light value. Zero means it is as dark as possible. While 31 means it will be the brightest possible.
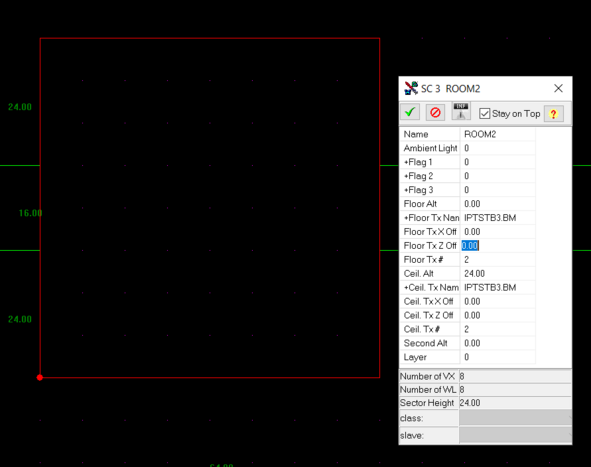
Ok that explains why the whole sector is dark... but why is the wall so bright? Switch to Wall Mode and click on the bottom Wall (# 7).
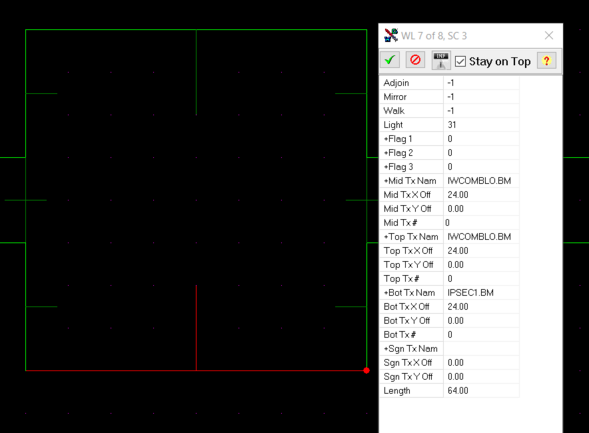
You will see that the Light value is 31 while the other walls are 0. This means that the wall is brighter than the rest of the sector and that is why it looks so different. This is useful when you want people to pay attention to a particular wall in your mission. Very useful for signs and switches. Go ahead and change the Sector 's (Not the Walls) Ambient Light to 31, click Commit (F3) to save your change and lets continue with the next section.
Water Effects and Skies
Skies
Go to Room 3 and you will see that it has a Sky Texture ceiling and a Water Floor.
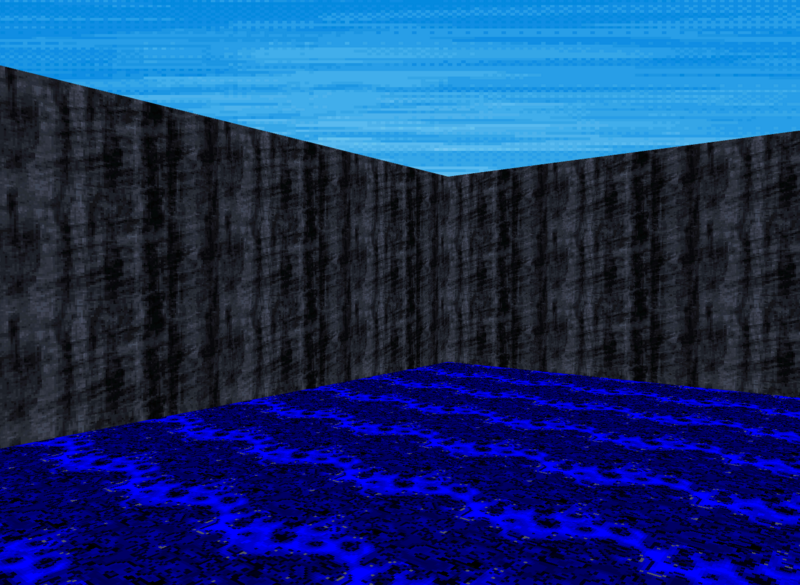
To make the SKY - a sector must have the EXTERIOR flag turned on.
When you double click on Flag 1 section of a sector you will see that Sky is enabled.
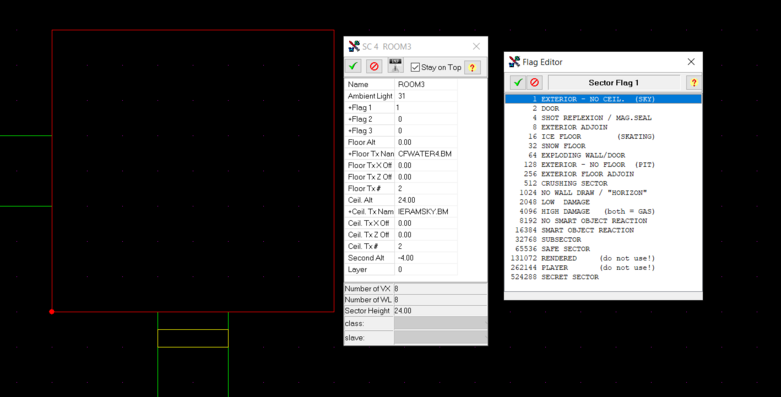
If you were to remove the Exterior flag (and save) the nice exterior effect will be gone and the Sector will have an ugly flat texture - or, in the original DF engine, a jumbled mess of pixels.
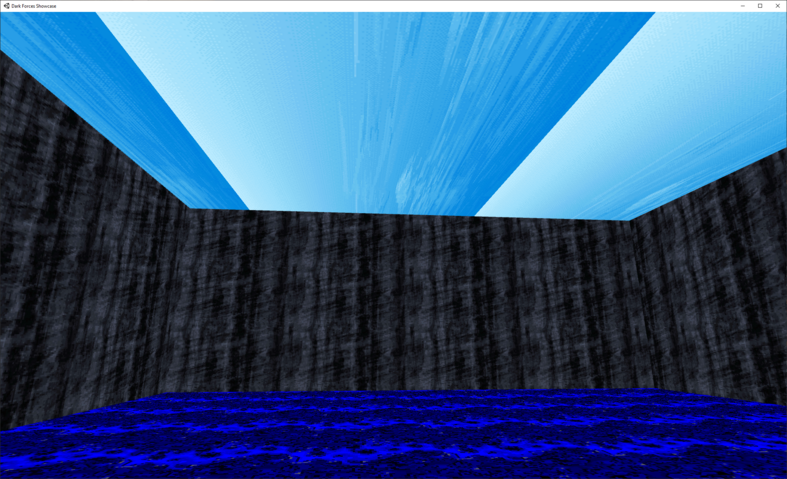
Go ahead and re-enable the sky, save and lets look at the water effect.
Water
Anyone can put a water texture on the floor but you need to add one more step to make sure you walk through the texture and hear a water effect splashing sound.
Normally you have a Floor and Ceiling which are the vertical bounds of your sector. However, there is a third layer called Second Altitude as defined in the Sector Editor's properties.
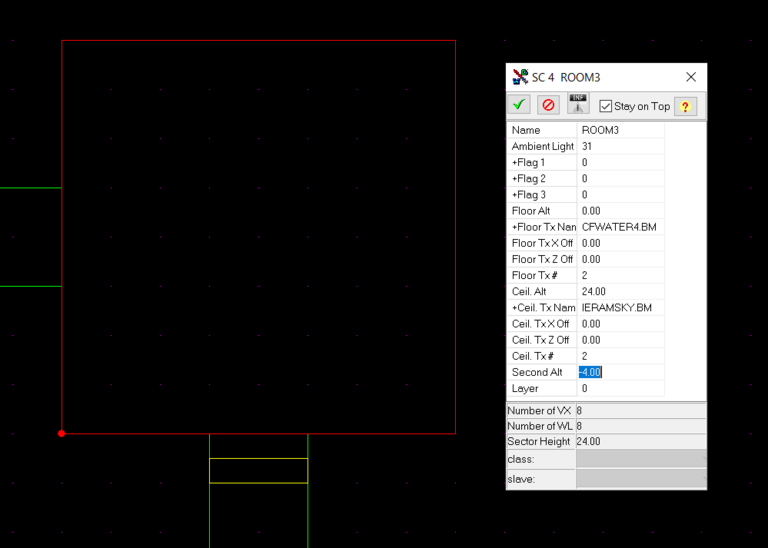
A Second Altitude is an additional physical layer you can walk on.
- If the second altitude is above the floor you will be able to stand above the floor. Example of that is the bridge near the start of Research Facility or the moving platform in Detention Center.
- If the second altitude is below the floor then the game assumes you are simulating a water sector and will play the water audio effects. It is recommended to set the value of the water to -4.00 as it is the ideal height for Kyle. Even if you set it extremely deep, Kyle will not be able to submerge!
What happens if you remove the Second Altitude parameter? Try making it zero and GOB and test your mission. When you play the mission you will see that you are walking on the water just like a regular floor and there are no water sound effects.
Basic Doors
Lets look at the corridor just below Room 4 . This is our first door.
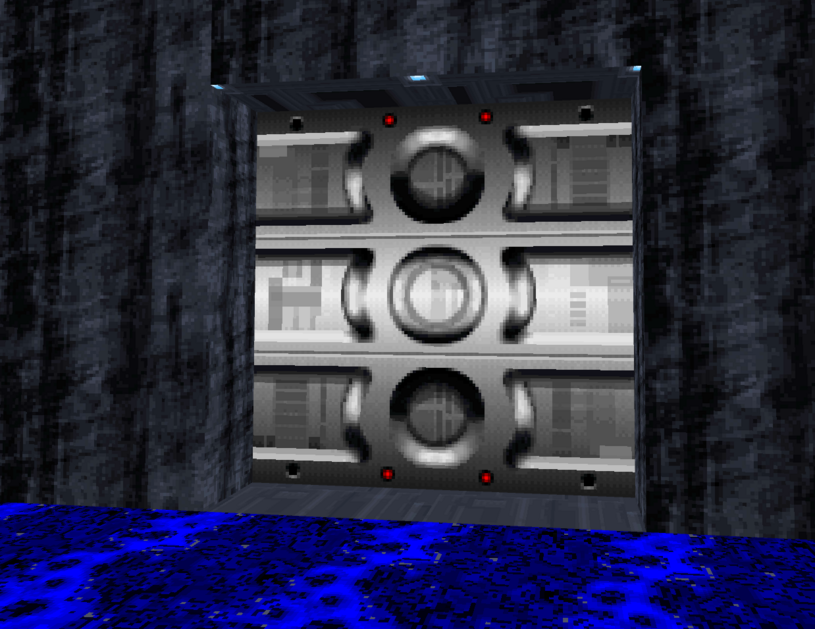
So how do we implement it? Lets take a look at the map editor. The first thing you see in the door sector is that it is colored yellow. it means that it has some logic to make it move or change states.
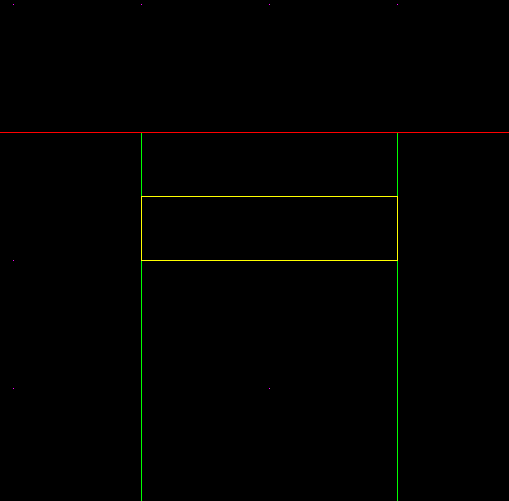
Click on the door in sector mode and lets see what makes it tick. Notice that Flag 1 value is 2.
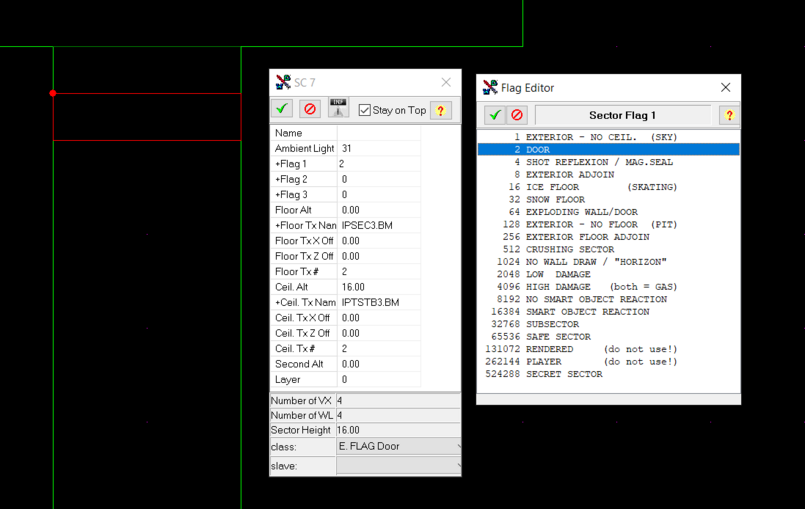
This means that this sector is marked as a door . This is a special basic case for a door. This type of flag-created door requires no scripting. All you need to do is mark the sector with the door flag and when you come near it it will automatically lift up when you press USE <Nudge> on it in the game. It will automatically play door whooosh sound and will close after a few seconds. The only thing done to make this sector a door in addition to changing the flag was to change the textures to something that looks like a door.
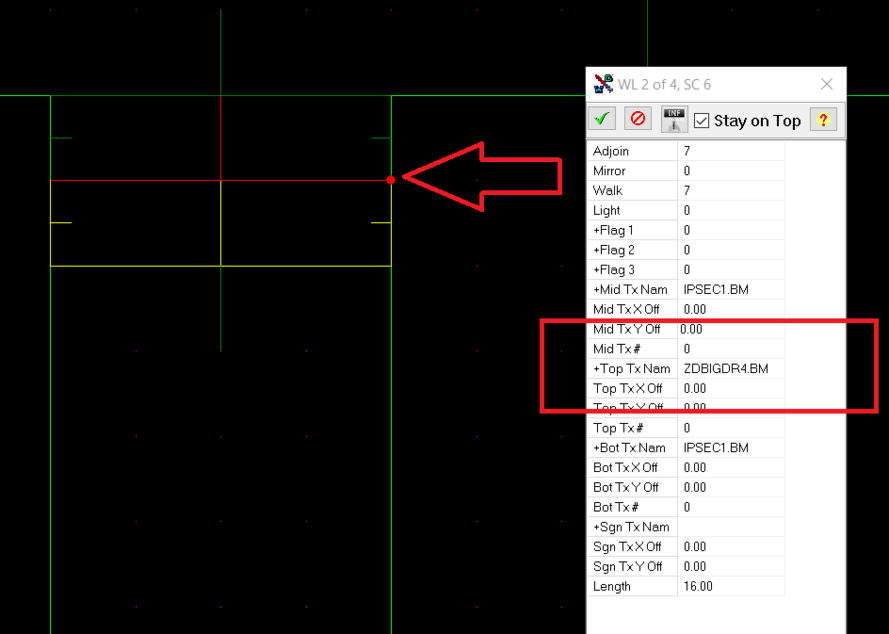
When you are dealing with door textures, the ones you care about are the ones that belong to the adjoining walls. For a basic door you care about the TOP texture. Here you can see that the door texture ZDBIGDR4.BM is set as the top both from the corridor sector above and below it. Consider a door (opening upward) just as a sector whose ceiling is movable vertically, after being nudged by the player (or enemies looking for the player).
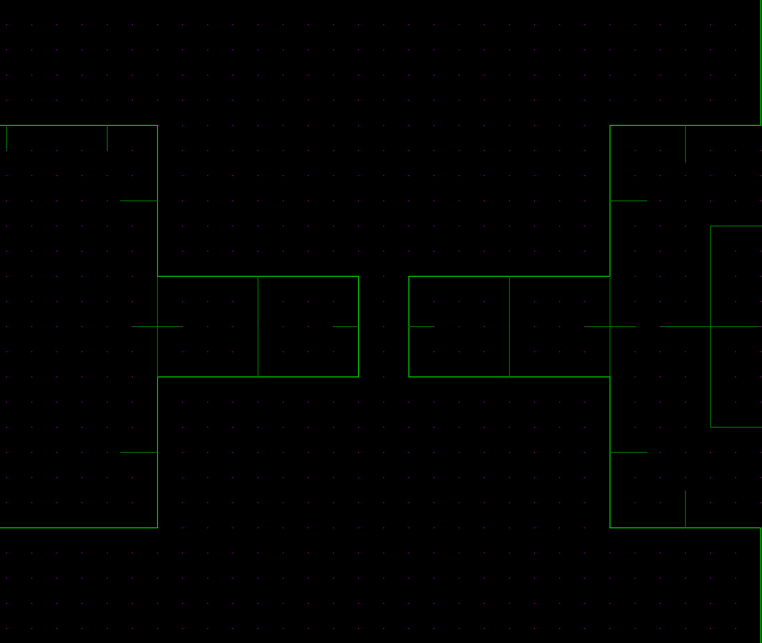
Now lets try and make our own door. Lets look at the passageway between Rooms 4 and 5.
Go ahead and switch to Wall Mode and Extrude one of the corridor walls just like you did before. This extruded sector will be our new door.
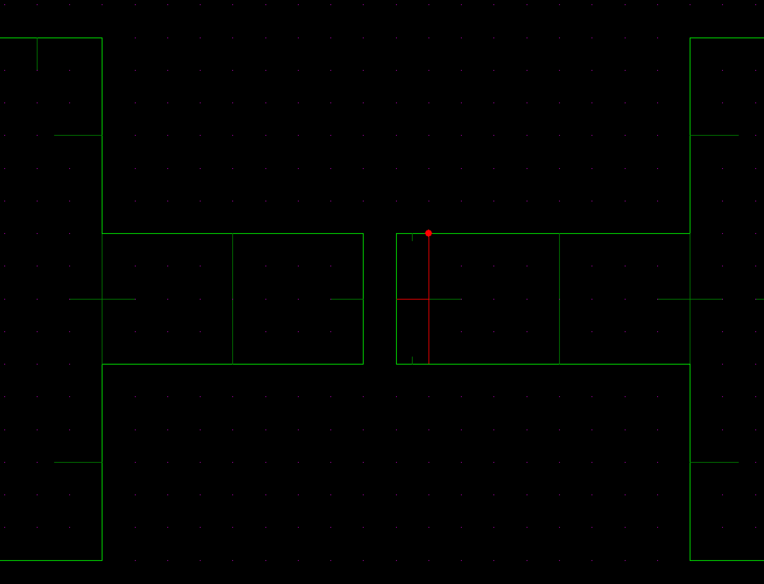
Now align the left-most wall to the other side of the corridor and adjoin them like you did before.
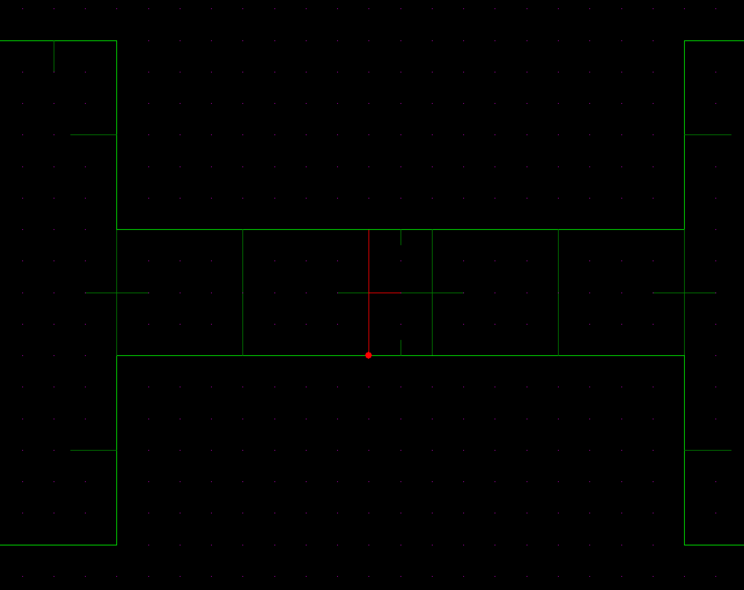
You should now see a passageway consisting of three sectors. Looks like this.
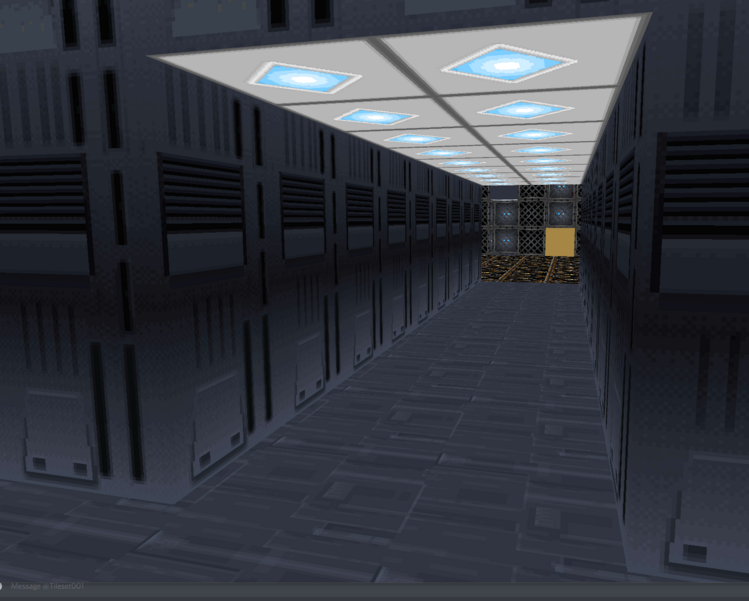
Select the middle sector and change the Flag 1 section to 2 (Door) and Save.
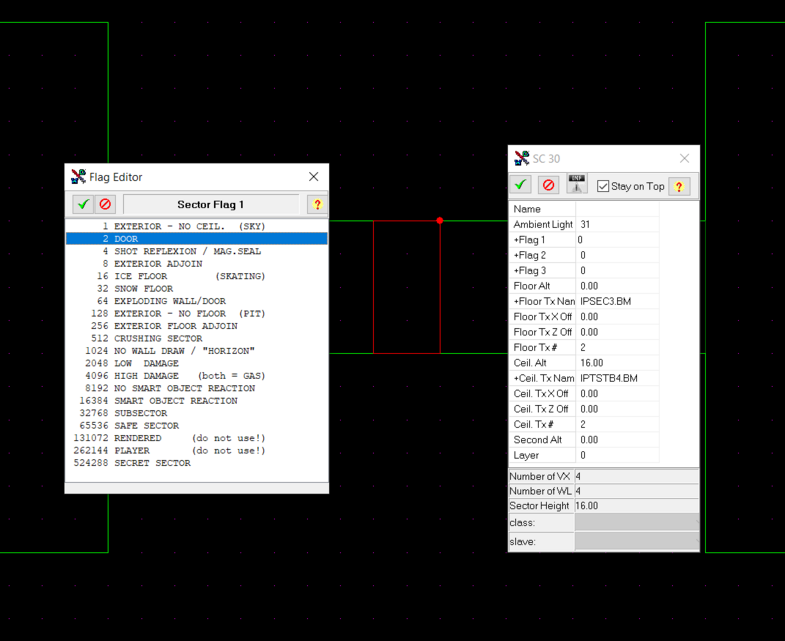
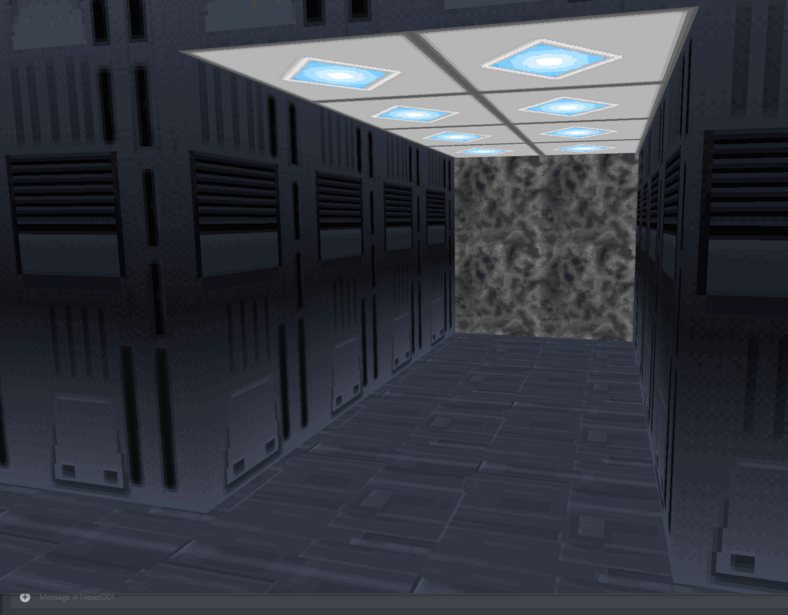
When you do that, you will see that the door changes color to yellow and also that the passage is blocked off in the renderer. Also notice that the height of the corridor is 16 - you will need this later for texturing!
This means that you've created your first door! Now we just need to give it a texture. Click on the walls of the sectors to the left and right of the door. Do NOT click on the walls of the door sector itself. You will never see them.
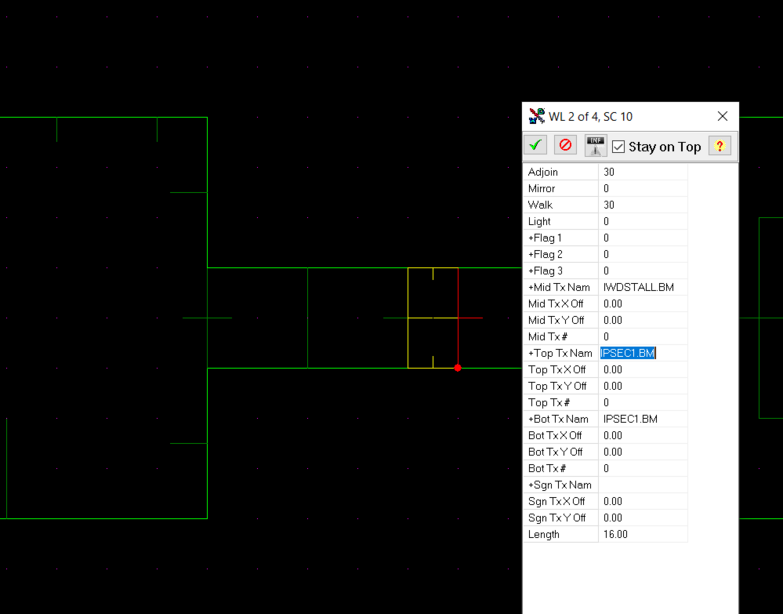
Now double click on the Top Texture Name of the Wall and choose something that looks good. Remember you want something that fits the height of the corridor which is 16 units in size.
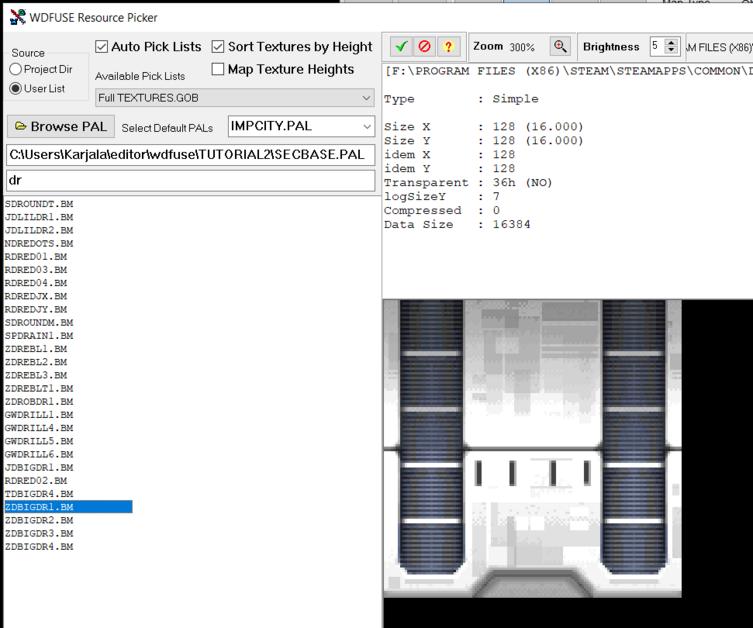
How about ZDBIGDR1.BM ? in the top right section you will see that Size Y is 128 pixels and 16 Dark Forces Units in height. Click the green Commit button of the Texture Resource Viewer and then click the green button to commit the texture changes for the wall.
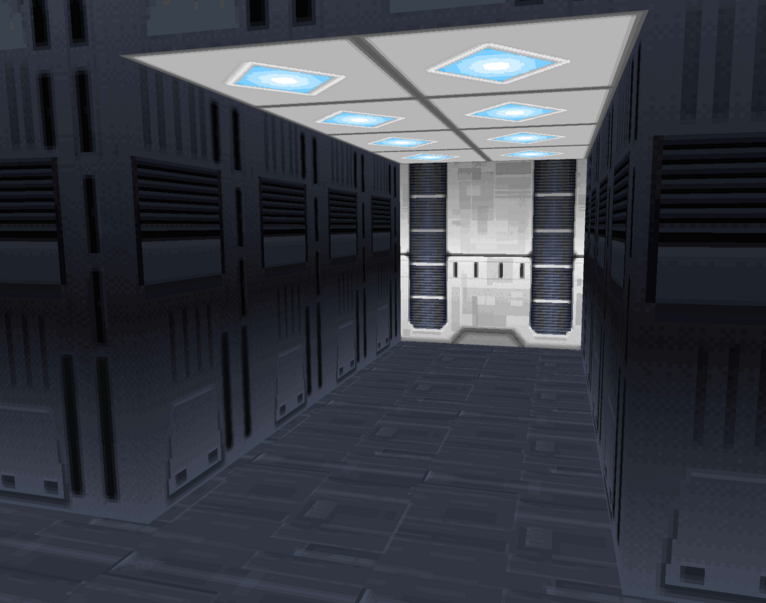
Hey that looks much better! Make sure you do that the other side of the door. When you are done GOB your mission and make sure the door actually opens!
Now you can continue to Advanced Geometry III page here.
WDFUSE Tutorials
- Introduction
- WDFUSE Tutorial - Configuration
- WDFUSE Tutorial - Basic Geometry
- WDFUSE Tutorial - Basic Geometry II
- WDFUSE Tutorial - 3D Renderer
- WDFUSE Tutorial - Advanced Geometry
- WDFUSE Tutorial - Advanced Geometry II
- WDFUSE Tutorial - Advanced Geometry III
- WDFUSE Tutorial - Objects
- WDFUSE Tutorial - Scripting
- WDFUSE Tutorial - Scripting II
- WDFUSE Tutorial - Scripting III