No edit summary |
No edit summary |
||
| Line 4: | Line 4: | ||
=== Adding Map Components === | === Adding Map Components === | ||
To add a new components (Remember: They are ''Sectors/Walls/Vertices/Objects'' - or '''SWVO''') simply select it by clicking on it (it will turn red) and press the '''Insert''' button (To the right of the Backspace key). Do it now while selecting the sector. A new Sector will appear where your mouse pointer is located . | To add a new components (Remember: They are ''Sectors/Walls/Vertices/Objects'' - or '''SWVO''') simply select it by clicking on it (it will turn red) and press the '''Insert''' button (To the right of the Backspace key). Do it now while selecting the sector. A new Sector will appear where your mouse pointer is located . | ||
[[File:Insert Sector.png| | [[File:Insert Sector.png|thumb|thumb|535x535px|center]] | ||
Additionally, you can '''Right Click''' on the map to bring up the Pop-Up menu and choose '''Duplicate.''' It's the same thing as pressing insert. | Additionally, you can '''Right Click''' on the map to bring up the Pop-Up menu and choose '''Duplicate.''' It's the same thing as pressing insert. | ||
[[File:PopUpInsert.png| | [[File:PopUpInsert.png|thumb|thumb|523x523px|center]] | ||
| Line 12: | Line 12: | ||
Now switch to the '''Wall Mode''' and hover over any of the Sector's walls. Press '''Insert''' and the wall will be '''split''' in two. You will get a pop-up confirming that you want to split the wall. Choose '''Yes.''' | Now switch to the '''Wall Mode''' and hover over any of the Sector's walls. Press '''Insert''' and the wall will be '''split''' in two. You will get a pop-up confirming that you want to split the wall. Choose '''Yes.''' | ||
[[File:SplitWall.png| | [[File:SplitWall.png|thumb|thumb|518x518px|center]] | ||
The sector will have now have five walls and 5 vertices. You can move the new wall around (with '''CTRL''' ) just like any other component. | The sector will have now have five walls and 5 vertices. You can move the new wall around (with '''CTRL''' ) just like any other component. | ||
[[File:FiveWallInsert.png| | [[File:FiveWallInsert.png|thumb|thumb|419x419px|center]] | ||
Just like the sectors you can '''Right-Click''' and choose '''Split-Wall''' to split the wall instead of pressing the insert button. | Just like the sectors you can '''Right-Click''' and choose '''Split-Wall''' to split the wall instead of pressing the insert button. | ||
[[File:PopUpSplit.png| | [[File:PopUpSplit.png|thumb|thumb|425x425px|center]] | ||
If you switch to '''Vertex Mode''' and press '''Insert''' you will be greeted with the same split-wall pop-up confirmation as in the Wall Mode. This is because for every new wall you create a new vertex will also be made and vice-versa. You can also insert more vertices by choosing the duplicate from the right-click menu. Once created, you should be able to move it around with '''CTLR''' button. | If you switch to '''Vertex Mode''' and press '''Insert''' you will be greeted with the same split-wall pop-up confirmation as in the Wall Mode. This is because for every new wall you create a new vertex will also be made and vice-versa. You can also insert more vertices by choosing the duplicate from the right-click menu. Once created, you should be able to move it around with '''CTLR''' button. | ||
[[File:VertexSplit.png| | [[File:VertexSplit.png|thumb|thumb|418x418px|center]] | ||
One more thing about Vertices. If you hold '''CTRL''' button and left click while in Vertex Mode you can add additional vertices without pressing the '''Insert''' button. It's a quick way to add them if you want to draw a particular shape. | One more thing about Vertices. If you hold '''CTRL''' button and left click while in Vertex Mode you can add additional vertices without pressing the '''Insert''' button. It's a quick way to add them if you want to draw a particular shape. | ||
Finally, In '''Object Mode,''' you can create more objects by pressing the '''Insert''' button and just like the rest you will get an exact duplicate of the original object, at the position where you were pointing to with your mouse at that very moment. | Finally, In '''Object Mode,''' you can create more objects by pressing the '''Insert''' button and just like the rest you will get an exact duplicate of the original object, at the position where you were pointing to with your mouse at that very moment. | ||
[[File:InsertObject.png| | [[File:InsertObject.png|thumb|thumb|413x413px|center]] | ||
=== Deleting Map Components === | === Deleting Map Components === | ||
To delete a map component in any map mode, simply press the '''Delete''' key underneath the '''Insert''' key. You will get a prompt to confirm you want to delete the component. | To delete a map component in any map mode, simply press the '''Delete''' key underneath the '''Insert''' key. You will get a prompt to confirm you want to delete the component. | ||
[[File:Delete Confirm.png| | [[File:Delete Confirm.png|thumb|thumb|316x316px|center]] | ||
You can also delete a component by '''Right-Clicking''' on the map and choosing '''Delete''' from the pop-up menu. | You can also delete a component by '''Right-Clicking''' on the map and choosing '''Delete''' from the pop-up menu. | ||
[[File:Delete PopUp.png| | [[File:Delete PopUp.png|thumb|thumb|338x338px|center]] | ||
If you ever make a mistake and delete something important, don't forget you can '''Undo''' an action by holding '''CTRL''' and pressing '''Z''' or bringing up the pop-up menu (by right clicking) and choosing '''Undo'''. | If you ever make a mistake and delete something important, don't forget you can '''Undo''' an action by holding '''CTRL''' and pressing '''Z''' or bringing up the pop-up menu (by right clicking) and choosing '''Undo'''. | ||
[[File:Undo-Redo.png| | [[File:Undo-Redo.png|thumb|thumb|309x309px|center]] | ||
=== Selecting Multiple Components === | === Selecting Multiple Components === | ||
| Line 43: | Line 43: | ||
To select more than one component hold '''Shift''' and '''Left-click''' on the item in question. Try clicking on multiple sectors holding Shift. | To select more than one component hold '''Shift''' and '''Left-click''' on the item in question. Try clicking on multiple sectors holding Shift. | ||
[[File:MultiSelect.png| | [[File:MultiSelect.png|thumb|thumb|436x436px|center]] | ||
Here you can see that there are multiple sectors selected because their color changed. Items that are multi-selected will turn W'''hite''' in color. You can remove items from the multi-selection by left-clicking the selected component again. And if you ever want to clear your multi-selection completely simply press the '''Backspace''' key. You can also bring up the pop-up menu and choose '''Clear Multiselection''' option. | Here you can see that there are multiple sectors selected because their color changed. Items that are multi-selected will turn W'''hite''' in color. You can remove items from the multi-selection by left-clicking the selected component again. And if you ever want to clear your multi-selection completely simply press the '''Backspace''' key. You can also bring up the pop-up menu and choose '''Clear Multiselection''' option. | ||
| Line 55: | Line 55: | ||
If you hold '''ALT''' you will create a white selection rectangle with which you can cover multiple map components. | If you hold '''ALT''' you will create a white selection rectangle with which you can cover multiple map components. | ||
[[File:Alt Select.png| | [[File:Alt Select.png|thumb|thumb|553x553px|center]] | ||
Here you can see the white dotted rectangle. When you let go, all the sectors will be selected. | Here you can see the white dotted rectangle. When you let go, all the sectors will be selected. | ||
=== Copying and Pasting === | === Copying and Pasting === | ||
Another way you can add components to your mission is by using '''Copy''' and '''Paste'''. To do that select any component, hold '''CTRL''' and then press '''C''' to store the item in memory and then hold '''Ctrl''' and press '''V''' to paste it anywhere on the map. You can also bring up the pop-up menu and choose Copy/Paste options. | Another way you can add components to your mission is by using '''Copy''' and '''Paste'''. To do that select any component, hold '''CTRL''' and then press '''C''' to store the item in memory and then hold '''Ctrl''' and press '''V''' to paste it anywhere on the map. You can also bring up the pop-up menu and choose Copy/Paste options. | ||
[[File:Copy-Paste.png| | [[File:Copy-Paste.png|thumb|thumb|363x363px|center]] | ||
This will work with multi-selected items and will even work between different instances of WDFUSE. So you can have two WDFUSE editor open at a time, copy a sector from the first one and be able to paste it into your own map. What's more - you can have a friend copy their own sector, paste the text representation of it (from Clipboard) and send it to you by email or chat. You can then select the text, copy it and then paste it into your map! | This will work with multi-selected items and will even work between different instances of WDFUSE. So you can have two WDFUSE editor open at a time, copy a sector from the first one and be able to paste it into your own map. What's more - you can have a friend copy their own sector, paste the text representation of it (from Clipboard) and send it to you by email or chat. You can then select the text, copy it and then paste it into your map! | ||
=== Sector Pop-Up Operations === | === Sector Pop-Up Operations === | ||
When you '''Right Click''' on the sector you will get a popup with various options. Many are self-explanatory but we will concentrate on '''Rotate, Flip''' and '''Stitch.''' | When you '''Right Click''' on the sector you will get a popup with various options. Many are self-explanatory but we will concentrate on '''Rotate, Flip''' and '''Stitch.''' | ||
[[File:SectorOps.png| | [[File:SectorOps.png|thumb|thumb|423x423px|center]] | ||
==== Rotate ==== | ==== Rotate ==== | ||
You can rotate a sector by 10, 45 or 90 degrees as well as the inverse of those numbers by selecting the rotation values from the pop-up menu. | You can rotate a sector by 10, 45 or 90 degrees as well as the inverse of those numbers by selecting the rotation values from the pop-up menu. | ||
[[File:RotateMenuOne.png| | [[File:RotateMenuOne.png|thumb|thumb|379x379px|center]] | ||
Here the square sector now was turned 45 degrees. | Here the square sector now was turned 45 degrees. | ||
[[File:Rotate1.png| | [[File:Rotate1.png|thumb|thumb|391x391px|center]] | ||
You can also use the hotkeys '''Shift+Up''' or '''Shift+Down''' to move a sector (or sectors) by 10 degrees or '''Shift+Left''' and '''Shift+Right''' to rotate a sector by 90 degrees. | You can also use the hotkeys '''Shift+Up''' or '''Shift+Down''' to move a sector (or sectors) by 10 degrees or '''Shift+Left''' and '''Shift+Right''' to rotate a sector by 90 degrees. | ||
==== Flip ==== | ==== Flip ==== | ||
You can flip a sector horizontally (X axis) or vertically (Z axis) from the pop-up menu. | You can flip a sector horizontally (X axis) or vertically (Z axis) from the pop-up menu. | ||
[[File:Flip1.png| | [[File:Flip1.png|thumb|thumb|517x517px|center]] | ||
You can see that the sector was flipped. | You can see that the sector was flipped. | ||
[[File:Flip2.png| | [[File:Flip2.png|thumb|thumb|353x353px|center]] | ||
You can also flip a sector with '''ALT+Left''' or '''ALT+Right''' hotkeys. | You can also flip a sector with '''ALT+Left''' or '''ALT+Right''' hotkeys. | ||
==== Scale ==== | ==== Scale ==== | ||
You can also scale the size of your sectors. You can make them bigger or smaller from the pop-up menu. (There are more advanced options allowing you to scale with any desired factor - but here the two most common are offered.) | You can also scale the size of your sectors. You can make them bigger or smaller from the pop-up menu. (There are more advanced options allowing you to scale with any desired factor - but here the two most common are offered.) | ||
[[File:Scale1.png| | [[File:Scale1.png|thumb|thumb|540x540px|center]] | ||
You can also use the hotkey '''ALT+Up''' or '''ALT+Down''' hotkeys. | You can also use the hotkey '''ALT+Up''' or '''ALT+Down''' hotkeys. | ||
Latest revision as of 14:11, 18 March 2024
Basic Operations and Modifying Geometry
While square sectors may be fun you may want to vary your geometry in your custom missions. Here we will talk about ways to add, remove and alter map components to suit your needs. Lets switch back to Sector Mode.
Adding Map Components
To add a new components (Remember: They are Sectors/Walls/Vertices/Objects - or SWVO) simply select it by clicking on it (it will turn red) and press the Insert button (To the right of the Backspace key). Do it now while selecting the sector. A new Sector will appear where your mouse pointer is located .
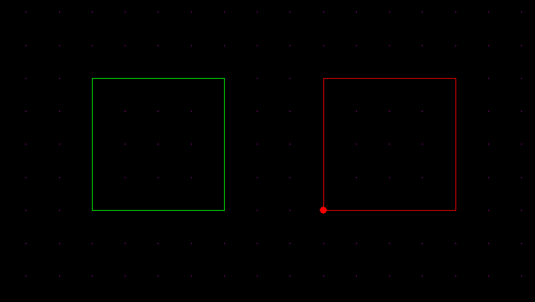
Additionally, you can Right Click on the map to bring up the Pop-Up menu and choose Duplicate. It's the same thing as pressing insert.
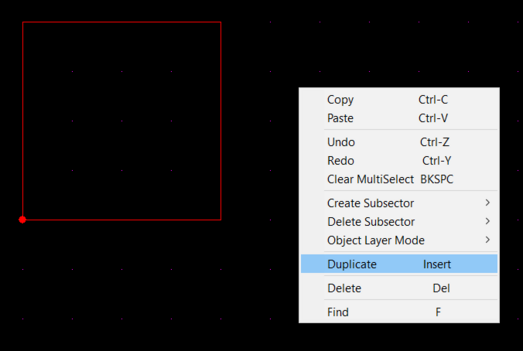
This new sector is an exact copy (Same shape, height, textures etc...) as your original. You can keep pressing insert as often as you'd like and more and more copies of the sector will appear. Remember you can move the copies around around by holding the CTRL button. This will work for any map component.
Now switch to the Wall Mode and hover over any of the Sector's walls. Press Insert and the wall will be split in two. You will get a pop-up confirming that you want to split the wall. Choose Yes.
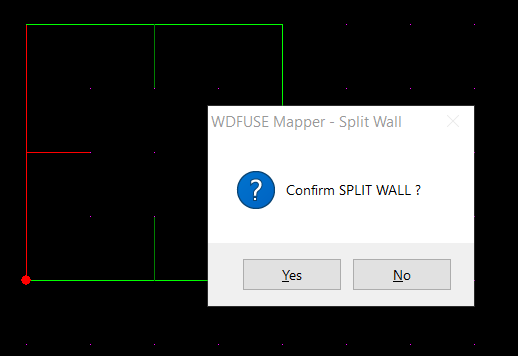
The sector will have now have five walls and 5 vertices. You can move the new wall around (with CTRL ) just like any other component.
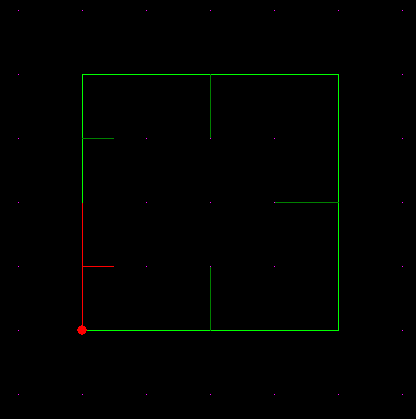
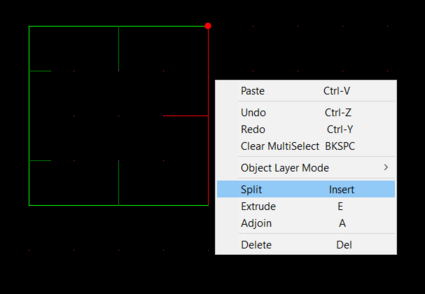
Just like the sectors you can Right-Click and choose Split-Wall to split the wall instead of pressing the insert button.
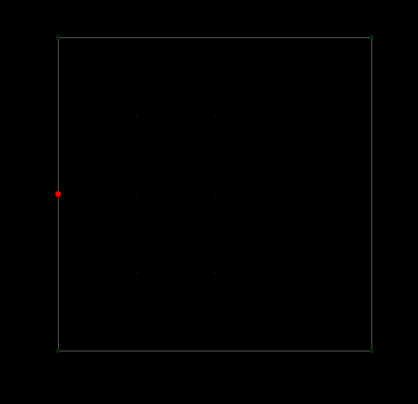
If you switch to Vertex Mode and press Insert you will be greeted with the same split-wall pop-up confirmation as in the Wall Mode. This is because for every new wall you create a new vertex will also be made and vice-versa. You can also insert more vertices by choosing the duplicate from the right-click menu. Once created, you should be able to move it around with CTLR button.
One more thing about Vertices. If you hold CTRL button and left click while in Vertex Mode you can add additional vertices without pressing the Insert button. It's a quick way to add them if you want to draw a particular shape.
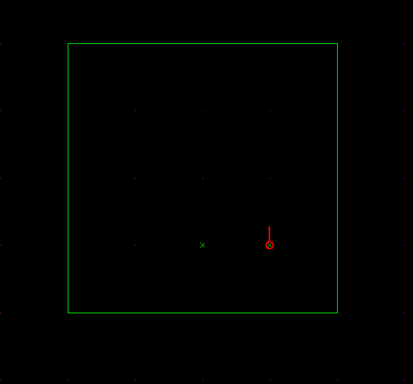
Finally, In Object Mode, you can create more objects by pressing the Insert button and just like the rest you will get an exact duplicate of the original object, at the position where you were pointing to with your mouse at that very moment.
Deleting Map Components
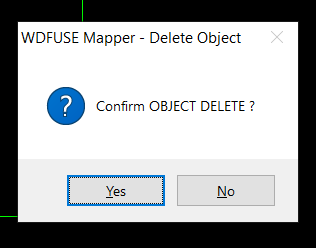
To delete a map component in any map mode, simply press the Delete key underneath the Insert key. You will get a prompt to confirm you want to delete the component.
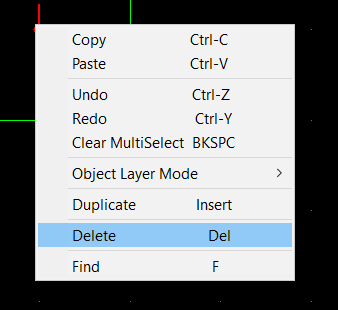
You can also delete a component by Right-Clicking on the map and choosing Delete from the pop-up menu.
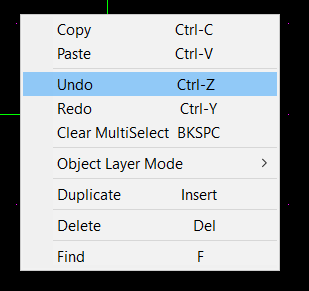
If you ever make a mistake and delete something important, don't forget you can Undo an action by holding CTRL and pressing Z or bringing up the pop-up menu (by right clicking) and choosing Undo.
Selecting Multiple Components
Now that you have multiple sectors you can make editor operations on them all at once.
To select more than one component hold Shift and Left-click on the item in question. Try clicking on multiple sectors holding Shift.
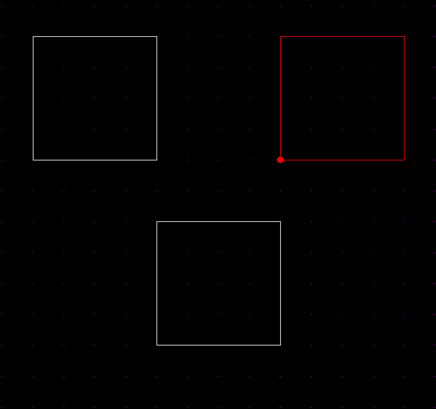
Here you can see that there are multiple sectors selected because their color changed. Items that are multi-selected will turn White in color. You can remove items from the multi-selection by left-clicking the selected component again. And if you ever want to clear your multi-selection completely simply press the Backspace key. You can also bring up the pop-up menu and choose Clear Multiselection option.
Here are something you can do when items are multi-selected.
- You can move them at once by holding the CTRL button.
- You can Add your selection at once by using the Insert key. So if you have 3 sectors selected you will create 3 more in another location.
- You can Delete your selection by using the Delete key. Please be careful, you may be accidentally delete more sectors than you want !
There is another way you can select multiple map components.
If you hold ALT you will create a white selection rectangle with which you can cover multiple map components.
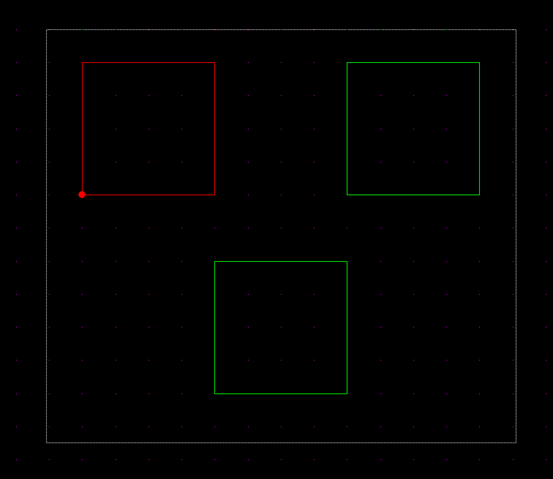
Here you can see the white dotted rectangle. When you let go, all the sectors will be selected.
Copying and Pasting
Another way you can add components to your mission is by using Copy and Paste. To do that select any component, hold CTRL and then press C to store the item in memory and then hold Ctrl and press V to paste it anywhere on the map. You can also bring up the pop-up menu and choose Copy/Paste options.
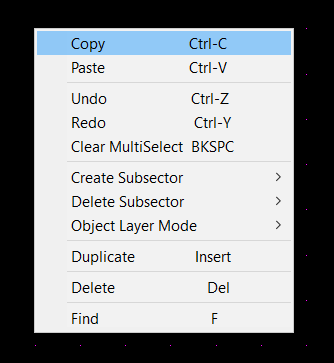
This will work with multi-selected items and will even work between different instances of WDFUSE. So you can have two WDFUSE editor open at a time, copy a sector from the first one and be able to paste it into your own map. What's more - you can have a friend copy their own sector, paste the text representation of it (from Clipboard) and send it to you by email or chat. You can then select the text, copy it and then paste it into your map!
Sector Pop-Up Operations
When you Right Click on the sector you will get a popup with various options. Many are self-explanatory but we will concentrate on Rotate, Flip and Stitch.
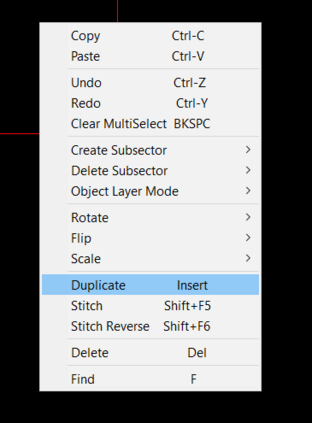
Rotate
You can rotate a sector by 10, 45 or 90 degrees as well as the inverse of those numbers by selecting the rotation values from the pop-up menu.
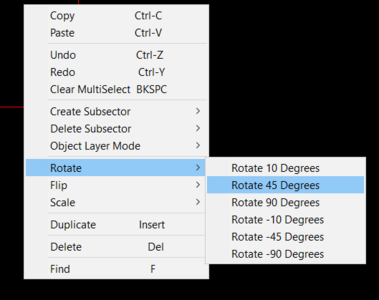
Here the square sector now was turned 45 degrees.
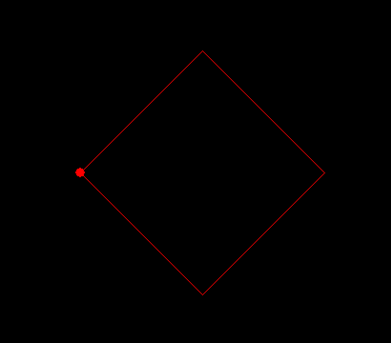
You can also use the hotkeys Shift+Up or Shift+Down to move a sector (or sectors) by 10 degrees or Shift+Left and Shift+Right to rotate a sector by 90 degrees.
Flip
You can flip a sector horizontally (X axis) or vertically (Z axis) from the pop-up menu.
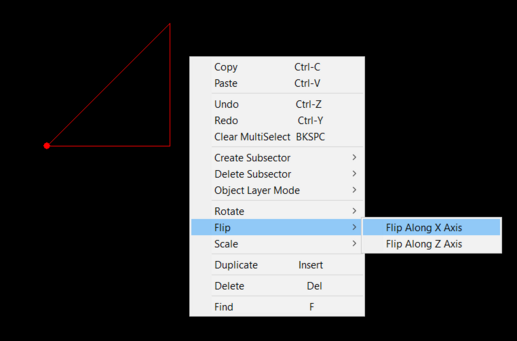
You can see that the sector was flipped.
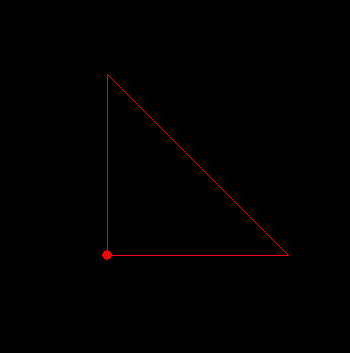
You can also flip a sector with ALT+Left or ALT+Right hotkeys.
Scale
You can also scale the size of your sectors. You can make them bigger or smaller from the pop-up menu. (There are more advanced options allowing you to scale with any desired factor - but here the two most common are offered.)
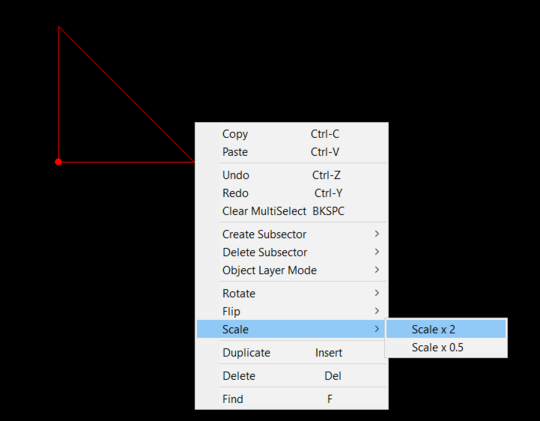
You can also use the hotkey ALT+Up or ALT+Down hotkeys.
The tutorial continues with the 3D Renderer article.
WDFUSE Tutorials
- Introduction
- WDFUSE Tutorial - Configuration
- WDFUSE Tutorial - Basic Geometry
- WDFUSE Tutorial - Basic Geometry II
- WDFUSE Tutorial - 3D Renderer
- WDFUSE Tutorial - Advanced Geometry
- WDFUSE Tutorial - Advanced Geometry II
- WDFUSE Tutorial - Advanced Geometry III
- WDFUSE Tutorial - Objects
- WDFUSE Tutorial - Scripting
- WDFUSE Tutorial - Scripting II
- WDFUSE Tutorial - Scripting III