| (10 intermediate revisions by the same user not shown) | |||
| Line 10: | Line 10: | ||
* Ensure the missions can be completed without cheats | * Ensure the missions can be completed without cheats | ||
* Make sure it can be completed on '''every''' difficulty | * Make sure it can be completed on '''every''' difficulty | ||
* Have other players test to ensure the logic makes sense | * Have other players (Someone in the DF-21's [https://discord.gg/6T9NvMh2MC Discord] ) test to ensure the logic makes sense or upload a video walkthrough on YouTube. | ||
* Check for accessibility - flashing lights and some scrolling textures may cause headaches and nausea. | * Check for accessibility - flashing lights and some scrolling textures may cause headaches and nausea. | ||
| Line 81: | Line 81: | ||
Here the author graciously provided us the information we need to create the DFBRIEF ourselves. | Here the author graciously provided us the information we need to create the DFBRIEF ourselves. | ||
===== ReadMe Template ===== | |||
If you want to create you own ReadMe file we have a template you can download [https://df-21.net/downloads/conf_files/GOB_AUTH.txt Here] . | |||
The example is also listed below. Please fill it out as best as you can and leave the rest blank. | |||
================================================================ | |||
Title : | |||
Filename : xxxx.GOB | |||
Author : Your name here | |||
Email Address : | |||
Discord Contact : | |||
Other Contacts : | |||
Misc. Author Info : | |||
Game Compatibility : DOS/Remaster/The Force Engine | |||
Additional Credits to : Who helped you make this mod? Did you use custom assets like WAX or BMs? | |||
List the asset and the authors here. | |||
Description : Set the mood here. | |||
================================================================ | |||
* Play Information * | |||
Level(s) replaced : levelname1(,levelname2,...) | |||
Difficulty Settings : Yes/Not implemented | |||
New BMs : Yes/No | |||
New FMEs : Yes/No | |||
New WAXs : Yes/No | |||
New 3DOs : Yes/No | |||
New VOCs : Yes/No | |||
New GMDs : Yes/No | |||
New VUEs : Yes/No | |||
* Construction * | |||
Base : New level from scratch/Modified levelname | |||
Editor(s) used : | |||
Known Bugs : | |||
* Copyright / Permissions * | |||
Authors (MAY/may NOT) use this level as a base to build additional | |||
levels. | |||
(One of the following) | |||
You MAY distribute this GOB, provided you include this file, with | |||
no modifications. You may distribute this file in any electronic | |||
format (BBS, Diskette, CD, etc) as long as you include this file | |||
intact. | |||
You MAY not distribute this GOB file in any format. | |||
You may do whatever you want with this file. | |||
* Where to get this GOB * | |||
Websites: | |||
Other: | |||
==== 2. Mapping briefing file to the mission ==== | ==== 2. Mapping briefing file to the mission ==== | ||
| Line 86: | Line 147: | ||
[[File:Anchorgob.png|center|thumb|801x801px]] | [[File:Anchorgob.png|center|thumb|801x801px]] | ||
As you see, there are many files here but the | As you see, there are many files here but the one we need is called '''JEDI.LVL .''' If you extract it - by either CTRL-C / CTRL-V the file into a folder or choosing '''File --> Extract Files''' option , then you can open it in '''notepad''' (or any other text editor) and see which original mission is being replaced. In our case, the mission being replaced is '''JABSHIP''' so this is what we will need to create a mission briefing for. | ||
LEVELS 1 | LEVELS 1 | ||
Anchor Hed, JABSHIP | Anchor Hed, JABSHIP | ||
| Line 161: | Line 222: | ||
Here is how we do it in the batch file. | Here is how we do it in the batch file. | ||
@echo off | |||
set dark_executable=dark.exe | set dark_executable=dark.exe | ||
set steam=khonsu_shipping_steam_x64.exe | set steam=khonsu_shipping_steam_x64.exe | ||
set gog=khonsu_shipping_galaxy_x64.exe | set gog=khonsu_shipping_galaxy_x64.exe | ||
if not exist "%dark_executable%" ( | if not exist "%dark_executable%" ( | ||
if exist "%steam%" ( | |||
copy "%steam%" "%dark_executable%" | |||
) else if exist "%gog%" ( | |||
copy "%gog%" "%dark_executable%" | |||
) else ( | |||
echo "Cannot find Dark Forces executable!" | |||
pause | |||
exit | |||
) | ) | ||
) | ) | ||
| Line 191: | Line 252: | ||
==== 3. Combined Batch Script Example ==== | ==== 3. Combined Batch Script Example ==== | ||
Combining all the parts here is what the batch script '''anchor.bat''' should look like. Don't forget to replace <gobname> with your own level (Ex: '''anchor''') | Combining all the parts here is what the batch script '''anchor.bat''' should look like. Don't forget to replace <gobname> with your own level (Ex: '''anchor''') | ||
@echo off | |||
set dark_executable=dark.exe | set dark_executable=dark.exe | ||
set steam=khonsu_shipping_steam_x64.exe | set steam=khonsu_shipping_steam_x64.exe | ||
set gog=khonsu_shipping_galaxy_x64.exe | set gog=khonsu_shipping_galaxy_x64.exe | ||
if not exist "%dark_executable%" ( | if not exist "%dark_executable%" ( | ||
if exist "%steam%" ( | |||
copy "%steam%" "%dark_executable%" | |||
) else if exist "%gog%" ( | |||
copy "%gog%" "%dark_executable%" | |||
) else ( | |||
echo "Cannot find Dark Forces executable!" | |||
pause | |||
exit | |||
) | ) | ||
) | ) | ||
if exist <gobname>.tmp ren <gobname>.tmp dfbrief.lfd | if exist <gobname>.tmp ren <gobname>.tmp dfbrief.lfd | ||
DARK -u<gobname>.gob | DARK -u<gobname>.gob | ||
| Line 223: | Line 285: | ||
[[File:Screenshot.png|center|thumb|975x975px]] | [[File:Screenshot.png|center|thumb|975x975px]] | ||
Save each image as 1.png 2.png etc... . Ideally you want to have 3-5 Screenshots of the missions. Choose some good ones! Furthermore, if you have video recording software, you can record and create some gifs which can be used the same way as the png screenshots. Simply name them 1.gif 2.gif etc... | Save each image as 1.png 2.png etc... . Ideally you want to have 3-5 Screenshots of the missions. Choose some good ones! Furthermore, if you have video recording software, you can record and create some gifs which can be used the same way as the png screenshots. Simply name them 1.gif 2.gif etc... | ||
Please have at least '''3''' screenshots/gifs of your level. | |||
=== Putting all the mission versions together === | === Putting all the mission versions together === | ||
| Line 235: | Line 299: | ||
# The Read Me file '''anchor.txt''' . (If missing - please provide a basic description of the mission. You can use [https://df-21.net/downloads/conf_files/GOB_AUTH.txt this] example and fill it out as much as you can). | # The Read Me file '''anchor.txt''' . (If missing - please provide a basic description of the mission. You can use [https://df-21.net/downloads/conf_files/GOB_AUTH.txt this] example and fill it out as much as you can). | ||
Save the zip as <gobname>_modern.zip (or '''''anchor_modern.zip''''' in our case). '''Modern''' is just a version identifier but it tells people that it is the new version over the classic ones. Here is what the zip should look like. | Save the zip as <gobname>_modern.zip (or '''''anchor_modern.zip''''' in our case). '''Modern''' is just a version identifier but it tells people that it is the new version over the classic ones. Here is what the zip should look like. | ||
[[File: | |||
[[File:Zip contents.png|center|thumb|608x608px]] | |||
'''Important:''' You should also '''rename''' the original mission zip to '''<gobname>_classic.zip''' . This way we will know that this is the original mission. | '''Important:''' You should also '''rename''' the original mission zip to '''<gobname>_classic.zip''' . This way we will know that this is the original mission. | ||
| Line 263: | Line 328: | ||
"last_mod_date": "2024-01-26", | "last_mod_date": "2024-01-26", | ||
"dos_support" : "true", | "dos_support" : "true", | ||
"remaster_support" : "false" | "remaster_support" : "false" | ||
} | } | ||
Lets take a look at what is happening here and go over all the fields. All are required unless tagged as optional. | Lets take a look at what is happening here and go over all the fields. All are required unless tagged as optional. | ||
| Line 270: | Line 335: | ||
* '''rating''' - This is the rating of the mission. Look at the rating in the [https://docs.google.com/spreadsheets/d/12ph7O8k80gGU2GdtdRoQ4qLxJyDzeGU1czZasoSETA4/edit#gid=0 mission list] and place it here. If it is missing, just set it to '''0''' | * '''rating''' - This is the rating of the mission. Look at the rating in the [https://docs.google.com/spreadsheets/d/12ph7O8k80gGU2GdtdRoQ4qLxJyDzeGU1czZasoSETA4/edit#gid=0 mission list] and place it here. If it is missing, just set it to '''0''' | ||
* '''author''' - The author of the map. If you do not know who it is - '''do not put your own''' - contact DF-21 staff! | * '''author''' - The author of the map. If you do not know who it is - '''do not put your own''' - contact DF-21 staff! | ||
* '''versions''' - This is a listing of all the variants of the map. Each one contains the name of the version and the release date. You can figure out the release date of the classic mission by looking at the time the files were last modified. Note: The version names in the list '''must correspond to the zip file suffixes!''' Ex: modern points to '''''anchor_modern.zip''''' and is the modernized version of the map and classic points to '''''anchor_classic.zip'''''. If you have a version named 2.0 then you must have a zip called '''''anchor_2.0.zip .''''' | * '''versions''' - This is a listing of all the variants of the map. You can have one or more versions. Each one contains the name of the version and the release date. You can name them whatever you want. You can figure out the release date of the classic mission by looking at the time the files were last modified. Note: The version names in the list '''must correspond to the zip file suffixes!''' Ex: modern points to '''''anchor_modern.zip''''' and is the modernized version of the map and classic points to '''''anchor_classic.zip'''''. If you have a version named 2.0 then you must have a zip called '''''anchor_2.0.zip .''''' '''Always''' place the latest version at the bottom of the list!!! | ||
* '''review''' ['''optional]''' - If you know there is a review place the URL here. Otherwise don't even add this line. You can find Dark Forces reviews here https://darkforces.reviews/ | * '''review''' ['''optional]''' - If you know there is a review place the URL here. Otherwise don't even add this line. You can find Dark Forces reviews here https://darkforces.reviews/ | ||
* '''description''' - The description of the mission. It is likely in the original read me file. | * '''description''' - The description of the mission. It is likely in the original read me file. | ||
Latest revision as of 09:00, 28 August 2024
Congratulations! You've made a custom mission and now you want to upload it to DF-21.net and so it is available like the Lava Planet mission.
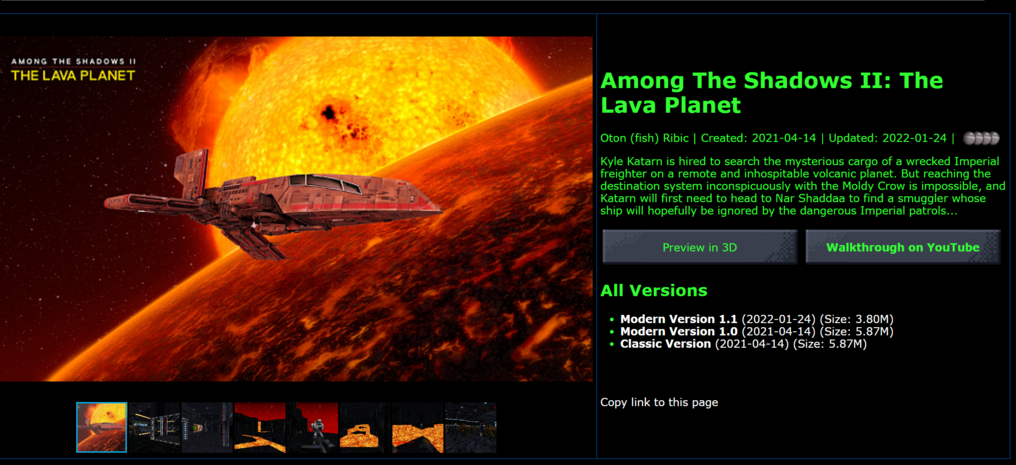
The missions that are stored on DF-21 must follow standard formats so they can easily be loaded by various game engines such as DOS, Dark Forces Remaster and The Force Engine. Here we will go in detail over each component. These are required to be displayed on the DF-21 website.
As we discuss the mission components we will use the custom mission Anchor Hed as an example. You can download it Here - the filename is anchor2.zip.
Important!!!
Make sure you fully test your mission!!
- Ensure the missions can be completed without cheats
- Make sure it can be completed on every difficulty
- Have other players (Someone in the DF-21's Discord ) test to ensure the logic makes sense or upload a video walkthrough on YouTube.
- Check for accessibility - flashing lights and some scrolling textures may cause headaches and nausea.
What must a modern map support include?
- It must support running in The Force Engine and preferably Dark Forces Remaster. DOS support is preferable but optional.
- The mission may have bugs but it must be completable - that is - it must have objectives that can result in a Mission Complete message.
- It must have a single entry point - a <missionname>.bat file - that a user or a mod loader would execute. This is not required for TFE support.
- It must have a metadata.txt file that includes information such as the author, name of the mission, release date, version information as well as optional walkthroughs or reviews.
- For DOS and Remaster support it should attempt to clean up any stale LFD files (Such as DFBRIEF.LFD) so as not to pollute the directory.
- It should support multiple game stores such as STEAM and GOG.
- It should have a mission briefing as well as objectives.
- It should include a few screenshots that show off the mission.
Mission Zip Structure
All Dark Forces missions should be in a zip file format (not a rar!). They need to have four components.
- The GOB that is the mission file itself
- The DFBRIEF.LFD that contains the briefing information as well as mission objectives
- The batch file that should start the mission.
- The README.TXT file (or any .TXT file that explains mission instructions).
Lets look at the anchor2.zip example.
It includes three files. The anchor.bat , ANCHOR.TXT as well as ANCHOR.GOB. The GOB is the mission itself and what we will need to modernize. You will notice it is missing the DFBRIEF.LFD file, we will have to create it ourselves.
1. Ensure the map is completable
When you submit a mission to DF-21.net the first thing you need to do is make sure the mission can be finished with modern engines. Go ahead and play it using The Force Engine or Dark Forces: Remaster. Your goal is to ensure you get to the Mission Completed message.
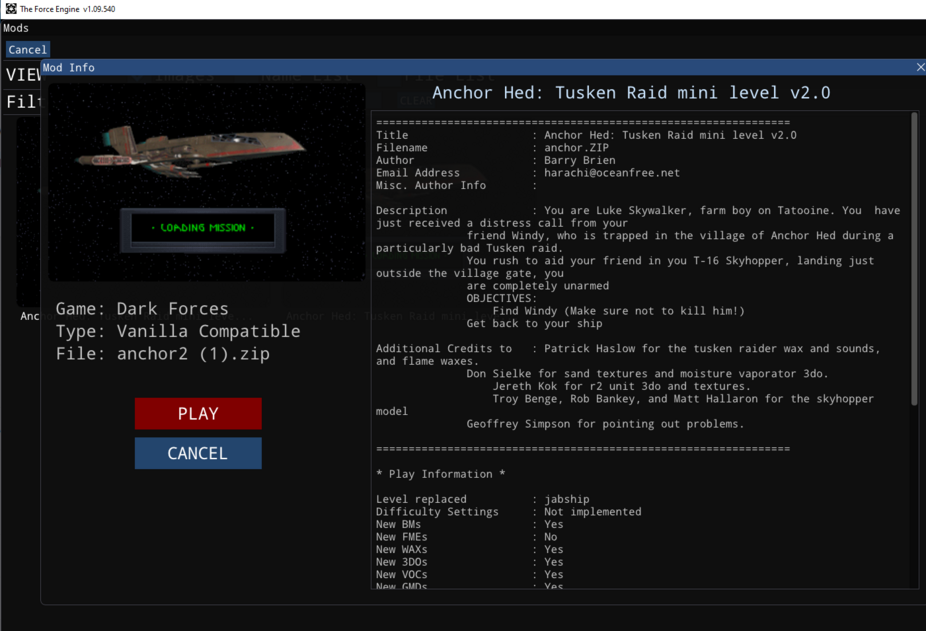
To test using the The Force Engine simply put the anchor2.zip (it must be in a zip!) and select it from the MOD menu. Play through it and ensure you get Mission Completed message. If the mission has critical bugs, you (or someone else) will need to fix them using WDFUSE or another editor which is out of scope for this guide.
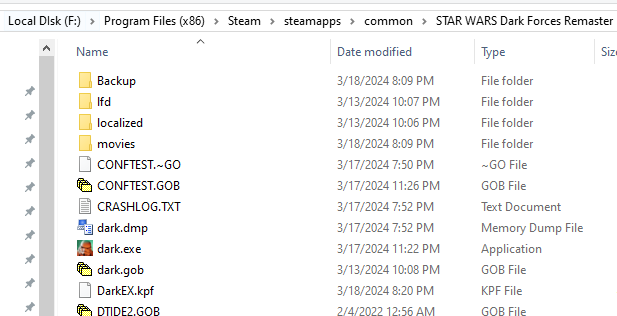
If you are testing using Dark Forces: Remaster make a copy the khnosu_shipping_<store_name>_x64 executable in your Steam or GOG directory to dark.exe. You can use CTRL-C and CTRL-V on your executable to make a copy and then you can rename it to dark.exe. When done, it should look like this folder.
2. Simple Batch File Creation
Lets create a basic batch file (using Notepad for example) and call it anchor.bat. Put this text inside the batch file, it will autolaunch the mission.
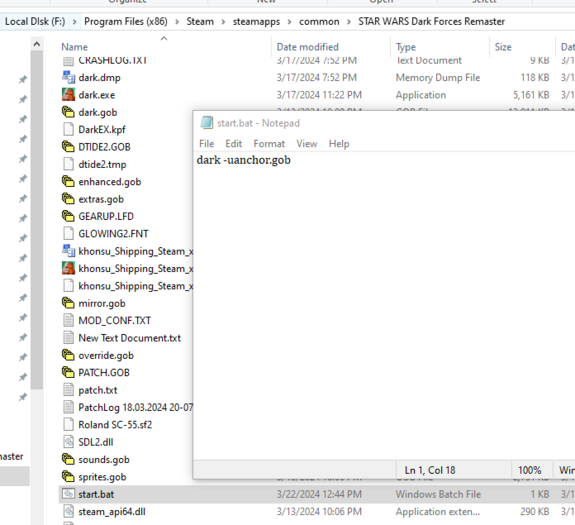
dark -uanchor.gob
The -u parameter tells Dark Forces to use a custom a mission. In this case it will launch anchor.gob. For other missions you just replace anchor.gob with the GOB you are working with such as bobafett.gob or academy.gob etc... .
In the example of anchor2.zip we already have a file called anchor2.bat that runs the GOB through Dark Forces. All we need to do is rename it to the standard name anchor.bat. It should look like this after you rename it. Be sure to put the file in your Star Wars folder where dark.exe is located.
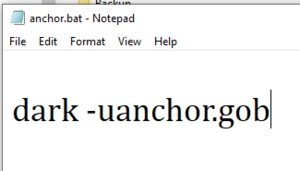
To run the mission just double click on anchor.bat and the Remaster (now named as dark.exe) will start the mission. Be sure you can complete it!
Briefing File
Each modernized mission must have a briefing and objectives. This data is stored in a file called DFBRIEF.LFD and must be present in the zip to be loaded by The Force Engine or simply extracted to be visible by the Remaster. Some missions already have this file so you can skip this step. However, many missions do not so this guide will talk about creating a DFBRIEF file from scratch.
Important Note: This guide assumes there is only ONE mission in the GOB file (which is the vast majority of missions) . If there are multiple missions, then you will need to create objectives and briefing file for each mission!
1. Figuring out briefing details and objectives
To populate the briefing file you need to give it a description of the mission and some objectives. Typically, you can get this from the readme file that comes with the mission. If you do not have this file, you will need to come up with a few sentences that explain what needs to be done. Here is an example from ANCHOR.TXT
================================================================
Title                   : Anchor Hed: Tusken Raid mini level v2.0
Filename                : anchor.ZIP
Author                  : Barry Brien
Email Address           : harachi@oceanfree.net
Misc. Author Info       :
Description             : You are Luke Skywalker, farm boy on Tatooine. You  have just received a distress call from your
  friend Windy, who is trapped in the village of Anchor Hed during a particularly bad Tusken raid.
  You rush to aid your friend in you T-16 Skyhopper, landing just outside the village gate, you
  are completely unarmed
			  OBJECTIVES:
		          Find Windy (Make sure not to kill him!)
			  Get back to your ship
Here the author graciously provided us the information we need to create the DFBRIEF ourselves.
ReadMe Template
If you want to create you own ReadMe file we have a template you can download Here .
The example is also listed below. Please fill it out as best as you can and leave the rest blank.
================================================================
Title                   :
Filename                : xxxx.GOB
Author                  : Your name here
Email Address           :
Discord Contact         :
Other Contacts          :
Misc. Author Info       :
Game Compatibility      : DOS/Remaster/The Force Engine
Additional Credits to   : Who helped you make this mod? Did you use custom assets like WAX or BMs?
                          List the asset and the authors here.
Description             : Set the mood here.

================================================================

* Play Information *

Level(s) replaced       : levelname1(,levelname2,...)
Difficulty Settings     : Yes/Not implemented
New BMs                 : Yes/No
New FMEs                : Yes/No
New WAXs                : Yes/No
New 3DOs                : Yes/No
New VOCs                : Yes/No
New GMDs                : Yes/No
New VUEs                : Yes/No

* Construction *

Base                    : New level from scratch/Modified levelname
Editor(s) used          :
Known Bugs              :


* Copyright / Permissions *

Authors (MAY/may NOT) use this level as a base to build additional
levels.

(One of the following)

You MAY distribute this GOB, provided you include this file, with
no modifications.  You may distribute this file in any electronic
format (BBS, Diskette, CD, etc) as long as you include this file
intact.

You MAY not distribute this GOB file in any format.

You may do whatever you want with this file.


* Where to get this GOB *

Websites:

Other:
2. Mapping briefing file to the mission
Dark Forces has 14 missions with names like SECBASE, TALAY or IMPCITY. We need to know which of the missions is being replaced and needs to have a briefing file. To do that we have to open the GOB file and look at the contents. There are many tools we can use but the easiest one is called CONMAN which you can download Here . Simply download and unzip the CONMAN program and then open the GOB file (in our case ANCHOR.GOB) . Here is what it looks like.
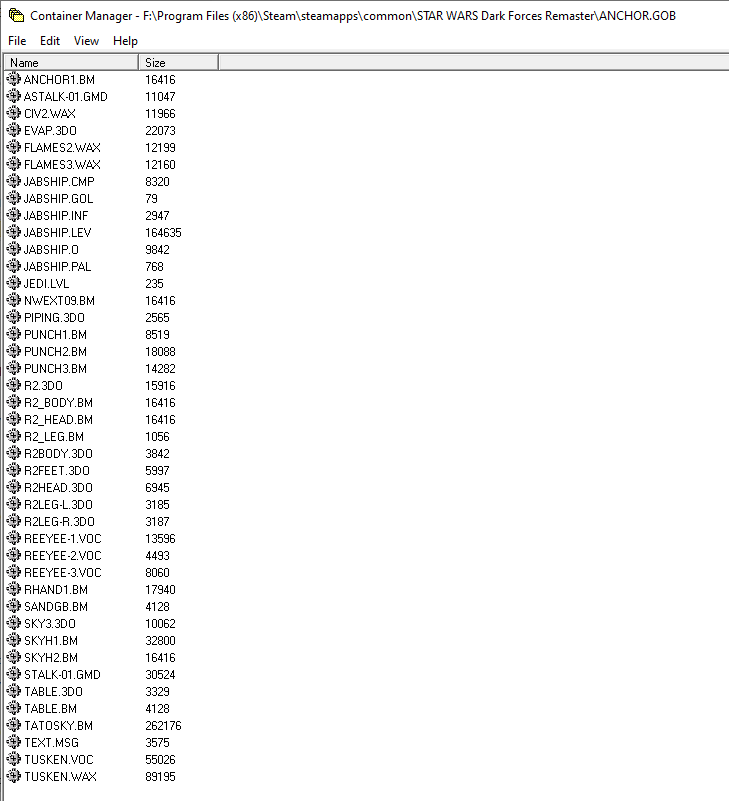
As you see, there are many files here but the one we need is called JEDI.LVL . If you extract it - by either CTRL-C / CTRL-V the file into a folder or choosing File --> Extract Files option , then you can open it in notepad (or any other text editor) and see which original mission is being replaced. In our case, the mission being replaced is JABSHIP so this is what we will need to create a mission briefing for.
LEVELS 1
Anchor Hed,        JABSHIP
//      (Comments must be at the end of this file)
//      This file contains the list of all the levels in Jedi,
//      and the DOS names for those levels.
Now that we have information on the mission being replaced and the description and objectives we should be ready to create a DFBRIEF.LFD file.
The full list of the 14 mission names that can be replaced is below. Look for them in the GOB container.
1.  SECBASE
2.  TALAY
3.  SEWERS
4.  TESTBASE
5.  GROMAS
6.  DTENTION
7.  RAMSHED
8.  ROBOTICS
9.  NARSHADA
10. JABSHIP
11. IMPCITY
12. FUELSTAT
13. EXECUTOR
14. ARC
3. Creating a new DFBRIEF.LFD file
LFD files can also be opened with the CONMAN tool you used to open up the GOB in the previous step. Our goal is to create the Mission Briefing and the PDA objectives. If you open DFBRIEF.LFD with conman you will see the contents of the file.
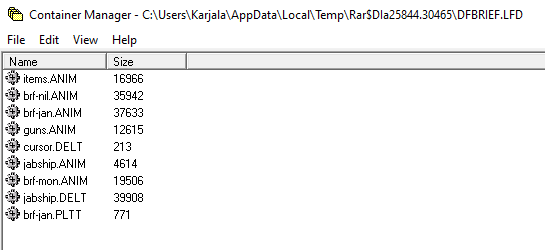
In our case they are stored in the JABSHIP.ANIM and the JABSHIP.DELT files. Specifically, the ANIM file contains the mission objective overlays (Ex: Blue and Yellow color overlays) and the DELT file contains the mission briefing itself. These are the files that we must update.
Unfortunately, this is a highly complicated process that requires you to ensure you have pixel-perfect images all stored in proper formats. Because the learning curve is steep, we've created an automated briefing generator at DF-21 which generates you the entire DFBRIEF.LFD file in seconds.! All you need to do is fill in the objective and mission description information!
Start by going to the briefing generator page here On this page you need to fill out the briefing information such as the mission name, the background and mission details and, finally, the objectives themselves. Be sure to select JABSHIP as the level you are placing (or the DFBRIEF.LFD won't work in game). It should look like this.
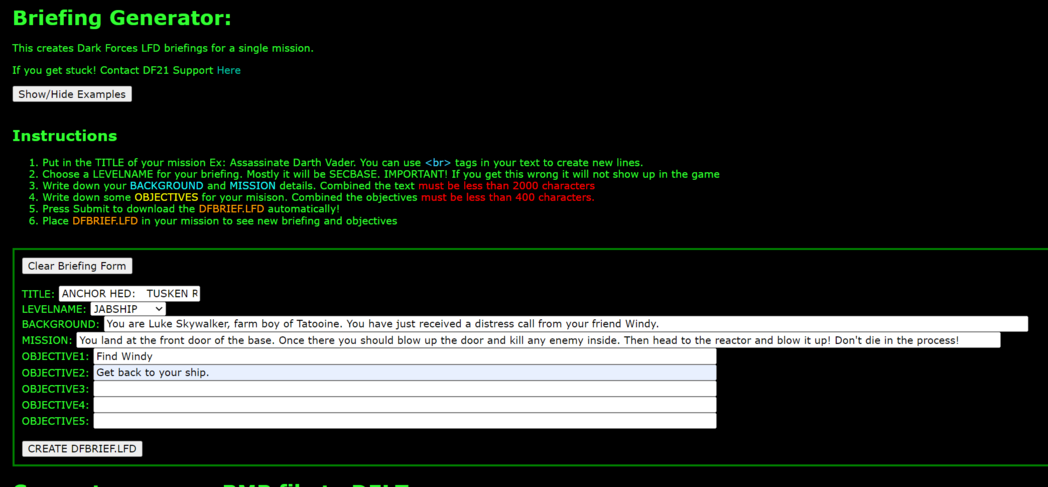
When you are done - press "Create DFBRIEF.LFD" button and in seconds you will download the finished file. To quickly validate the LFD file with The Force Engine simply place it inside anchor2.zip and run the mission from the Mod menu. Otherwise, for the Remaster, copy DFBRIEF.LFD to the same folder as the dark.exe executable. Now you can test your briefing.
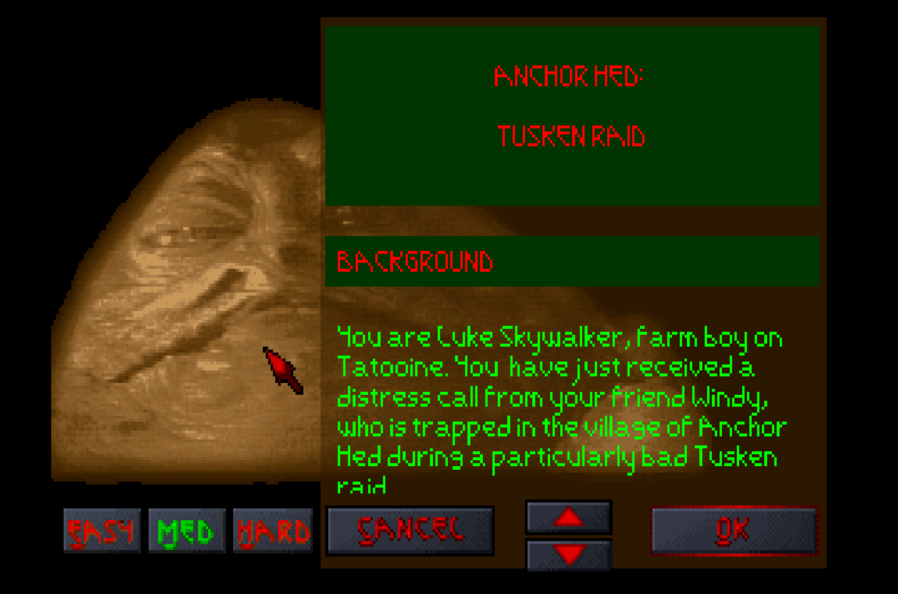
When the mission starts you should see the new briefing file! This was automatically generated with the text you put in it on the website!
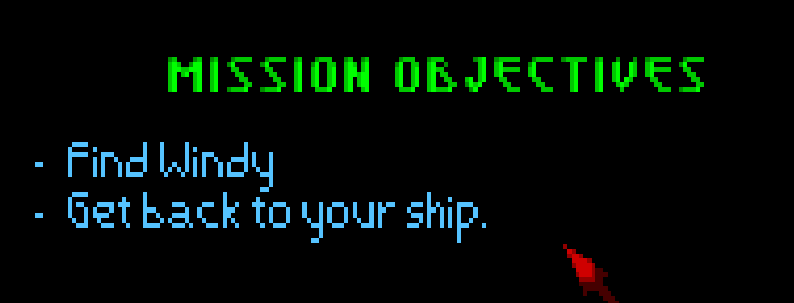
Additionally, if you click on the PDA objectives you will see them created as well.
If you are having issues seeing your new briefing it is most likely due to you choosing the wrong level to replace on the webpage (as shown in the JEDI.LVL file) or the game cannot find the DFBRIEF.LFD file (maybe you've made a typo?). Ask in the DF-21's discord if you are stuck!
Note for multiple missions. If you have multiple missions then you need to create the ANIM and DELT files for each mission to replace. You can use the briefing generator yourself to make new DFBRIEF.LFD file and then use CONMAN to copy each of the ANIM/DELT files into a single LFD container.
4. Dealing with Images in the briefing
The briefing and the objectives in game are JUST IMAGES that are stored in a DELT format. Under the hood it is an 8-BIT (256 color) BMP file converted to a DELT file. If you create a new briefing you will be shown a preview of your image. If you click on it, you can download the raw BMP file which you can then edit yourself.
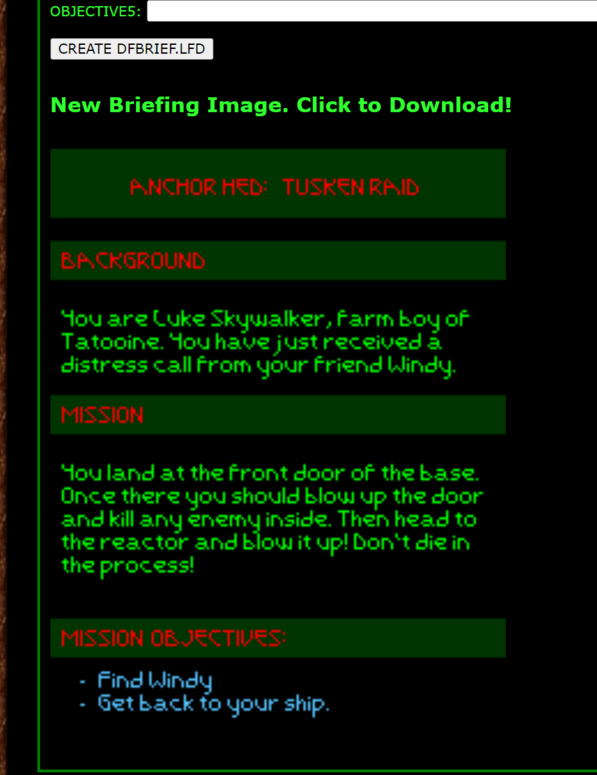
Once you click on the image and download it, you can use any image program, including PAINT to make your changes. Go ahead and do that now. Here we drew a smiley face in the middle of the briefing as a simple example.
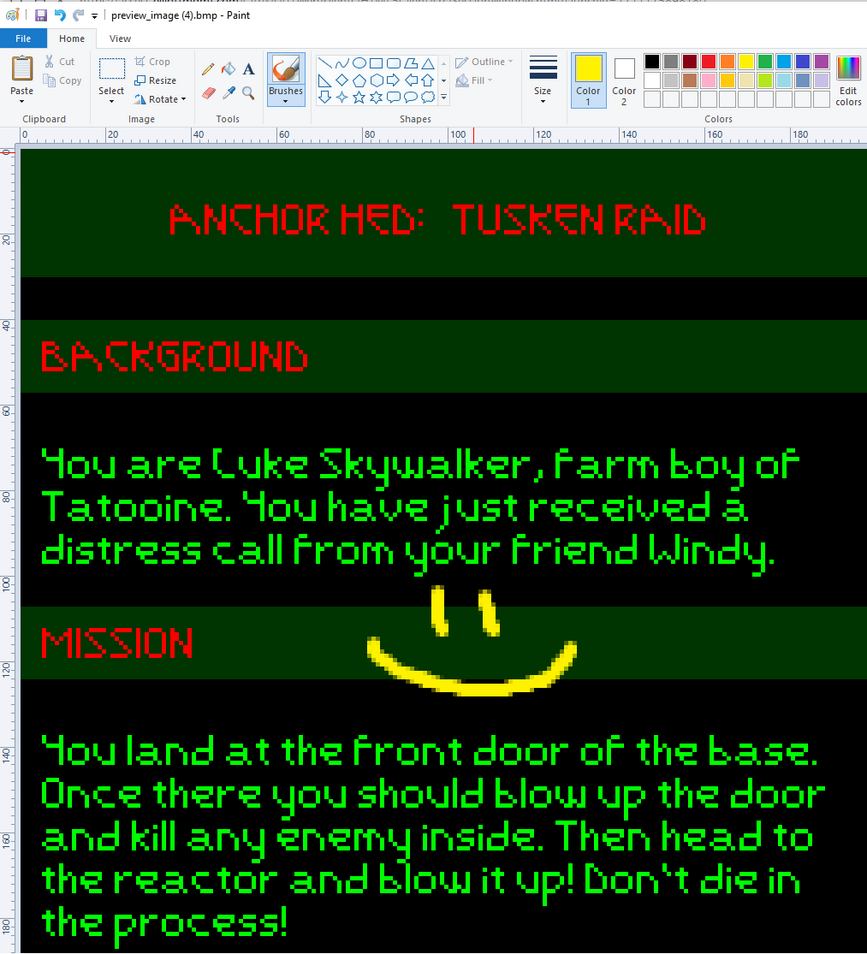
Once you are done, save the file as an 8-BIT BMP file (in the SAVE AS options). In this case we saved it as anchor.bmp. Then to convert it back to DELT format simply go back to the briefing generator page and select the BMP you've created and press UPLOAD to create a new DELT file.

The webpage program will convert the BMP to DELT format and you will download a file called converted_<uniqueid>.DELT. You need to rename it to the mission name, in our case JABSHIP.DELT and put the DELT file (using CONMAN) back into DFBRIEF.LFD to see your changes. Place the updated LFD back into the anchor.zip as you did before and you will be able to see your changes!
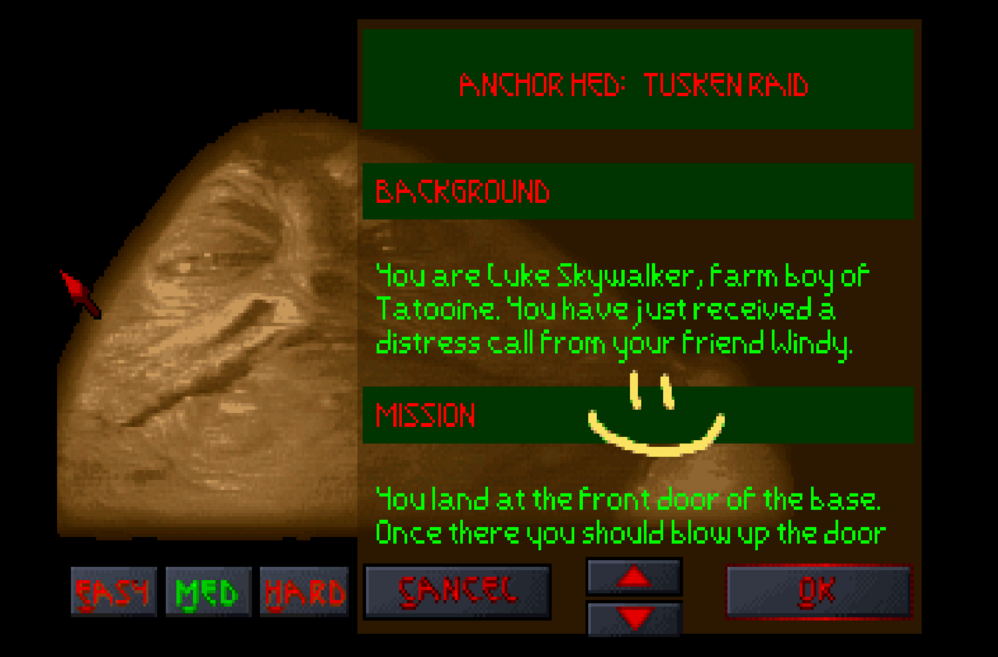
See - it is pretty easy to do whatever you want with custom briefings! You can easily add custom images of starships or Darth Vader from the movies. Just be cognizant that the original game only supports images up to 198 pixels in length!
Batch File Details
We've talked earlier about creating a batch file to start the mission. Now let's look at the details of what the batch file must contain. We need a uniform way to start all the missions. To do that we will create a batch file named anchor.bat ( or generally <missionname>.bat ) that will start our mission automatically.
We start with this simple code in our batch file and go from there.
dark -u<MISSIONNAME>.GOB
Great - now we need to ensure that the batch file supports multiple Dark Forces executables!
1. Dark Forces Executable Support
There are multiple versions of Dark Forces out there. Some own Dark Forces through DOS, some have it through Night Dive's Remaster. Because of this variety, it is important to support all types of executables. The application name we always expect to have is dark.exe . It is the default name in DOS but is different in Night Dive's release. For Steam the executable is named khonsu_Shipping_Steam_x64.exe and for GOG it is called khonsu_Shipping_Galaxy_x64.exe. We must ensure we have a copy of dark.exe in the folder where the mission GOB is located, so the batch script would be needed to make a copy of the executable if it is missing.
Here is how we do it in the batch file.
@echo off
set dark_executable=dark.exe
set steam=khonsu_shipping_steam_x64.exe
set gog=khonsu_shipping_galaxy_x64.exe

if not exist "%dark_executable%" (
    if exist "%steam%" (
        copy "%steam%" "%dark_executable%"
    ) else if exist "%gog%" (
        copy "%gog%" "%dark_executable%"
    ) else (
        echo "Cannot find Dark Forces executable!"
        pause
        exit
    )
)
Without going into details, this script ensures you have dark.exe in your game directory. Simply add this to your batch file.
2. Handling DFBRIEF.LFD
We need the DFBIEF.LFD file to override the default mission briefings in the game. However, if we do not clean it up after playing a custom mission the briefing will always override the original game briefings and also for any other mod you choose to play. This is why it is important to clean up this briefing file, or simply, rename the briefing file when you start and end the mission.
Here is the template to rename the briefing file inside the batch script. Just replace <gobname> with the name of the mission in the script below.
if exist <gobname>.tmp ren <gobname>.tmp dfbrief.lfd
DARK -u<gobname>
ren dfbrief.lfd <gobname>.tmp
exit
Note, we also add an exit call at the end so the script always exits and we don't get a hanging window after finishing a mission.
3. Combined Batch Script Example
Combining all the parts here is what the batch script anchor.bat should look like. Don't forget to replace <gobname> with your own level (Ex: anchor)
@echo off
set dark_executable=dark.exe
set steam=khonsu_shipping_steam_x64.exe
set gog=khonsu_shipping_galaxy_x64.exe

if not exist "%dark_executable%" (
    if exist "%steam%" (
        copy "%steam%" "%dark_executable%"
    ) else if exist "%gog%" (
        copy "%gog%" "%dark_executable%"
    ) else (
        echo "Cannot find Dark Forces executable!"
        pause
        exit
    )
)

if exist <gobname>.tmp ren <gobname>.tmp dfbrief.lfd
DARK -u<gobname>.gob
ren dfbrief.lfd <gobname>.tmp
exit
This is what it looks like for the mission anchor.gob. When you run anchor.bat we will be able to run the missions in the remaster, tfe or dos.
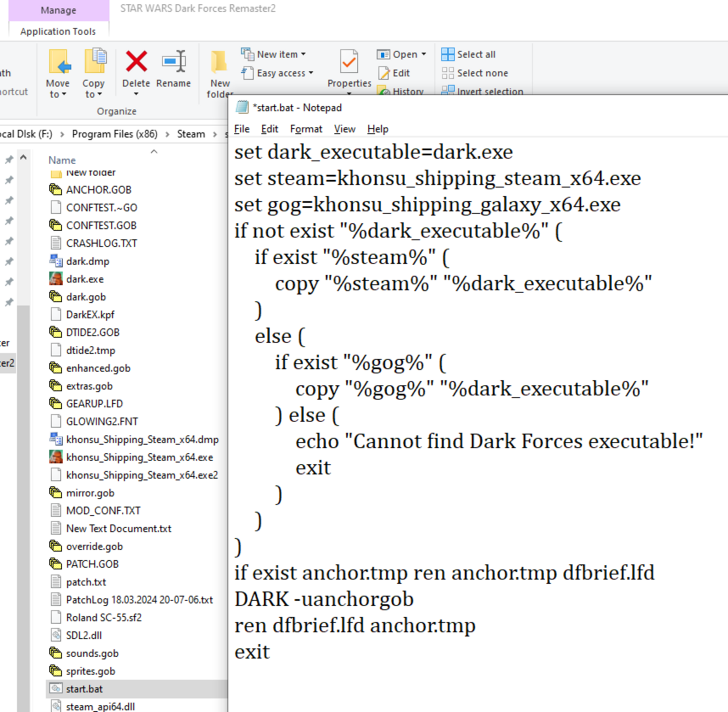
Important: When you save your anchor.bat make sure you TEST IT !! It is easy to make a typo and we don't want players fail attempting to play the mission. Be absolutely sure your batch file works without problems! Don't skip this step.
Screenshots
It is important to take some screenshots of the mission. Go ahead and load it in either The Force Engine and the Remaster and take some nice screens. You can use (by default) F12 in Steam to take screenshots or Print Screen when using The Force Engine. Additionally, you can press the combination Windows Key + Shift + S to take a snap of the screen by dragging your cursor around the area of the screen you want saved. Then simply paste (CTRL-V) into any paint program.
To view the Steam screenshots just click on View in Steam's top navigation bar, then press Screenshots. For TFE just open explorer and go to this path
%userprofile%\Documents\TheForceEngine\Screenshots\
When you take screenshots make sure to turn off the GUI and your weapon with F7 and F8. It also helps to use the cheat LAREDLITE so all the enemies stop in their place.
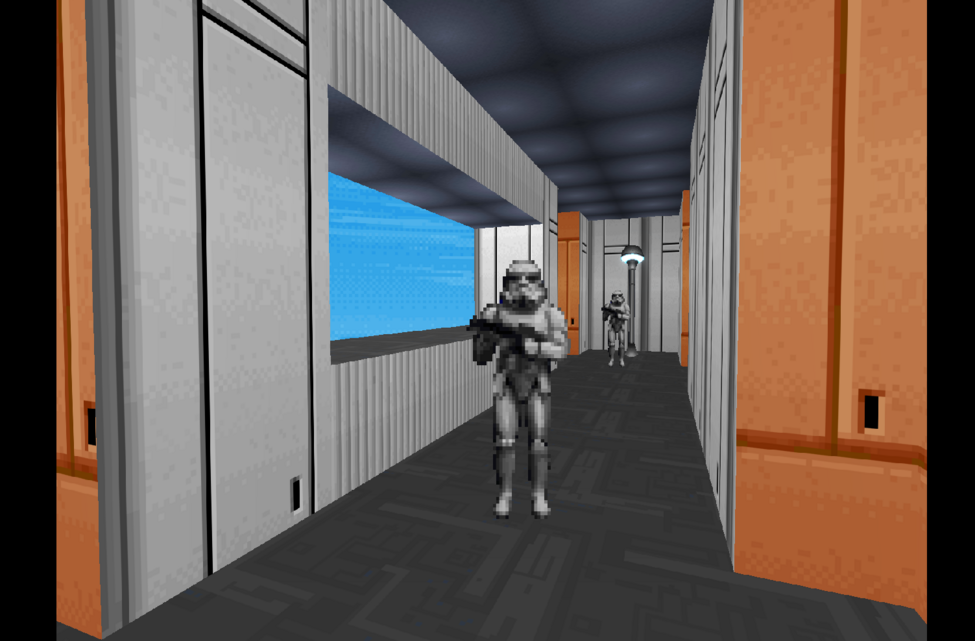
Save each image as 1.png 2.png etc... . Ideally you want to have 3-5 Screenshots of the missions. Choose some good ones! Furthermore, if you have video recording software, you can record and create some gifs which can be used the same way as the png screenshots. Simply name them 1.gif 2.gif etc...
Please have at least 3 screenshots/gifs of your level.
Putting all the mission versions together
Now that you have all the components of a mission, lets get them organized in a single zip!
1. Creating the new zip
First place all the assets in a zip. You should have at least four items in the mission zip.
- The mission name (Ex: anchor.gob )
- The briefing file dfbrief.lfd
- The batch file anchor.bat
- The Read Me file anchor.txt . (If missing - please provide a basic description of the mission. You can use this example and fill it out as much as you can).
Save the zip as <gobname>_modern.zip (or anchor_modern.zip in our case). Modern is just a version identifier but it tells people that it is the new version over the classic ones. Here is what the zip should look like.

Important: You should also rename the original mission zip to <gobname>_classic.zip . This way we will know that this is the original mission.
2. MetaData File
This is a crucial last step of the process. We need a way to keep track of all the mission versions. To do this, we have a metadata file stored in JSON format. The format is very simple but basically contains nested key-value pairs like "hello" = "world". You can learn about the format here .
The name of the file we will use is called metadata.txt . Here is what it looks like for the mission anchor.gob.
{
    "name": "Anchor Hed: Tusken Raid",
    "rating": 3,
    "author": "Barry Brien",
    "versions": {
        "classic": {
            "name": "Classic Version",
            "release_date": "2002-06-07"
        },
        "modern": {
            "name": "Modern Version",
            "release_date": "2024-01-26"
        }
    },
    "review": "https://darkforces.reviews/missions/anchor-hed-tusken-raid-mini-level",
    "description": "You are Luke Skywalker, farm boy on Tatooine. You  have just received a distress call from your friend Windy, who is trapped in the village of Anchor Hed during a particularly bad Tusken raid. You rush to aid your friend in you T-16 Skyhopper, landing just outside the village gate, you are completely unarmed. You must save Windy!",
    "walkthrough": "https://www.youtube.com/watch?v=_11GIjcx8eg",
    "create_date": "2002-06-07",
    "last_mod_date": "2024-01-26",
    "dos_support" : "true",
    "remaster_support" : "false"
}
Lets take a look at what is happening here and go over all the fields. All are required unless tagged as optional.
- name - This is the name of the mission
- rating - This is the rating of the mission. Look at the rating in the mission list and place it here. If it is missing, just set it to 0
- author - The author of the map. If you do not know who it is - do not put your own - contact DF-21 staff!
- versions - This is a listing of all the variants of the map. You can have one or more versions. Each one contains the name of the version and the release date. You can name them whatever you want. You can figure out the release date of the classic mission by looking at the time the files were last modified. Note: The version names in the list must correspond to the zip file suffixes! Ex: modern points to anchor_modern.zip and is the modernized version of the map and classic points to anchor_classic.zip. If you have a version named 2.0 then you must have a zip called anchor_2.0.zip . Always place the latest version at the bottom of the list!!!
- review [optional] - If you know there is a review place the URL here. Otherwise don't even add this line. You can find Dark Forces reviews here https://darkforces.reviews/
- description - The description of the mission. It is likely in the original read me file.
- walkthrough [optional] - maybe there is a walkthrough on youtube? Check out here for walkthroughs.
- create_date - This is original creation date of the map (should be the same as classic).
- last_mod_date - This is date of the latest version. (Usually the day you created the modern version).
- dos_support - Set this to true or false if the LATEST mission supports DOS (Note: The Force Engine support is implied)
- remaster_support - Set this to true or false if the LATEST mission supports Night Dive's Remaster
It's important to remember that for each version definition you must have a <gobname>_<version>.zip available!
Don't get confused when you make your own metadata file , simply use the example for anchor.gob and update the values! If stuck, ask the DF-21 staff!
3. What a DF-21 mission folder should look like
Now that you have all your components. Lets put all the mission versions in a single folder (preferably called the same as the gob file. In our case anchor). Lets add the screenshots we took and lets add the metadata.txt file.

There we go! This is the file format that DF-21 uses to host the modern missions. When you are ready, zip this whole folder structure and upload it here .
Thank you so much for doing this work! It is greatly appreciated.
